部署到 Koyeb
在本指南中,你将设置并部署一个使用 Prisma ORM 和 PostgreSQL 到 科耶布 的 Node.js 服务器。该应用公开 REST API 并使用 Prisma 客户端来处理从数据库中获取、创建和删除记录。
¥In this guide, you will set up and deploy a Node.js server that uses Prisma ORM with PostgreSQL to Koyeb. The application exposes a REST API and uses Prisma Client to handle fetching, creating, and deleting records from a database.
Koyeb 是一个开发者友好的无服务器平台,用于在全球范围内部署应用。该平台可让你通过基于 git 的部署、TLS 加密、原生自动缩放、全球边缘网络以及内置服务网格和发现来无缝运行 Docker 容器、Web 应用和 API。
¥Koyeb is a developer-friendly serverless platform to deploy apps globally. The platform lets you seamlessly run Docker containers, web apps, and APIs with git-based deployment, TLS encryption, native autoscaling, a global edge network, and built-in service mesh & discovery.
使用 Koyeb git 驱动的部署 方法时,每次将代码更改推送到 GitHub 存储库时,都会在 Koyeb 无服务器平台上自动触发应用的新构建和部署。本指南使用后一种方法,你可以将代码推送到 GitHub 上的应用存储库。
¥When using the Koyeb git-driven deployment method, each time you push code changes to a GitHub repository a new build and deployment of the application are automatically triggered on the Koyeb Serverless Platform. This guide uses the latter approach whereby you push your code to the app's repository on GitHub.
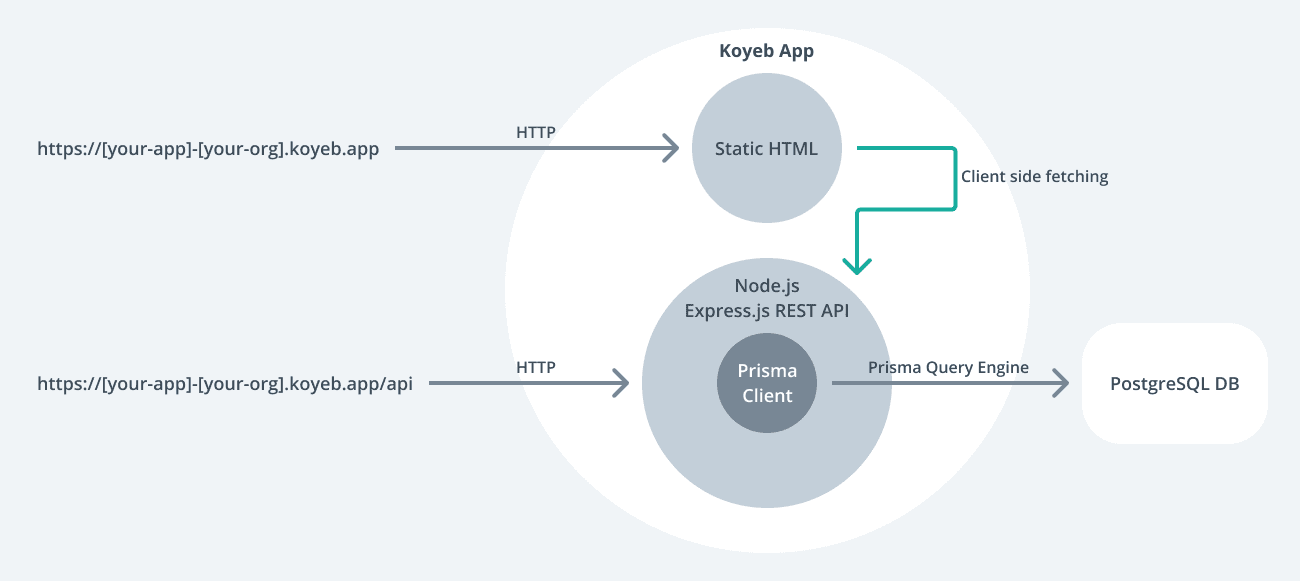
该应用具有以下组件:
¥The application has the following components:
-
后端:Node.js REST API 使用 Express.js 构建,其资源端点使用 Prisma 客户端来处理针对 PostgreSQL 数据库(例如,托管在 Heroku 上)的数据库操作。
¥Backend: Node.js REST API built with Express.js with resource endpoints that use Prisma Client to handle database operations against a PostgreSQL database (e.g., hosted on Heroku).
-
前端:用于与 API 交互的静态 HTML 页面。
¥Frontend: Static HTML page to interact with the API.
本指南的重点是展示如何使用 Prisma ORM 将项目部署到 Koyeb。起点是 Prisma Koyeb 示例,其中包含一个 Express.js 服务器,带有几个预配置的 REST 端点和一个简单的前端。
¥The focus of this guide is showing how to deploy projects using Prisma ORM to Koyeb. The starting point will be the Prisma Koyeb example, which contains an Express.js server with a couple of preconfigured REST endpoints and a simple frontend.
注意:本指南中的各个检查点可让你验证是否正确执行了这些步骤。
¥Note: The various checkpoints throughout the guide allow you to validate whether you performed the steps correctly.
先决条件
¥Prerequisites
-
托管 PostgreSQL 数据库和可访问该数据库的 URL,例如
postgresql://username:password@your_postgres_db.cloud.com/db_identifier(你可以使用 Supabase,它提供 免费计划)。¥Hosted PostgreSQL database and a URL from which it can be accessed, e.g.
postgresql://username:password@your_postgres_db.cloud.com/db_identifier(you can use Supabase, which offers a free plan). -
带有空公共存储库的 GitHub 账户,我们将使用它来推送代码。
¥GitHub account with an empty public repository we will use to push the code.
-
科耶布 帐号。
¥Koyeb account.
-
安装了 Node.js。
¥Node.js installed.
Prisma ORM 工作流程
¥Prisma ORM workflow
Prisma ORM 的核心是 Prisma 架构 – 一种声明性配置,你可以在其中定义数据模型和其他 Prisma ORM 相关配置。Prisma 架构也是 Prisma Client 和 Prisma Migrate 的单一事实来源。
¥At the core of Prisma ORM is the Prisma schema – a declarative configuration where you define your data model and other Prisma ORM-related configuration. The Prisma schema is also a single source of truth for both Prisma Client and Prisma Migrate.
在本指南中,你将使用 Prisma 迁移 创建数据库架构。Prisma Migrate 基于 Prisma 架构,并通过生成针对数据库执行的 .sql 迁移文件来工作。
¥In this guide, you will create the database schema with Prisma Migrate to create the database schema. Prisma Migrate is based on the Prisma schema and works by generating .sql migration files that are executed against the database.
Migrate 具有两个主要工作流程:
¥Migrate comes with two primary workflows:
-
使用
prisma migrate dev创建迁移并在本地开发过程中应用它们¥Creating migrations and applying them during local development with
prisma migrate dev -
使用
prisma migrate deploy将生成的迁移应用到生产中¥Applying generated migration to production with
prisma migrate deploy
为简洁起见,本指南不介绍如何使用 prisma migrate dev 创建迁移。相反,它专注于生产工作流程并使用示例代码中包含的 Prisma 架构和 SQL 迁移。
¥For brevity, the guide does not cover how migrations are created with prisma migrate dev. Rather, it focuses on the production workflow and uses the Prisma schema and SQL migration that are included in the example code.
你将使用 Koyeb 的 构建步骤 运行 prisma migrate deploy 命令,以便在应用启动之前应用迁移。
¥You will use Koyeb's build step to run the prisma migrate deploy command so that the migrations are applied before the application starts.
要了解有关如何使用 Prisma Migrate 创建迁移的更多信息,请查看 从头开始指南
¥To learn more about how migrations are created with Prisma Migrate, check out the start from scratch guide
1. 下载示例并安装依赖
¥ Download the example and install dependencies
打开你的终端并导航到你选择的位置。创建将保存应用代码的目录并下载示例代码:
¥Open your terminal and navigate to a location of your choice. Create the directory that will hold the application code and download the example code:
mkdir prisma-on-koyeb
cd prisma-on-koyeb
curl https://github.com/koyeb/example-prisma/tarball/main/latest | tar xz  --strip=1
检查点:执行 tree 命令应显示以下目录和文件:
¥Checkpoint: Executing the tree command should show the following directories and files:
.
├── README.md
├── package.json
├── prisma
│   ├── migrations
│   │   ├── 20210310152103_init
│   │   │   └── migration.sql
│   │   └── migration_lock.toml
│   └── schema.prisma
├── public
│   └── index.html
└── src
    └── index.js

5 directories, 8 files
安装依赖:
¥Install the dependencies:
npm install
2. 初始化 Git 存储库并将应用代码推送到 GitHub
¥ Initialize a Git repository and push the application code to GitHub
在上一步中,你下载了代码。在此步骤中,你将从代码创建一个存储库,以便可以将其推送到 GitHub 存储库进行部署。
¥In the previous step, you downloaded the code. In this step, you will create a repository from the code so that you can push it to a GitHub repository for deployment.
为此,请从源代码文件夹运行 git init:
¥To do so, run git init from the source code folder:
git init
> Initialized empty Git repository in /Users/edouardb/prisma-on-koyeb/.git/
初始化存储库后,添加并提交文件:
¥With the repository initialized, add and commit the files:
git add .
git commit -m 'Initial commit'
检查点:git log -1 应该显示提交:
¥Checkpoint: git log -1 should show the commit:
git log -1
commit 895534590fdd260acee6396e2e1c0438d1be7fed (HEAD -> main)
然后,通过添加远程代码将代码推送到你的 GitHub 存储库
¥Then, push the code to your GitHub repository by adding the remote
git remote add origin git@github.com:<YOUR_GITHUB_USERNAME>/<YOUR_GITHUB_REPOSITORY_NAME>.git
git push -u origin main
3. 在 Koyeb 上部署应用
¥ Deploy the application on Koyeb
在 科耶布控制面板 上,点击“创建应用”按钮。
¥On the Koyeb Control Panel, click the Create App button.
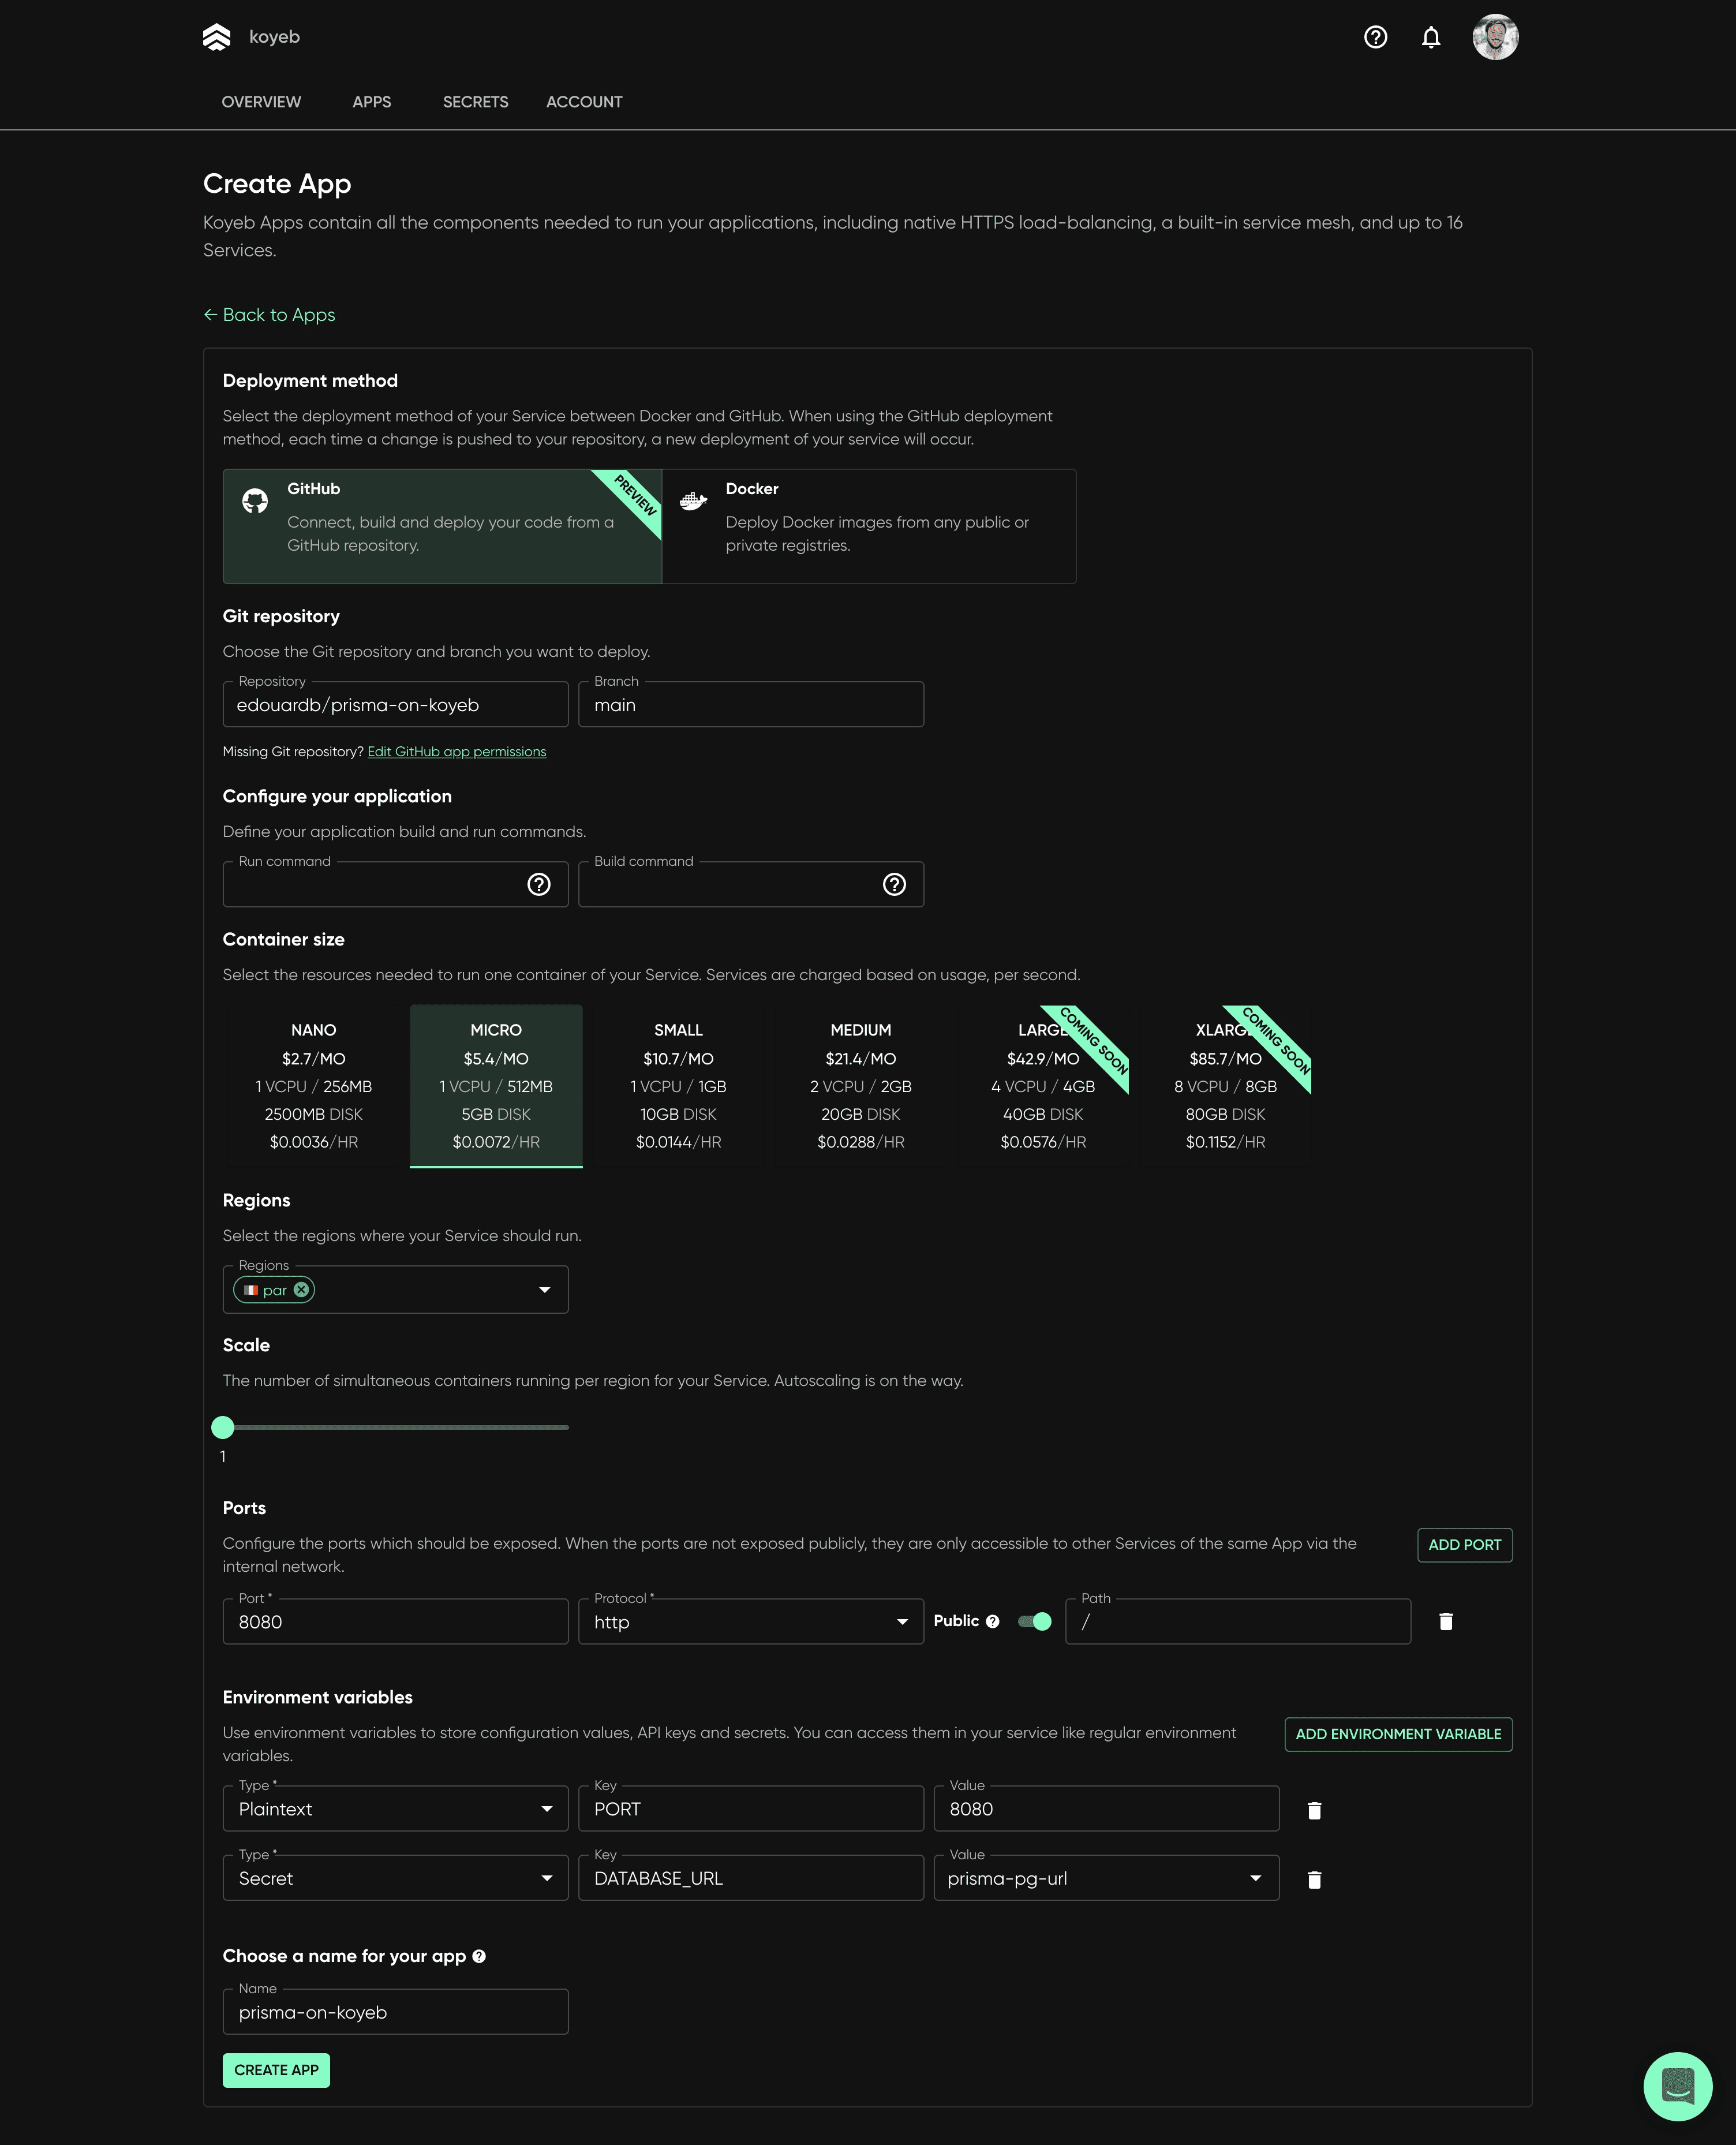
你登陆 Koyeb 应用创建页面,系统会要求你提供有关要部署的应用的信息,例如要使用的部署方法、存储库 URL、要部署的分支、要执行的构建和运行命令。
¥You land on the Koyeb App creation page where you are asked for information about the application to deploy such as the deployment method to use, the repository URL, the branch to deploy, the build and run commands to execute.
选择 GitHub 作为部署方法,然后选择包含你的应用的 GitHub 存储库,并将分支设置为部署到 main。
¥Pick GitHub as the deployment method and select the GitHub repository containing your application and set the branch to deploy to main.
注意:如果这是你第一次使用 Koyeb,系统将提示你在 GitHub 账户中安装 Koyeb 应用。
¥Note: If this is your first time using Koyeb, you will be prompted to install the Koyeb app in your GitHub account.
在环境变量部分中,创建一个类型为 Secret 的新环境变量 DATABASE_URL。在值字段中,单击创建密钥,将密钥命名为 prisma-pg-url 并将 PostgreSQL 数据库连接字符串设置为密钥值,如下所示:postgresql://__USER__:__PASSWORD__@__HOST__/__DATABASE__。科耶布的秘密 允许你安全地存储和检索敏感信息,例如 API 令牌、数据库连接字符串。它们使你能够通过删除硬编码凭据来保护代码,并让你将环境变量安全地传递到应用。
¥In the Environment variables section, create a new environment variable DATABASE_URL that is type Secret. In the value field, click Create Secret, name your secret prisma-pg-url and set the PostgreSQL database connection string as the secret value which should look as follows: postgresql://__USER__:__PASSWORD__@__HOST__/__DATABASE__.
Koyeb Secrets allow you to securely store and retrieve sensitive information like API tokens, database connection strings. They enable you to secure your code by removing hardcoded credentials and let you pass environment variables securely to your applications.
最后,为你的应用命名并单击“创建应用”按钮。
¥Last, give your application a name and click the Create App button.
检查点:单击已部署应用的屏幕截图打开已部署的应用。页面加载后,单击“检查 API 状态”按钮,该按钮应返回:{"up":true}
¥Checkpoint: Open the deployed app by clicking on the screenshot of the deployed app. Once the page loads, click on the Check API status button, which should return: {"up":true}
恭喜!你已成功将应用部署到 Koyeb。
¥Congratulations! You have successfully deployed the app to Koyeb.
Koyeb 将构建并部署该应用。对 GitHub 存储库的额外提交将触发 Koyeb 上的新构建和部署。
¥Koyeb will build and deploy the application. Additional commits to your GitHub repository will trigger a new build and deployment on Koyeb.
检查点:构建和部署完成后,你可以通过单击 Koyeb 控制面板中以 koyeb.app 结尾的应用 URL 来访问你的应用。加载应用页面后,单击“检查 API 状态”按钮,该按钮应返回:{"up":true}
¥Checkpoint: Once the build and deployment are completed, you can access your application by clicking the App URL ending with koyeb.app in the Koyeb control panel. Once on the app page loads, Once the page loads, click on the Check API status button, which should return: {"up":true}
4. 测试你部署的应用
¥ Test your deployed application
你可以使用静态前端通过预览 URL 与部署的 API 进行交互。
¥You can use the static frontend to interact with the API you deployed via the preview URL.
在浏览器中打开预览 URL,该 URL 应如下所示:https://APP_NAME-ORG_NAME.koyeb.app。你应该看到以下内容:
¥Open up the preview URL in your browser, the URL should like this: https://APP_NAME-ORG_NAME.koyeb.app. You should see the following:

这些按钮允许你向 REST API 触发请求并查看响应:
¥The buttons allow you to make requests to the REST API and view the response:
-
检查 API 状态:将调用返回
{"up":true}的 REST API 状态端点。¥Check API status: Will call the REST API status endpoint that returns
{"up":true}. -
种子数据:将使用测试
user和post为数据库播种。返回创建的用户。¥Seed data: Will seed the database with a test
userandpost. Returns the created users. -
负载进给:将加载数据库中的所有
users及其相关的profiles。¥Load feed: Will load all
usersin the database with their relatedprofiles.
要更深入地了解 Prisma Client 的 API,请查看 src/index.js 文件中的路由处理程序。
¥For more insight into Prisma Client's API, look at the route handlers in the src/index.js file.
你可以从 Koyeb 控制面板单击应用服务上的 Runtime logs 选项卡来查看应用的日志:
¥You can view the application's logs clicking the Runtime logs tab on your app service from the Koyeb control panel:
node-72d14691	stdout	> prisma-koyeb@1.0.0 start
node-72d14691	stdout	> node src/index.js
node-72d14691	stdout	🚀 Server ready at: http://localhost:8080
node-72d14691	stdout	⭐️ See sample requests: http://pris.ly/e/ts/rest-express#3-using-the-rest-api
科耶布具体说明
¥Koyeb specific notes
构建
¥Build
默认情况下,对于使用 Node.js 运行时的应用,如果 package.json 包含 build 脚本,Koyeb 会在依赖安装后自动执行它。在示例中,build 脚本用于运行 prisma generate && prisma migrate deploy && next build。
¥By default, for applications using the Node.js runtime, if the package.json contains a build script, Koyeb automatically executes it after the dependencies installation.
In the example, the build script is used to run prisma generate && prisma migrate deploy && next build.
部署
¥Deployment
默认情况下,对于使用 Node.js 运行时的应用,如果 package.json 包含 start 脚本,Koyeb 会自动执行它来启动应用。在示例中,start 脚本用于运行 node src/index.js。
¥By default, for applications using the Node.js runtime, if the package.json contains a start script, Koyeb automatically executes it to launch the application.
In the example, the start script is used to run node src/index.js.
数据库迁移和部署
¥Database migrations and deployments
在你部署的示例中,在 Koyeb 构建期间使用 prisma migrate deploy 命令应用迁移(如 package.json 中的 build 脚本中所定义)。
¥In the example you deployed, migrations are applied using the prisma migrate deploy command during the Koyeb build (as defined in the build script in package.json).
补充注意
¥Additional notes
在本指南中,我们保留了区域、实例大小和水平缩放的预设值。你可以根据你的需要自定义它们。
¥In this guide, we kept pre-set values for the region, instance size, and horizontal scaling. You can customize them according to your needs.
注意:端口部分用于让 Koyeb 知道你的应用正在监听哪个端口并正确路由传入的 HTTP 请求。创建新应用时,默认
PORT环境变量设置为8080,传入 HTTP 请求将路由到/路径。如果你的应用正在监听另一个端口,你可以定义另一个端口来路由传入的 HTTP 请求。¥Note: The Ports section is used to let Koyeb know which port your application is listening to and properly route incoming HTTP requests. A default
PORTenvironment variable is set to8080and incoming HTTP requests are routed to the/path when creating a new application. If your application is listening on another port, you can define another port to route incoming HTTP requests.
概括
¥Summary
恭喜!你已成功将带有 Prisma ORM 的 Node.js 应用部署到 Koyeb。
¥Congratulations! You have successfully deployed a Node.js app with Prisma ORM to Koyeb.
你可以在 这个 GitHub 存储库 中找到该示例的源代码。
¥You can find the source code for the example in this GitHub repository.
要更深入地了解 Prisma Client 的 API,请查看 src/index.js 文件中的路由处理程序。
¥For more insight into Prisma Client's API, look at the route handlers in the src/index.js file.