部署到 Heroku
在本指南中,你将设置并部署一个使用 Prisma ORM 和 PostgreSQL 到 Heroku 的 Node.js 服务器。该应用公开 REST API 并使用 Prisma 客户端来处理从数据库中获取、创建和删除记录。
¥In this guide, you will set up and deploy a Node.js server that uses Prisma ORM with PostgreSQL to Heroku. The application exposes a REST API and uses Prisma Client to handle fetching, creating, and deleting records from a database.
Heroku 是一个云平台即服务 (PaaS)。与流行的无服务器部署模型相比,使用 Heroku,即使没有向你的应用触发任何请求,你的应用也会持续运行。由于 PostgreSQL 数据库的连接限制,这有几个好处。欲了解更多信息,请查看 通用部署文档
¥Heroku is a cloud platform as a service (PaaS). In contrast to the popular serverless deployment model, with Heroku, your application is constantly running even if no requests are made to it. This has several benefits due to the connection limits of a PostgreSQL database. For more information, check out the general deployment documentation
通常,Heroku 与 Git 存储库集成,以便在提交时自动部署。你可以从 GitHub 存储库部署到 Heroku,或者将源代码推送到 Heroku 为每个应用创建的 Git 存储库。本指南使用后一种方法,你可以将代码推送到 Heroku 上的应用存储库,这会触发构建并部署应用。
¥Typically Heroku integrates with a Git repository for automatic deployments upon commits. You can deploy to Heroku from a GitHub repository or by pushing your source to a Git repository that Heroku creates per app. This guide uses the latter approach whereby you push your code to the app's repository on Heroku, which triggers a build and deploys the application.
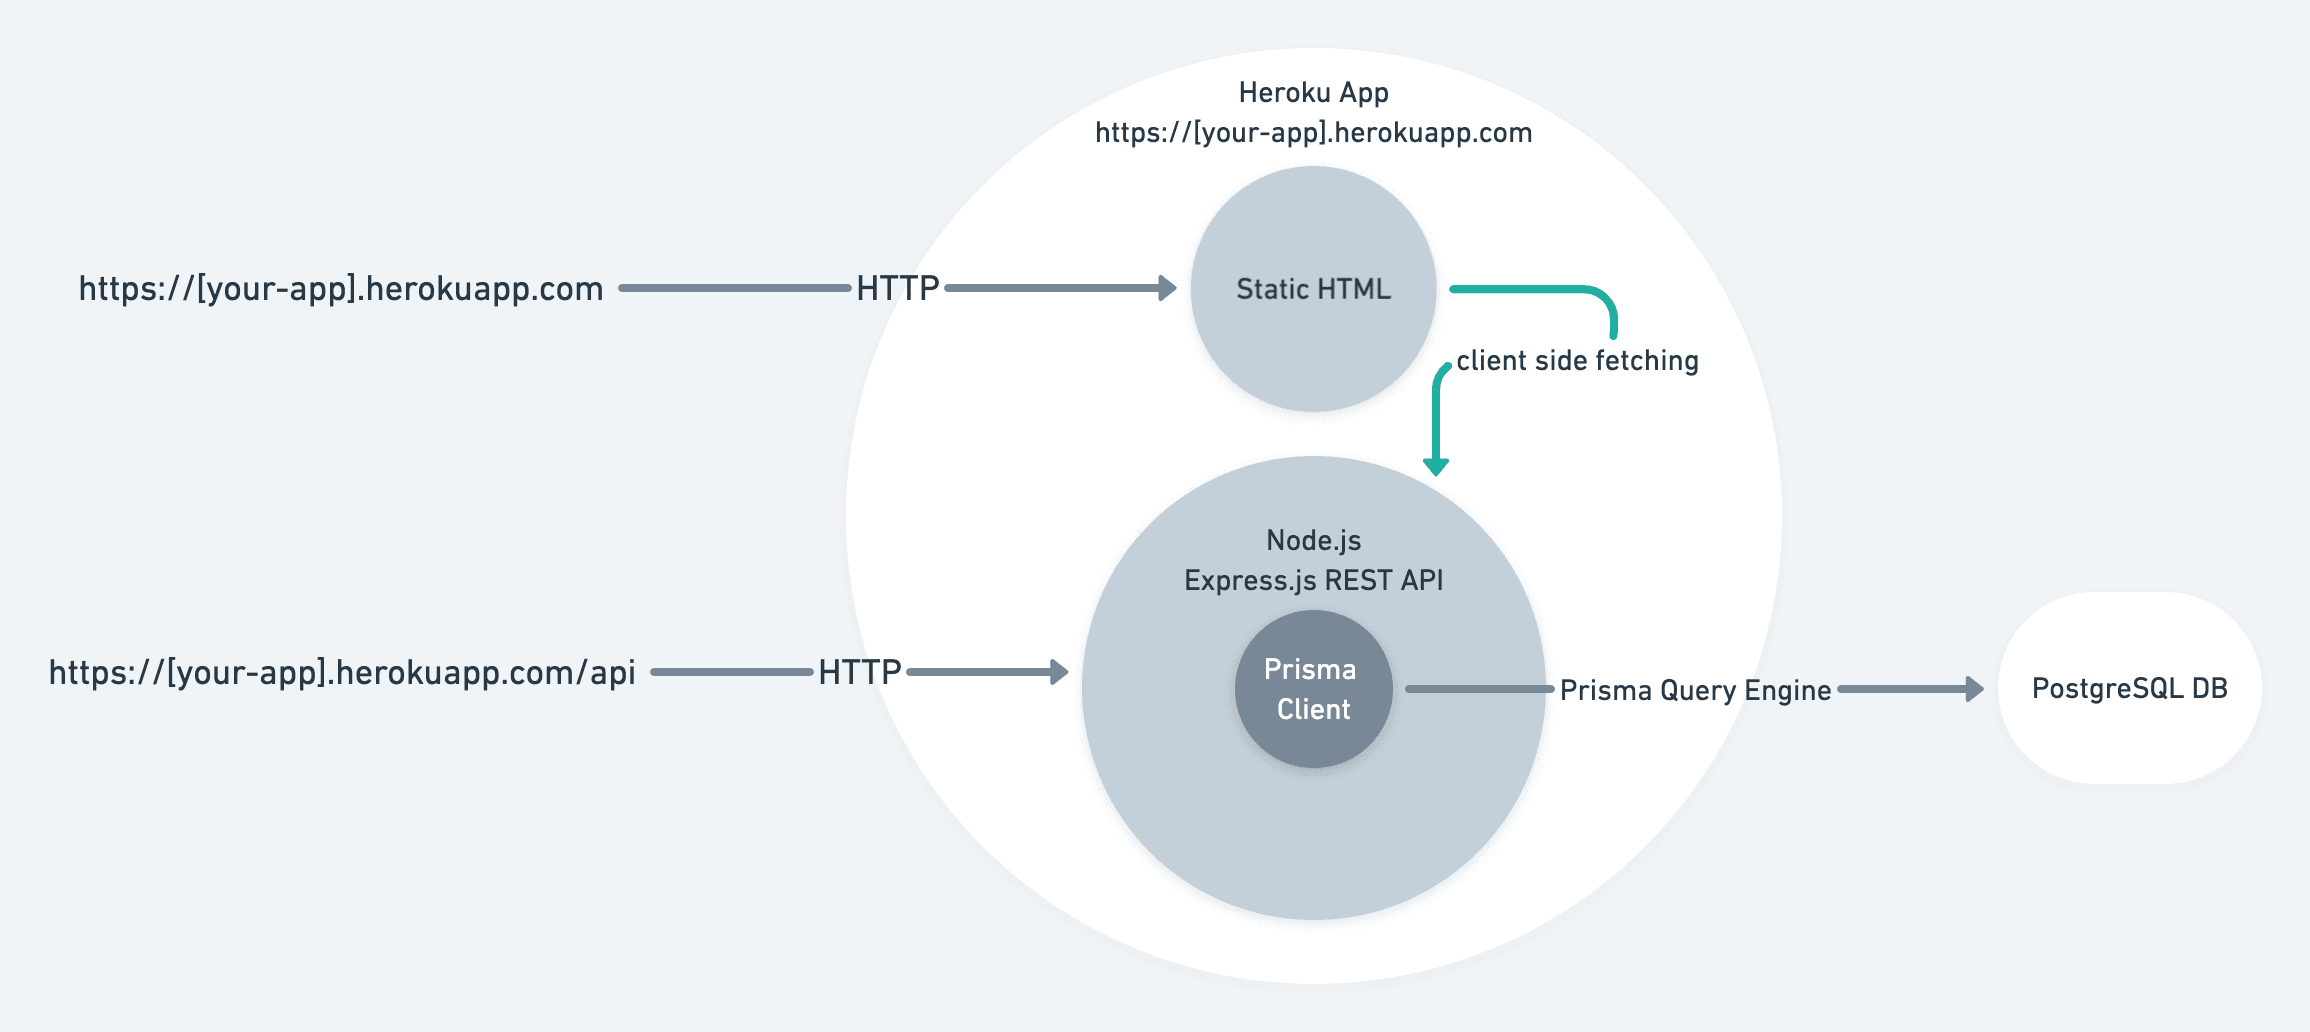
该应用具有以下组件:
¥The application has the following components:
-
后端:Node.js REST API 使用 Express.js 构建,其资源端点使用 Prisma 客户端来处理针对 PostgreSQL 数据库(例如,托管在 Heroku 上)的数据库操作。
¥Backend: Node.js REST API built with Express.js with resource endpoints that use Prisma Client to handle database operations against a PostgreSQL database (e.g., hosted on Heroku).
-
前端:用于与 API 交互的静态 HTML 页面。
¥Frontend: Static HTML page to interact with the API.
本指南的重点是展示如何使用 Prisma ORM 将项目部署到 Heroku。起点是 Prisma Heroku 示例,其中包含一个 Express.js 服务器,带有几个预配置的 REST 端点和一个简单的前端。
¥The focus of this guide is showing how to deploy projects using Prisma ORM to Heroku. The starting point will be the Prisma Heroku example, which contains an Express.js server with a couple of preconfigured REST endpoints and a simple frontend.
注意:本指南中的各个检查点可让你验证是否正确执行了这些步骤。
¥Note: The various checkpoints throughout the guide allowing you to validate whether you performed the steps correctly.
关于将 GraphQL 服务器部署到 Heroku 的说明
¥A note on deploying GraphQL servers to Heroku
虽然该示例使用 REST,但相同的原则也适用于 GraphQL 服务器,主要区别在于你通常有一个 GraphQL API 端点,而不是像 REST 那样为每个资源都有一个路由。
¥While the example uses REST, the same principles apply to a GraphQL server, with the main difference being that you typically have a single GraphQL API endpoint rather than a route for every resource as with REST.
先决条件
¥Prerequisites
-
Heroku 帐号。
¥Heroku account.
-
已安装 Heroku CLI。
¥Heroku CLI installed.
-
安装了 Node.js。
¥Node.js installed.
-
已安装 PostgreSQL CLI
psql。¥PostgreSQL CLI
psqlinstalled.
注意:Heroku 不提供免费计划,因此需要账单信息。
¥Note: Heroku doesn't provide a free plan, so billing information is required.
Prisma ORM 工作流程
¥Prisma ORM workflow
Prisma ORM 的核心是 Prisma 架构 – 一种声明性配置,你可以在其中定义数据模型和其他 Prisma ORM 相关配置。Prisma 架构也是 Prisma Client 和 Prisma Migrate 的单一事实来源。
¥At the core of Prisma ORM is the Prisma schema – a declarative configuration where you define your data model and other Prisma ORM-related configuration. The Prisma schema is also a single source of truth for both Prisma Client and Prisma Migrate.
在本指南中,你将使用 Prisma 迁移 创建数据库架构。Prisma Migrate 基于 Prisma 架构,并通过生成针对数据库执行的 .sql 迁移文件来工作。
¥In this guide, you will use Prisma Migrate to create the database schema. Prisma Migrate is based on the Prisma schema and works by generating .sql migration files that are executed against the database.
Migrate 具有两个主要工作流程:
¥Migrate comes with two primary workflows:
-
使用
prisma migrate dev创建迁移并在本地开发期间应用¥Creating migrations and applying during local development with
prisma migrate dev -
使用
prisma migrate deploy将生成的迁移应用到生产中¥Applying generated migration to production with
prisma migrate deploy
为简洁起见,本指南不介绍如何使用 prisma migrate dev 创建迁移。相反,它专注于生产工作流程并使用示例代码中包含的 Prisma 架构和 SQL 迁移。
¥For brevity, the guide does not cover how migrations are created with prisma migrate dev. Rather, it focuses on the production workflow and uses the Prisma schema and SQL migration that are included in the example code.
你将使用 Heroku 的 发布阶段 运行 prisma migrate deploy 命令,以便在应用启动之前应用迁移。
¥You will use Heroku's release phase to run the prisma migrate deploy command so that the migrations are applied before the application starts.
要了解有关如何使用 Prisma Migrate 创建迁移的更多信息,请查看 从头开始指南
¥To learn more about how migrations are created with Prisma Migrate, check out the start from scratch guide
1. 下载示例并安装依赖
¥ Download the example and install dependencies
打开你的终端并导航到你选择的位置。创建将保存应用代码的目录并下载示例代码:
¥Open your terminal and navigate to a location of your choice. Create the directory that will hold the application code and download the example code:
mkdir prisma-heroku
cd prisma-heroku
curl https://codeload.github.com/prisma/prisma-examples/tar.gz/latest | tar -xz --strip=3 prisma-examples-latest/deployment-platforms/heroku
检查点:ls -1 应显示:
¥Checkpoint: ls -1 should show:
ls -1
Procfile
README.md
package.json
prisma
public
src
安装依赖:
¥Install the dependencies:
npm install
注意:
Procfile告诉 Heroku 启动应用所需的命令,即npm start,以及在发布阶段运行的命令,即npx prisma migrate deploy¥Note: The
Procfiletells Heroku the command needed to start the application, i.e.npm start, and the command to run during the release phase, i.e.,npx prisma migrate deploy
2. 为应用创建 Git 存储库
¥ Create a Git repository for the application
在上一步中,你下载了代码。在此步骤中,你将从代码创建一个存储库,以便可以将其推送到 Heroku 进行部署。
¥In the previous step, you downloaded the code. In this step, you will create a repository from the code so that you can push it to Heroku for deployment.
为此,请从源代码文件夹运行 git init:
¥To do so, run git init from the source code folder:
git init
> Initialized empty Git repository in /Users/alice/prisma-heroku/.git/
要将 main 分支用作默认分支,请运行以下命令:
¥To use the main branch as the default branch, run the following command:
git branch -M main
初始化存储库后,添加并提交文件:
¥With the repository initialized, add and commit the files:
git add .
git commit -m 'Initial commit'
检查点:git log -1 应该显示提交:
¥Checkpoint: git log -1 should show the commit:
git log -1
commit 895534590fdd260acee6396e2e1c0438d1be7fed (HEAD -> main)
3. Heroku CLI 登录
¥ Heroku CLI login
确保你已使用 CLI 登录到 Heroku:
¥Make sure you're logged in to Heroku with the CLI:
heroku login
这将允许你从终端部署到 Heroku。
¥This will allow you to deploy to Heroku from the terminal.
检查点:heroku auth:whoami 应显示你的用户名:
¥Checkpoint: heroku auth:whoami should show your username:
heroku auth:whoami
> your-email
4. 创建 Heroku 应用
¥ Create a Heroku app
要将应用部署到 Heroku,你需要创建一个应用。你可以使用以下命令来执行此操作:
¥To deploy an application to Heroku, you need to create an app. You can do so with the following command:
heroku apps:create your-app-name
注意:使用你选择的唯一名称而不是
your-app-name。¥Note: Use a unique name of your choice instead of
your-app-name.
检查点:你应该会看到 Heroku 应用的 URL 和存储库:
¥Checkpoint: You should see the URL and the repository for your Heroku app:
heroku apps:create your-app-name
> Creating ⬢ your-app-name... done
> https://your-app-name.herokuapp.com/ | https://git.heroku.com/your-app-name.git
创建 Heroku 应用会将创建的 git 远程 Heroku 添加到本地存储库。将提交推送到此远程将触发部署。
¥Creating the Heroku app will add the git remote Heroku created to your local repository. Pushing commits to this remote will trigger a deploy.
检查点:git remote -v 应该显示你的应用的 Heroku git 远程:
¥Checkpoint: git remote -v should show the Heroku git remote for your application:
heroku https://git.heroku.com/your-app-name.git (fetch)
heroku https://git.heroku.com/your-app-name.git (push)
如果你没有看到 heroku 遥控器,请使用以下命令添加它:
¥If you don't see the heroku remote, use the following command to add it:
heroku git:remote --app your-app-name
5. 将 PostgreSQL 数据库添加到你的应用
¥ Add a PostgreSQL database to your application
Heroku 允许你将 PostgreSQL 数据库配置为应用的一部分。
¥Heroku allows your to provision a PostgreSQL database as part of an application.
使用以下命令创建数据库:
¥Create the database with the following command:
heroku addons:create heroku-postgresql:hobby-dev
检查点:要验证数据库是否已创建,你应该看到以下内容:
¥Checkpoint: To verify the database was created you should see the following:
Creating heroku-postgresql:hobby-dev on ⬢ your-app-name... free
Database has been created and is available
 ! This database is empty. If upgrading, you can transfer
 ! data from another database with pg:copy
Created postgresql-parallel-73780 as DATABASE_URL
注意:当应用在 Heroku 上运行时,Heroku 会自动设置
DATABASE_URL环境变量。Prisma ORM 使用此环境变量,因为它是在 Prisma 模式 (prisma/schema.prisma) 的数据源块中使用env("DATABASE_URL")声明的。¥Note: Heroku automatically sets the
DATABASE_URLenvironment variable when the app is running on Heroku. Prisma ORM uses this environment variable because it's declared in the datasource block of the Prisma schema (prisma/schema.prisma) withenv("DATABASE_URL").
6. 推送部署
¥ Push to deploy
通过将更改推送到 Heroku 应用存储库来部署应用:
¥Deploy the app by pushing the changes to the Heroku app repository:
git push heroku main
这将触发构建并将你的应用部署到 Heroku。Heroku 还将运行 npx prisma migrate deploy 命令,该命令执行迁移以在部署应用之前创建数据库架构(如 Procfile 的 release 步骤中所定义)。
¥This will trigger a build and deploy your application to Heroku. Heroku will also run the npx prisma migrate deploy command which executes the migrations to create the database schema before deploying the app (as defined in the release step of the Procfile).
检查点:git push 将触发构建和发布阶段的日志并显示已部署应用的 URL:
¥Checkpoint: git push will emit the logs from the build and release phase and display the URL of the deployed app:
remote: -----> Launching...
remote:  !     Release command declared: this new release will not be available until the command succeeds.
remote:        Released v5
remote:        https://your-app-name.herokuapp.com/ deployed to Heroku
remote:
remote: Verifying deploy... done.
remote: Running release command...
remote:
remote: Prisma schema loaded from prisma/schema.prisma
remote: Datasource "db": PostgreSQL database "your-db-name", schema "public" at "your-db-host.compute-1.amazonaws.com:5432"
remote:
remote: 1 migration found in prisma/migrations
remote:
remote: The following migration have been applied:
remote:
remote: migrations/
remote:   └─ 20210310152103_init/
remote:     └─ migration.sql
remote:
remote: All migrations have been successfully applied.
remote: Waiting for release.... done.
注意:Heroku 还将设置你的应用绑定到的
PORT环境变量。¥Note: Heroku will also set the
PORTenvironment variable to which your application is bound.
7. 测试你部署的应用
¥ Test your deployed application
你可以使用静态前端通过预览 URL 与部署的 API 进行交互。
¥You can use the static frontend to interact with the API you deployed via the preview URL.
在浏览器中打开预览 URL,该 URL 应如下所示:https://APP_NAME.herokuapp.com。你应该看到以下内容:
¥Open up the preview URL in your browser, the URL should like this: https://APP_NAME.herokuapp.com. You should see the following:
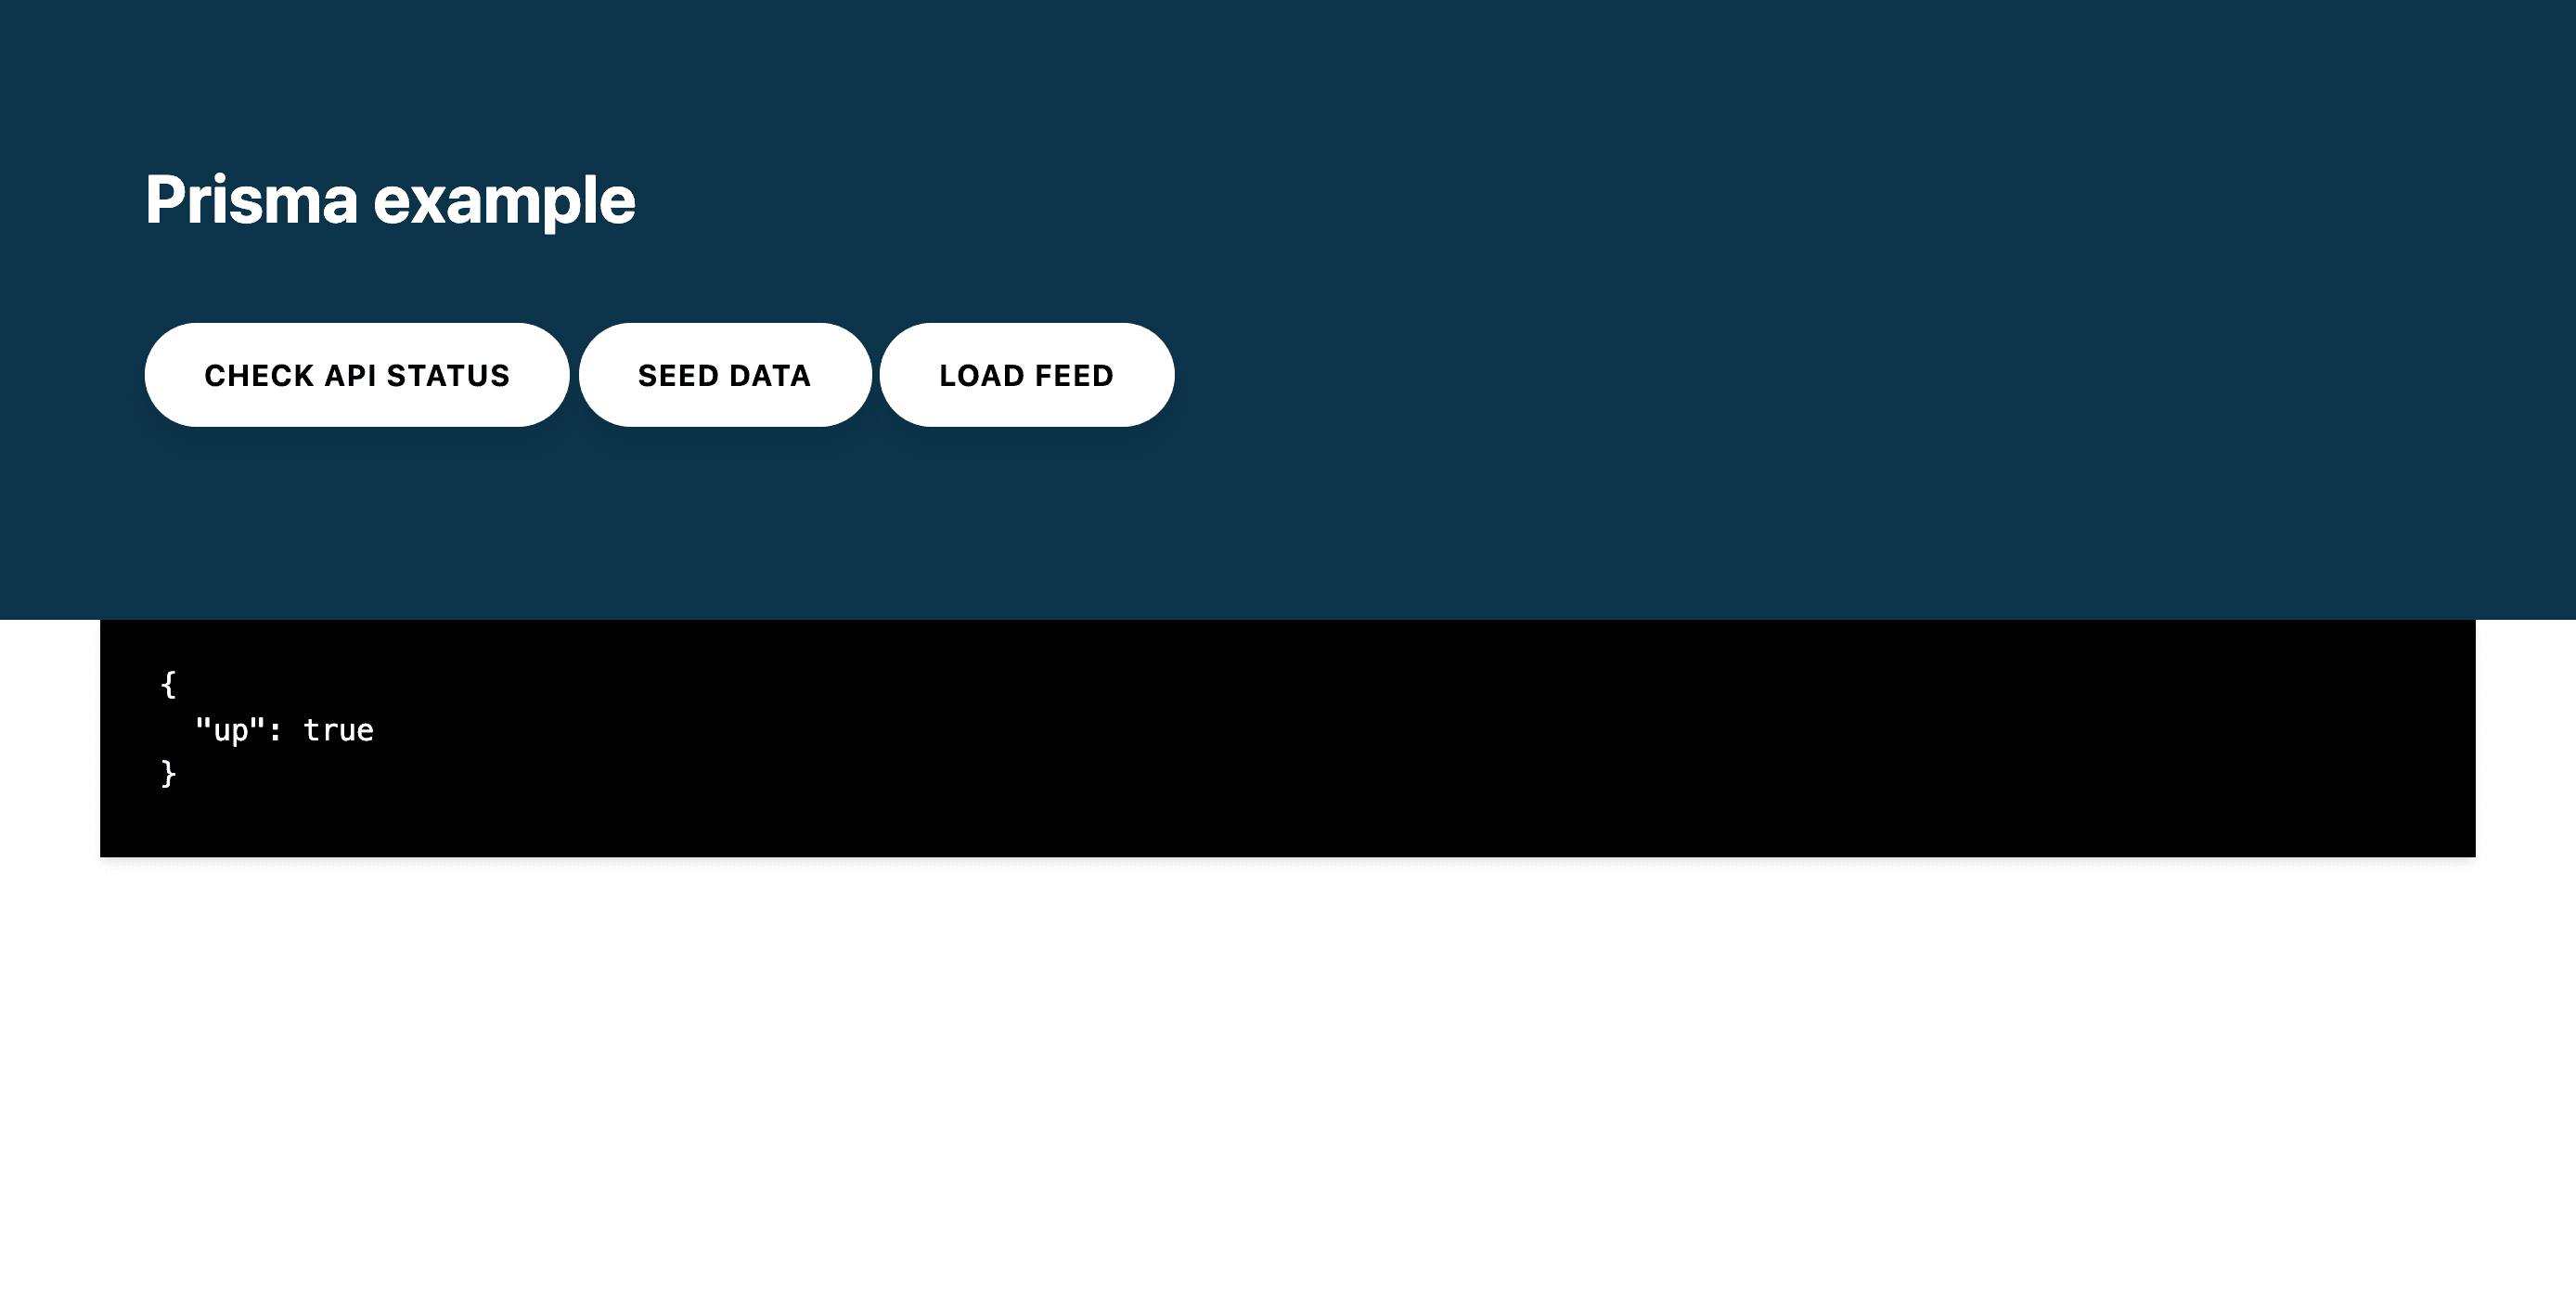
这些按钮允许你向 REST API 触发请求并查看响应:
¥The buttons allow you to make requests to the REST API and view the response:
-
检查 API 状态:将调用返回
{"up":true}的 REST API 状态端点。¥Check API status: Will call the REST API status endpoint that returns
{"up":true}. -
种子数据:将使用测试
user和post为数据库播种。返回创建的用户。¥Seed data: Will seed the database with a test
userandpost. Returns the created users. -
负载进给:将加载数据库中的所有
users及其相关的profiles。¥Load feed: Will load all
usersin the database with their relatedprofiles.
要更深入地了解 Prisma Client 的 API,请查看 src/index.js 文件中的路由处理程序。
¥For more insight into Prisma Client's API, look at the route handlers in the src/index.js file.
你可以使用 heroku logs --tail 命令查看应用的日志:
¥You can view the application's logs with the heroku logs --tail command:
2020-07-07T14:39:07.396544+00:00 app[web.1]:
2020-07-07T14:39:07.396569+00:00 app[web.1]: > prisma-heroku@1.0.0 start /app
2020-07-07T14:39:07.396569+00:00 app[web.1]: > node src/index.js
2020-07-07T14:39:07.396570+00:00 app[web.1]:
2020-07-07T14:39:07.657505+00:00 app[web.1]: 🚀 Server ready at: http://localhost:12516
2020-07-07T14:39:07.657526+00:00 app[web.1]: ⭐️ See sample requests: http://pris.ly/e/ts/rest-express#3-using-the-rest-api
2020-07-07T14:39:07.842546+00:00 heroku[web.1]: State changed from starting to up
Heroku 具体注释
¥Heroku specific notes
本指南涉及一些与 Heroku 相关的实现细节,值得重申:
¥There are some implementation details relating to Heroku that this guide addresses and are worth reiterating:
-
端口绑定:Web 服务器绑定到端口,以便它们可以接受连接。部署到 Heroku 时
PORT环境变量由 Heroku 设置。确保你绑定到process.env.PORT,以便你的应用在部署后可以接受请求。一种常见的模式是尝试绑定以尝试process.env.PORT并回退到预设端口,如下所示:¥Port binding: web servers bind to a port so that they can accept connections. When deploying to Heroku The
PORTenvironment variable is set by Heroku. Ensure you bind toprocess.env.PORTso that your application can accept requests once deployed. A common pattern is to try binding to tryprocess.env.PORTand fallback to a preset port as follows:
const PORT = process.env.PORT || 3000
const server = app.listen(PORT, () => {
  console.log(`app running on port ${PORT}`)
})
-
数据库网址:作为 Heroku 配置过程的一部分,
DATABASE_URL配置变量会添加到你的应用的配置中。这包含你的应用用于访问数据库的 URL。确保你的schema.prisma文件使用env("DATABASE_URL"),以便 Prisma 客户端可以成功连接到数据库。¥Database URL: As part of Heroku's provisioning process, a
DATABASE_URLconfig var is added to your app’s configuration. This contains the URL your app uses to access the database. Ensure that yourschema.prismafile usesenv("DATABASE_URL")so that Prisma Client can successfully connect to the database.
-
禁用 SSL 证书验证:将
PrismaPg适配器与DATABASE_URL一起使用时,请确保根据 Heroku 指南 禁用 SSL 证书验证。如果不这样做,可能会导致P1010 DriverAdapterError: DatabaseAccessDenied错误。你可以根据数据库是本地数据库还是托管在 Heroku 上来有条件地处理此操作:¥Disable SSL certificate validation: When using the
PrismaPgadapter withDATABASE_URL, make sure to disable SSL certificate validation in line with Heroku's guidelines. Failing to do so can result in aP1010 DriverAdapterError: DatabaseAccessDeniederror. You can handle this conditionally based on whether the database is local or hosted on Heroku:
const isSecureDb = !process.env.DATABASE_URL.includes("@127.0.0.1")

export const db = new PrismaClient({
  adapter: new PrismaPg({
    connectionString: process.env.DATABASE_URL + (isSecureDb ? `?sslmode=no-verify` : "")
  })
})
概括
¥Summary
恭喜!你已成功将带有 Prisma ORM 的 Node.js 应用部署到 Heroku。
¥Congratulations! You have successfully deployed a Node.js app with Prisma ORM to Heroku.
你可以在 这个 GitHub 存储库 中找到该示例的源代码。
¥You can find the source code for the example in this GitHub repository.
要更深入地了解 Prisma Client 的 API,请查看 src/index.js 文件中的路由处理程序。
¥For more insight into Prisma Client's API, look at the route handlers in the src/index.js file.