升级 Prisma ORM 层(PostgreSQL)
概述
¥Overview
本页介绍了升级过程的第一步:采用 Prisma 1 配置并将其升级到 Prisma ORM 2。具体来说,你将学习如何:
¥This page explains the first step of your upgrade process: Taking your Prisma 1 configuration and upgrading it to Prisma ORM 2. Concretely, you will learn how to:
Questions answered in this page
-
Prisma 1 → 2 模式之间有哪些不兼容性?
¥What are Prisma 1 → 2 schema incompatibilities?
-
如何解决 Postgres 特有的差异?
¥How to resolve Postgres-specific differences?
-
如何安全地使用升级 CLI?
¥How to use the upgrade CLI safely?
-
添加 Prisma ORM 2 CLI 作为开发依赖
¥Add the Prisma ORM 2 CLI as a development dependency
-
创建你的 Prisma ORM 2 架构
¥Create your Prisma ORM 2 schema
-
确定你的连接 URL 并连接到你的数据库
¥Determine your connection URL and connect to your database
-
检查你的数据库(到目前为止是使用 Prisma 1 管理的)
¥Introspect your database (that was so far managed with Prisma 1)
-
使用 Prisma 1 升级 CLI 解析新 Prisma ORM 2 数据模型中的 模式不兼容
¥Use the Prisma 1 Upgrade CLI to resolve the schema incompatibilities in the new Prisma ORM 2 data model
-
安装并生成 Prisma 客户端
¥Install and generate Prisma Client
完成这些步骤后,你可以继续阅读下一个指南,该指南解释了如何升级应用层以使用 Prisma Client 进行数据库查询。
¥Once done with these steps, you can move on to the next guide that explains how you can upgrade the application layer to use Prisma Client for your database queries.
注意:在升级过程中,获取数据库的图形视图会很有帮助。因此建议使用图形数据库客户端连接到你的数据库,例如 TablePlus 或 邮局。
¥Note: During the upgrade process it can be helpful to get a graphical view on your database. It is therefore recommended to use a graphical database client to connect to your database, such as TablePlus or Postico.
1. 安装 Prisma ORM 2 CLI
¥ Install Prisma ORM 2 CLI
Prisma ORM 2 CLI 在 npm 上作为 prisma 包提供,并通过 prisma 命令调用。
¥The Prisma ORM 2 CLI is available as the prisma package on npm and is invoked via the prisma command.
请注意,Prisma 1 的前 prisma 命令已重命名为 prisma1。你可以了解有关此 此处 的更多信息。
¥Note that the former prisma command for Prisma 1 has been renamed to prisma1. You can learn more about this here.
你可以按如下方式在 Node.js 项目中安装 Prisma ORM 2 CLI(请务必在 package.json 所在的目录中调用此命令):
¥You can install the Prisma ORM 2 CLI in your Node.js project as follows (be sure to invoke this command in the directory where your package.json is located):
npm install prisma --save-dev
注意:对于 Prisma 1,通常建议全局安装 CLI。我们现在建议使用 本地安装 Prisma CLI,以防止版本冲突。
¥Note: With Prisma 1, it was usually recommended to install the CLI globally. We now recommend to install the Prisma CLI locally to prevent version conflicts.
现在,你可以通过在本地安装 prisma CLI 时添加 npx 前缀来使用它:
¥You can now use the local installation of the prisma CLI by prefixing it with npx:
npx prisma
如果你要升级整个项目 一次全部,你现在还可以卸载 Prisma 1 CLI(否则在下面展开):
¥If you're upgrading your entire project all at once, you can now also uninstall the Prisma 1 CLI (otherwise expand below):
# remove global installation
npm uninstall -g prisma1

# remove local installation
npm uninstall prisma1
Expand if you want to keep using your Prisma 1 CLI side-by-side
如果你想继续使用 Prisma 1 CLI,建议删除全局安装并添加 prisma1 CLI 作为开发依赖:
¥If you want to keep using the Prisma 1 CLI, it is recommend to remove your global installation of it and add the prisma1 CLI as a development dependency:
# installs v1.34 of the Prisma 1 CLI
npm uninstall -g prisma
npm install prisma1 --save-dev
你现在可以按如下方式调用它:
¥You can now invoke it as follows:
npx prisma1
请注意,如果你需要小于 1.34 的 CLI 版本(例如 1.30),可以按如下方式安装:
¥Note that if you need a CLI version smaller than 1.34 (e.g. 1.30), you can install it as follows:
# installs v1.30 of the Prisma 1 CLI
npm uninstall -g prisma@1.30
npm install prisma@1.30 --save-dev
你现在可以按如下方式调用它:
¥You can now invoke it as follows:
npx prisma
2. 创建你的 Prisma ORM 2 架构
¥ Create your Prisma ORM 2 schema
在本指南中,你将首先使用 prisma init 命令创建一个新的 Prisma 架构,然后使用 introspection 命令通过数据模型对其进行 "fill"。
¥For this guide, you'll first create a new Prisma schema using the prisma init command and then "fill" it with a data model using introspection.
运行以下命令来创建 Prisma 架构(请注意,如果你已有名为 prisma 的文件夹,这会引发错误):
¥Run the following command to create your Prisma schema (note that this throws an error if you already have a folder called prisma):
npx prisma init
如果你看到以下错误,则需要重命名当前的 prisma 目录:
¥If you're seeing the following error, you need to rename your current prisma directory:
ERROR  A folder called prisma already exists in your project.
       Please try again in a project that is not yet using Prisma.
你可以将当前 prisma 目录重命名为 prisma1,以明确它保存了以前的 Prisma 1 配置:
¥You can rename the current prisma directory to prisma1 to make it clear that this holds the former Prisma 1 configuration:
mv prisma prisma1
现在你可以运行 init,它会成功:
¥Now you can run init and it will succeed:
npx prisma init
它应该打印以下输出:
¥It should print the following output:
✔ Your Prisma schema was created at prisma/schema.prisma.
  You can now open it in your favorite editor.

Next steps:
1. Set the `DATABASE_URL` in the `.env` file to point to your existing database. If your database has no tables yet, read https://pris.ly/d/getting-started
2. Set the `provider` of your `datasource` block in `schema.prisma` to match your database: `postgresql`, `mysql` or `sqlite`.
3. Run `prisma db pull` to turn your database schema into a Prisma data model.
4. Run `prisma generate` to install Prisma Client. You can then start querying your database.

More information in our documentation:
https://pris.ly/d/getting-started
该命令创建了一个名为 prisma 的新文件夹和两个文件:
¥The command created a new folder called prisma, and two files:
-
prisma/schema.prisma:指定 数据源、generator 和 数据模型 的 Prisma 模式(请注意,数据模型尚不存在,它将通过自省生成)。¥
prisma/schema.prisma: Your Prisma schema that specifies the data source, generator and data model (note that the data model doesn't exist yet, it will be generated via introspection). -
.env:用于配置数据库 连接网址 的 dotenv 文件。¥
.env: A dotenv file to configure your database connection URL.
你的初始 Prisma 架构如下所示:
¥Your initial Prisma schema looks as follows:
// This is your Prisma schema file,
// learn more about it in the docs: https://pris.ly/d/prisma-schema

datasource db {
  provider = "postgresql"
  url      = env("DATABASE_URL")
}

generator client {
  provider = "prisma-client-js"
}
使用 Prisma 1,你可以指定要在 prisma.yml 中使用的 Prisma 客户端语言变体。使用 Prisma ORM 2,此信息现在通过 generator 块在 Prisma 模式内指定。
¥With Prisma 1, you specify which language variant of Prisma Client you wanted to use in your prisma.yml. With Prisma ORM 2, this information is now specified inside the Prisma schema via a generator block.
注意:与 Prisma 1 不同,Prisma Client 2.0 的 TypeScript 和 JavaScript 变体使用名为
prisma-client-js的相同生成器。即使在纯 JavaScript 项目中,也始终包含index.d.ts中生成的类型。即使不使用 TypeScript,这也可以在 VS Code 中启用自动补齐等功能。¥Note: Unlike Prisma 1, the TypeScript and JavaScript variants of Prisma Client 2.0 use the same generator called
prisma-client-js. The generated types inindex.d.tsare always included, even in plain JavaScript projects. This enables feature like autocompletion in VS Code even when not using TypeScript.
3. 确定你的连接 URL 并连接到你的数据库
¥ Determine your connection URL and connect to your database
对于 Prisma 1,数据库连接是在用于启动 Prisma ORM 服务器的 Docker Compose 文件中配置的。然后,Prisma ORM 服务器公开一个 GraphQL 端点(通过 HTTP),该端点代理来自 Prisma 客户端应用代码的所有数据库请求。该 HTTP 端点在你的 prisma.yml.conf 中指定。
¥With Prisma 1, the database connection is configured in the Docker Compose file that's used to launch the Prisma ORM server. The Prisma ORM server then exposes a GraphQL endpoint (via HTTP) that proxies all database requests from the Prisma Client application code. That HTTP endpoint is specified in your prisma.yml.
使用 Prisma ORM 2,HTTP 层不再公开,Prisma Client 2.0 配置为针对数据库运行请求 "directly"(即,请求由 Prisma ORM 的 查询引擎 代理,但不再有额外的服务器) 。
¥With Prisma ORM 2, the HTTP layer isn't exposed any more and Prisma Client 2.0 is configured to run requests "directly" against the database (that is, requests are proxied by Prisma ORM's query engine, but there isn't an extra server any more).
因此,下一步你需要告诉 Prisma ORM 2 你使用哪种数据库(MySQL 或 PostgreSQL)以及它所在的位置。
¥So, as a next step you'll need to tell Prisma ORM 2 what kind of database you use (MySQL or PostgreSQL) and where it is located.
首先,你需要确保 schema.prisma 内 datasource 块上的 provider 字段配置为使用正确的数据库:
¥First, you need to ensure that that provider field on the datasource block inside schema.prisma is configured to use the right database:
-
如果你使用 PostgreSQL,则需要在
provider字段中定义值"postgresql"。¥If you're using PostgreSQL, it needs to define the value
"postgresql"in theproviderfield. -
如果你使用 MySQL,则需要在
provider字段中定义值"mysql"。¥If you're using MySQL, it needs to define the value
"mysql"in theproviderfield.
使用代码块中的选项卡切换以查看两者的示例:
¥Switch around with the tabs in the code block to see examples of both:
- PostgreSQL
- MySQL
datasource db {
  provider = "postgresql"
  url      = env("DATABASE_URL")
}
datasource db {
  provider = "mysql"
  url      = env("DATABASE_URL")
}
设置 provider 字段后,你可以继续在 .env 文件内配置连接 URL。
¥With the provider field set, you can go ahead and configure the connection URL inside the .env file.
假设用于部署 Prisma ORM 服务器的 Docker Compose 文件中的数据库配置如下所示:
¥Assume the database configuration in your Docker Compose file that you used to deploy your Prisma ORM server looks as follows:
PRISMA_CONFIG: |
  port: 4466
  databases:
    default:
      connector: postgres
      host: postgres
      port: 5432
      user: prisma
      password: prisma
另外假设你的 prisma.yml 中的 endpoint 配置如下:
¥Also assume your endpoint in prisma.yml is configured as follows:
endpoint: http://localhost:4466/myproject/dev
根据这些连接详细信息,你需要在 .env 文件中配置 DATABASE_URL 环境变量,如下所示:
¥Based on these connection details, you need to configure the DATABASE_URL environment variable inside your .env file as follows:
DATABASE_URL="postgresql://janedoe:randompassword@localhost:5432/prisma?schema=myproject$dev"
请注意,schema 参数通常由你的服务名称和服务阶段(它们是 prisma.yml 中 endpoint 的一部分)组成,并由 $ 字符分隔。
¥Note that the schema argument is typically composed of your service name and service stage (which are part of the endpoint in prisma.yml), separated by the $ character.
有时 prisma.yml 中没有指定服务名称和阶段:
¥Sometimes no service name and stage are specified in prisma.yml:
endpoint: http://localhost:4466/
在这种情况下,必须按如下方式指定 schema:
¥In that case, the schema must be specified as follows:
DATABASE_URL="postgresql://janedoe:randompassword@localhost:5432/prisma?schema=default$default"
在 连接 URL 页面上了解更多信息。
¥Learn more on the Connection URLs page.
4. 检查你的数据库
¥ Introspect your database
出于本指南的目的,我们将使用以下 Prisma 1 数据模型(选择下面的 SQL 选项卡以查看数据模型在 SQL 中映射到的内容):
¥For the purpose of this guide, we'll use the following Prisma 1 data model (select the SQL tab below to see what the data model maps to in SQL):
- Prisma 1 Data Model
- SQL
type User {
  id: ID! @id
  email: String @unique
  name: String!
  role: Role! @default(value: CUSTOMER)
  jsonData: Json
  profile: Profile
  posts: [Post!]!
}

type Post {
  id: ID! @id
  createdAt: DateTime! @createdAt
  updatedAt: DateTime! @updatedAt
  title: String!
  content: String
  published: Boolean! @default(value: false)
  author: User @relation(link: TABLE)
  categories: [Category!]!
}

type Profile {
  id: ID! @id
  bio: String
  user: User! @relation(link: INLINE)
}

type Category {
  id: ID! @id
  name: String!
  posts: [Post!]!
}

enum Role {
  ADMIN
  CUSTOMER
}
CREATE TABLE"User" (
    id character varying(25) PRIMARY KEY,
    email text,
    name text NOT NULL,
    role text NOT NULL,
    "jsonData" text
);
CREATE UNIQUE INDEX "User_pkey" ON"User"(id text_ops);
CREATE UNIQUE INDEX "default$default.User.email._UNIQUE" ON"User"(email text_ops);

CREATE TABLE"Post" (
    id character varying(25) PRIMARY KEY,
    title text NOT NULL,
    published boolean NOT NULL,
    "createdAt" timestamp(3) without time zone NOT NULL,
    "updatedAt" timestamp(3) without time zone NOT NULL,
    content text
);
CREATE UNIQUE INDEX "Post_pkey" ON"Post"(id text_ops);

CREATE TABLE"Profile" (
    id character varying(25) PRIMARY KEY,
    bio text,
    user character varying(25) REFERENCES"User"(id) ON DELETE SET NULL
);
CREATE UNIQUE INDEX "Profile_pkey" ON"Profile"(id text_ops);

CREATE TABLE"Category" (
    id character varying(25) PRIMARY KEY,
    name text NOT NULL
);
CREATE UNIQUE INDEX "Category_pkey" ON"Category"(id text_ops);

CREATE TABLE"_PostToUser" (
    "A" character varying(25) NOT NULL REFERENCES"Post"(id) ON DELETE CASCADE,
    "B" character varying(25) NOT NULL REFERENCES"User"(id) ON DELETE CASCADE
);
CREATE UNIQUE INDEX "_PostToUser_AB_unique" ON"_PostToUser"("A" text_ops,"B" text_ops);
CREATE INDEX "_PostToUser_B" ON"_PostToUser"("B" text_ops);

CREATE TABLE"_CategoryToPost" (
    "A" character varying(25) NOT NULL REFERENCES"Category"(id) ON DELETE CASCADE,
    "B" character varying(25) NOT NULL REFERENCES"Post"(id) ON DELETE CASCADE
);
CREATE UNIQUE INDEX "_CategoryToPost_AB_unique" ON"_CategoryToPost"("A" text_ops,"B" text_ops);
CREATE INDEX "_CategoryToPost_B" ON"_CategoryToPost"("B" text_ops);
请注意,该数据模型有三个 relations:
¥Note that this data model has three relations:
-
1-1:
User↔Profile -
1-n:
User↔Post(通过_PostToUser关系表维护)¥1-n:
User↔Post(maintained via the_PostToUserrelation table) -
m-n:
Post↔Category(通过_CategoryToPost关系表维护)¥m-n:
Post↔Category(maintained via the_CategoryToPostrelation table)
现在你可以使用以下命令对数据库运行 Prisma ORM 的自省:
¥Now you can run Prisma ORM's introspection against your database with the following command:
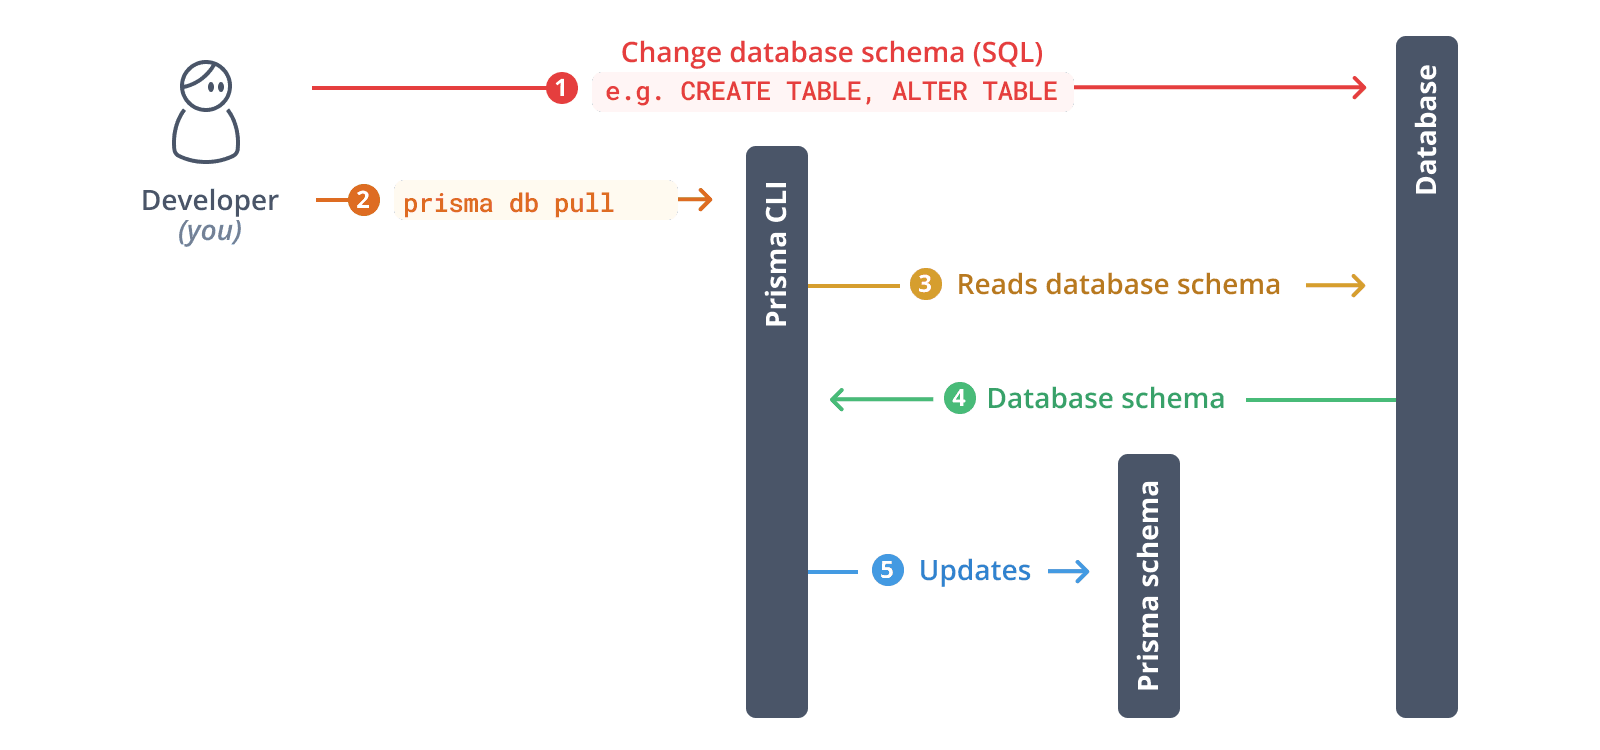
npx prisma db pull
下面是调用 db pull 时发生的情况的图形说明:
¥Here's a graphical illustration for what happens when db pull is invoked:
对于上述 Prisma 1 数据模型,这会产生以下 Prisma ORM 2 模式(请注意,模型已重新排序以匹配 Prisma 1 数据模型的初始顺序):
¥For the above Prisma 1 datamodel, this results in the following Prisma ORM 2 schema (note that the models have been reordered to match the initial order of the Prisma 1 datamodel):
model User {
  id       String    @id @default(cuid())
  email    String?   @unique
  name     String
  role     String
  jsonData String?
  Profile  Profile[]
  Post     Post[]
}

model Post {
  id        String     @id @default(cuid())
  createdAt DateTime
  updatedAt DateTime
  title     String
  content   String?
  published Boolean
  Category  Category[]
  User      User[]
}

model Profile {
  id   String  @id @default(cuid())
  bio  String?
  user String? @unique
  User User?   @relation(fields: [user], references: [id])
}

model Category {
  id   String @id @default(cuid())
  name String
  Post Post[]
}
虽然这已经是一个有效的 Prisma ORM 2 模式,但它缺少 Prisma 1 等效项的许多功能:
¥While this is already a valid Prisma ORM 2 schema, it lacks a number of features that were part of its Prisma 1 equivalent:
-
Post上的createdAt和updatedAt字段没有自动生成的日期值¥no auto-generated date values for the
createdAtandupdatedAtfields onPost -
User上的role字段没有默认值¥no default value for the
rolefield onUser -
Post上的published字段没有默认值¥no default value for the
publishedfield onPost
此外,还存在许多不一致之处,导致 Prisma 客户端 API 不太惯用/符合人机工程学:
¥There further are a number of inconsistencies which result in a less idiomatic/ergonomic Prisma Client API:
-
User↔Profile是 1-n 而不是 1-1 关系¥
User↔Profileis a 1-n instead of 1-1 relation -
User↔Post是 m-n 而不是 1-n 关系¥
User↔Postis a m-n instead of 1-n relation -
关系字段是大写的(例如
User上的Profile和Post)¥relation fields are uppercased (e.g.
ProfileandPostonUser) -
User上的jsonData字段的类型为String而不是Json¥the
jsonDatafield onUseris of typeStringinstead ofJson -
User上的role字段的类型为String而不是Role,角色的enum定义完全丢失¥the
rolefield onUseris of typeStringinstead ofRole, theenumdefinition for role is missing altogether
虽然这些不一致实际上不会影响你在 Prisma 客户端 API 中可用的 "功能集",但它们会使你失去之前存在的某些约束/保证。
¥While these inconsistencies don't actually impact the "feature set" you'll have available in your Prisma Client API, they make you lose certain constraints/guarantees that were present before.
例如,Prisma ORM 现在不能保证 User 最多连接到一个 Profile,因为在内省期间表之间的关系被识别为 1-n,因此一条 User 记录现在可以连接到多个 Profile 记录。
¥For example, Prisma ORM now won't guarantee that a User is connected to at most one Profile because the relation between the tables was recognized as 1-n during introspection, so one User record could now get connected to multiple Profile records.
另一个问题是,你可以存储 jsonData 和 role 字段的任何文本,无论它是有效的 JSON 还是表示 Role 枚举的值。
¥Another issue is that you can store whatever text for the jsonData and role fields, regardless of whether it's valid JSON or represents a value of the Role enum.
要了解有关这些不一致的更多信息,请查看 架构不兼容 页面。
¥To learn more about these inconsistencies check out the Schema incompatibilities page.
接下来,我们将检查这些不兼容性,并使用 Prisma 架构升级 CLI 一一修复它们。
¥In the following, we'll go through these incompatibilities and fix them one by one using the Prisma schema upgrade CLI.
5. 使用 Prisma 架构升级 CLI 解决架构不兼容问题
¥ Use the Prisma schema upgrade CLI to resolve schema incompatibilities
Prisma 1 升级 CLI 是一款交互式工具,可帮助你升级 Prisma 架构并解决上面列出的大部分不一致问题。
¥The Prisma 1 Upgrade CLI is an interactive tool that helps you upgrading your Prisma schema and ironing out most of the inconsistencies listed above.
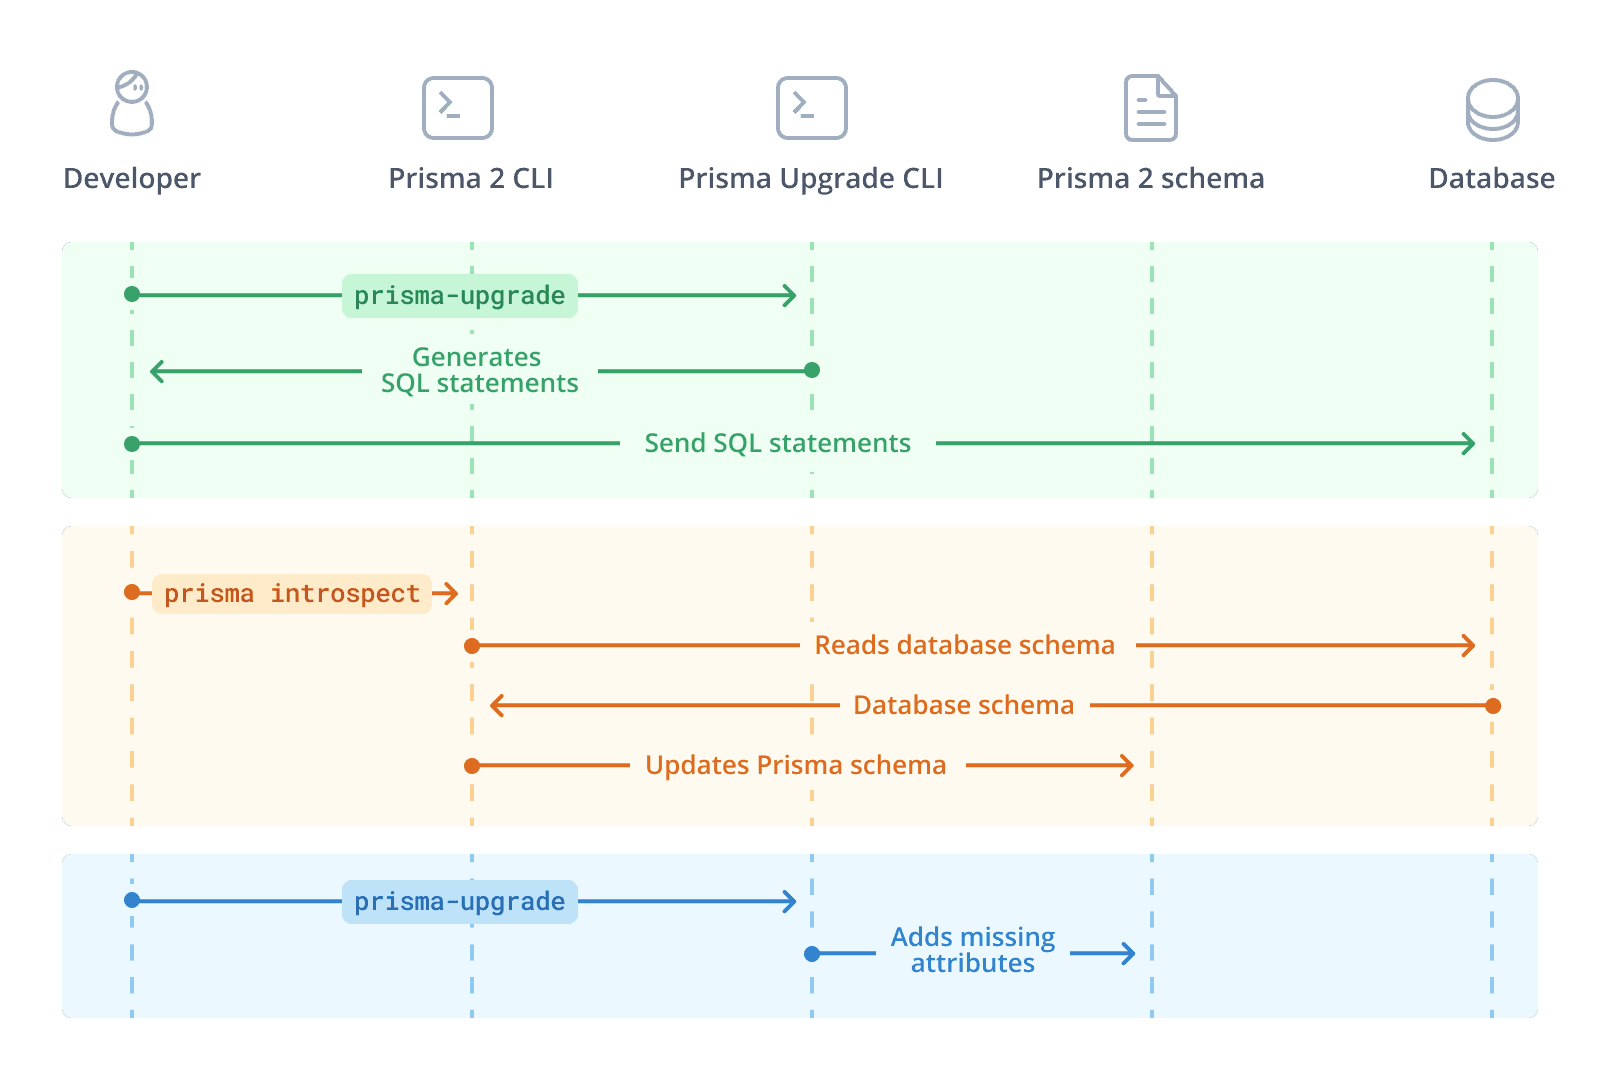
Prisma 1 升级 CLI 分为两个主要阶段:
¥The Prisma 1 Upgrade CLI works in two major phases:
-
通过纯 SQL 修复数据库架构
¥Fix the database schema via plain SQL
-
将缺失的属性添加到 Prisma ORM 2 架构和其他架构修复
¥Add missing attributes to the Prisma ORM 2 schema and other schema fixes
在第一阶段,它将生成并打印许多 SQL 语句,你应该针对数据库运行这些语句来调整数据库架构。你可以在继续第二阶段之前运行所有语句或其中的子集。
¥During the first phase, it will generate and print a number of SQL statements that you should run against your database to adjust the database schema. You can either run all of the statements or a subset of them before continuing to the second phase.
在第二阶段,你不需要手动执行任何操作。升级 CLI 将通过添加某些 Prisma ORM 级别属性(例如 @default(cuid)) 或 @updatedAt)、调整关系字段的名称以匹配 Prisma 1 数据模型中的名称并确保所需的 1-1 关系来更改你的 Prisma 架构 Prisma ORM 2 模式中也需要 Prisma 1 数据模型两侧的数据。
¥During the second phase, you don't need to do anything manually. The Upgrade CLI will make changes to your Prisma schema by adding certain Prisma ORM-level attributes (like @default(cuid)) or @updatedAt), adjusting the names of relation fields to match the ones from your Prisma 1 datamodel and ensure 1-1-relations that were required on both sides in your Prisma 1 datamodel are also required in the Prisma ORM 2 schema.
请注意,你可以在此过程中随时重新开始,并从第二阶段返回到第一阶段。
¥Note that you can start over at any time during the process and go back from the second to the first phase.
在此图中,绿色区域显示第一相,蓝色区域显示第二相。请注意,你可以选择在两个阶段之间运行 prisma db pull 来更新你的 Prisma ORM 数据模型:
¥In this illustration, the green area shows the first phase, the blue area shows the second phase. Note that you can optionally run prisma db pull in between the phases to update your Prisma ORM data model:
要使用升级 CLI,你可以在项目中本地安装它,也可以在不使用 npx 安装的情况下调用它一次,如下所示:
¥To use the Upgrade CLI, you can either install it locally in your project, or invoke it once without installation using npx as done here:
npx prisma-upgrade prisma1/prisma.yml prisma/schema.prisma
CLI 将向你显示以下消息:
¥The CLI will greet you with the following message:
◮ Welcome to the interactive Prisma Upgrade CLI that helps with the
upgrade process from Prisma 1 to Prisma ORM 2.

Please read the docs to learn more about the upgrade process:
https://pris.ly/d/how-to-upgrade

➤ Goal
The Upgrade CLI helps you resolve the schema incompatibilities
between Prisma 1 and Prisma ORM 2. Learn more in the docs:
https://pris.ly/d/schema-incompatibilities

➤ How it works
Throughout the process, you'll need to adjust your database schema by sending
SQL statements to it. The SQL statements are provided by the Upgrade CLI.

Note that the Upgrade CLI never makes changes to your database,
you are in full control over any operations that are executed against it.

You can stop and re-run the Upgrade CLI at any time.

These are the different steps of the upgrade process:

  1. The Upgrade CLI generates SQL commands for you to run on your database.
  2. You run the SQL commands against your database.
  3. You run the `npx prisma db pull` command again.
  4. You run the `npx prisma-upgrade` command again.
  5. The Upgrade CLI adjusts the Prisma ORM 2 schema by adding missing attributes.

➤ Note
It is recommended that you make a full backup of your existing data before starting
the upgrade process. If possible, the migration should be performed in a staging
environment before executed against a production environment.

➤ Help
If you have any questions or run into any problems along the way,
please create an issue at:
https://github.com/prisma/prisma1-upgrade/issues

Are you ready? [Y/n]
按 Y 按钮,然后按键盘上的 RETURN 确认继续。
¥Press the Y button, then confirm by hitting RETURN on your keyboard to continue.
确认后,CLI 会输出你应该针对数据库运行的 SQL 语句:
¥Once you confirmed, the CLI outputs the SQL statements you should be running against your database:
➤ Adjust your database schema
Run the following SQL statements against your database:

  Fix columns with ENUM data types
  https://pris.ly/d/schema-incompatibilities#enums-are-represented-as-text-in-database

    CREATE TYPE "default$default"."Role" AS ENUM ('ADMIN', 'CUSTOMER');
    ALTER TABLE "default$default"."User" ALTER COLUMN "role" SET DATA TYPE "default$default"."Role" using "role"::"default$default"."Role";


  Add missing `DEFAULT` constraints to the database
  https://pris.ly/d/schema-incompatibilities#default-values-arent-represented-in-database

    ALTER TABLE "default$default"."User" ALTER COLUMN "role" SET DEFAULT 'CUSTOMER';
    ALTER TABLE "default$default"."Post" ALTER COLUMN "published" SET DEFAULT false;


  Fix columns with JSON data types
  https://pris.ly/d/schema-incompatibilities#json-type-is-represented-as-text-in-database

    ALTER TABLE "default$default"."User" ALTER COLUMN "jsonData" SET DATA TYPE JSONB USING "jsonData"::TEXT::JSONB;


  Replicate `@createdAt` behavior in Prisma ORM 2
  https://pris.ly/d/schema-incompatibilities#createdat-isnt-represented-in-database

    ALTER TABLE "default$default"."Post" ALTER COLUMN "createdAt" SET DEFAULT CURRENT_TIMESTAMP;


  Fix 1-1 relations by adding `UNIQUE` constraints
  https://pris.ly/d/schema-incompatibilities#inline-1-1-relations-are-recognized-as-1-n-missing-unique-constraint

    ALTER TABLE "default$default"."Profile" ADD UNIQUE ("user");


  Migrate IDs from varchar(25) to varchar(30)
  https://pris.ly/d/schema-incompatibilities#mismatching-cuid-length

    ALTER TABLE "default$default"."Category" ALTER COLUMN "id" SET DATA TYPE character varying(30);
    ALTER TABLE "default$default"."Post" ALTER COLUMN "id" SET DATA TYPE character varying(30);
    ALTER TABLE "default$default"."Profile" ALTER COLUMN "id" SET DATA TYPE character varying(30);
    ALTER TABLE "default$default"."Profile" ALTER COLUMN "user" SET DATA TYPE character varying(30);
    ALTER TABLE "default$default"."User" ALTER COLUMN "id" SET DATA TYPE character varying(30);

➤ Breaking changes detected

In order to fully optimize your database schema, you'll need to run a few SQL
statements that can break your Prisma 1 setup. Note that these changes are optional
and if you are upgrading gradually and running Prisma 1 and Prisma ORM 2 side-by-side,
you should not perform these changes yet. Instead, you can perform them whenever
you are ready to completely remove Prisma 1 from your project.
If you are upgrading all at once, you can safely perform these changes now.

Learn more in the docs:
https://pris.ly/d/how-to-upgrade'
注意:如果你看到有关重大更改的注释,你现在可以忽略它。我们稍后再讨论。
¥Note: If you're seeing the note about breaking changes, you can ignore it for now. We'll discuss it later.
显示的 SQL 语句分为多个 "buckets",都是为了解决某个 模式不兼容:
¥The shown SQL statements are categorized into a number of "buckets", all aiming to resolve a certain schema incompatibility:
-
修复具有 ENUM 数据类型的列
¥Fix columns with ENUM data types
-
将缺失的
DEFAULT约束添加到数据库¥Add missing
DEFAULTconstraints to the database -
修复具有 JSON 数据类型的列
¥Fix columns with JSON data types
-
在 Prisma 2 中复制
@createdAt行为¥Replicate
@createdAtbehavior in Prisma 2 -
通过添加
UNIQUE约束来修复 1-1 关系¥Fix 1-1 relations by adding
UNIQUEconstraints
下一步,你可以开始将 SQL 语句发送到数据库。请注意,所有这些更改都不会造成破坏,你将能够继续并排使用 Prisma 1 和 Prisma ORM 2。
¥As a next step, you can start sending the SQL statements to your database. Note that all of these changes are non-breaking and you'll be able to continue using Prisma 1 side-by-side with Prisma ORM 2.
接下来的部分将介绍要单独发送到数据库的不同类型的 SQL 语句。
¥The next sections cover the different kinds of SQL statements to be sent to your database individually.
5.1.通过纯 SQL 修复数据库架构(不间断)
¥5.1. Fix the database schema via plain SQL (non-breaking)
在本节中,我们将逐步浏览打印的 SQL 语句,并逐一对数据库运行它们。
¥In this section, we'll walk through the printed SQL statements and run them against the database one by one.
5.1.1.修复具有 ENUM 数据类型的列
¥5.1.1. Fix columns with ENUM data types
该工具所做的第一件事是帮助你确保 Prisma 1 数据模型中的 enum 定义将表示为底层数据库中的实际 ENUM 类型,现在它们表示为纯字符串(例如 MySQL 中的 MEDIUMTEXT)。
¥The first thing the tool does is help you ensure that enum definitions in your Prisma 1 datamodel will be represented as actual ENUM types in the underlying database, right now they are represented as plain strings (e.g. as MEDIUMTEXT in MySQL).
CLI 当前显示以下输出:
¥The CLI currently shows the following output:
Fix columns with ENUM data types
https://pris.ly/d/schema-incompatibilities#enums-are-represented-as-text-in-database

  CREATE TYPE "default$default"."Role" AS ENUM ('ADMIN', 'CUSTOMER');
  ALTER TABLE "default$default"."User" ALTER COLUMN "role" SET DATA TYPE "default$default"."Role" using "role"::"default$default"."Role";
⚠️ 警告:如果你正在运行 Prisma 1 和 Prisma ORM 2 side-by-side,则这些 SQL 语句将破坏你的 Prisma 1 设置。该文档将很快更新以反映这一点。
¥⚠️ Warning: If you are running Prisma 1 and Prisma ORM 2 side-by-side, these SQL statements will break your Prisma 1 setup. The docs will be updated to reflect this soon.
现在继续针对你的数据库运行这些语句。
¥Go ahead and run these statements against your database now.
5.1.2.将缺失的 DEFAULT 约束添加到数据库
¥5.1.2. Add missing DEFAULT constraints to the database
接下来,升级 CLI 通过生成将相应 DEFAULT 约束直接添加到数据库的 SQL 语句来帮助你解决 默认值未在数据库中表示 问题。
¥Next, the Upgrade CLI helps you resolve the issue that default values aren't represented in the database by generating SQL statements that add the respective DEFAULT constraints directly to the database.
在这种情况下,缺少该工具建议的两个 DEFAULT 约束:
¥In this case, two DEFAULT constraints are missing which are suggested by the tool:
Add missing `DEFAULT` constraints to the database
https://pris.ly/d/schema-incompatibilities#default-values-arent-represented-in-database

  ALTER TABLE "default$default"."User" ALTER COLUMN "role" SET DEFAULT 'CUSTOMER';
  ALTER TABLE "default$default"."Post" ALTER COLUMN "published" SET DEFAULT false;
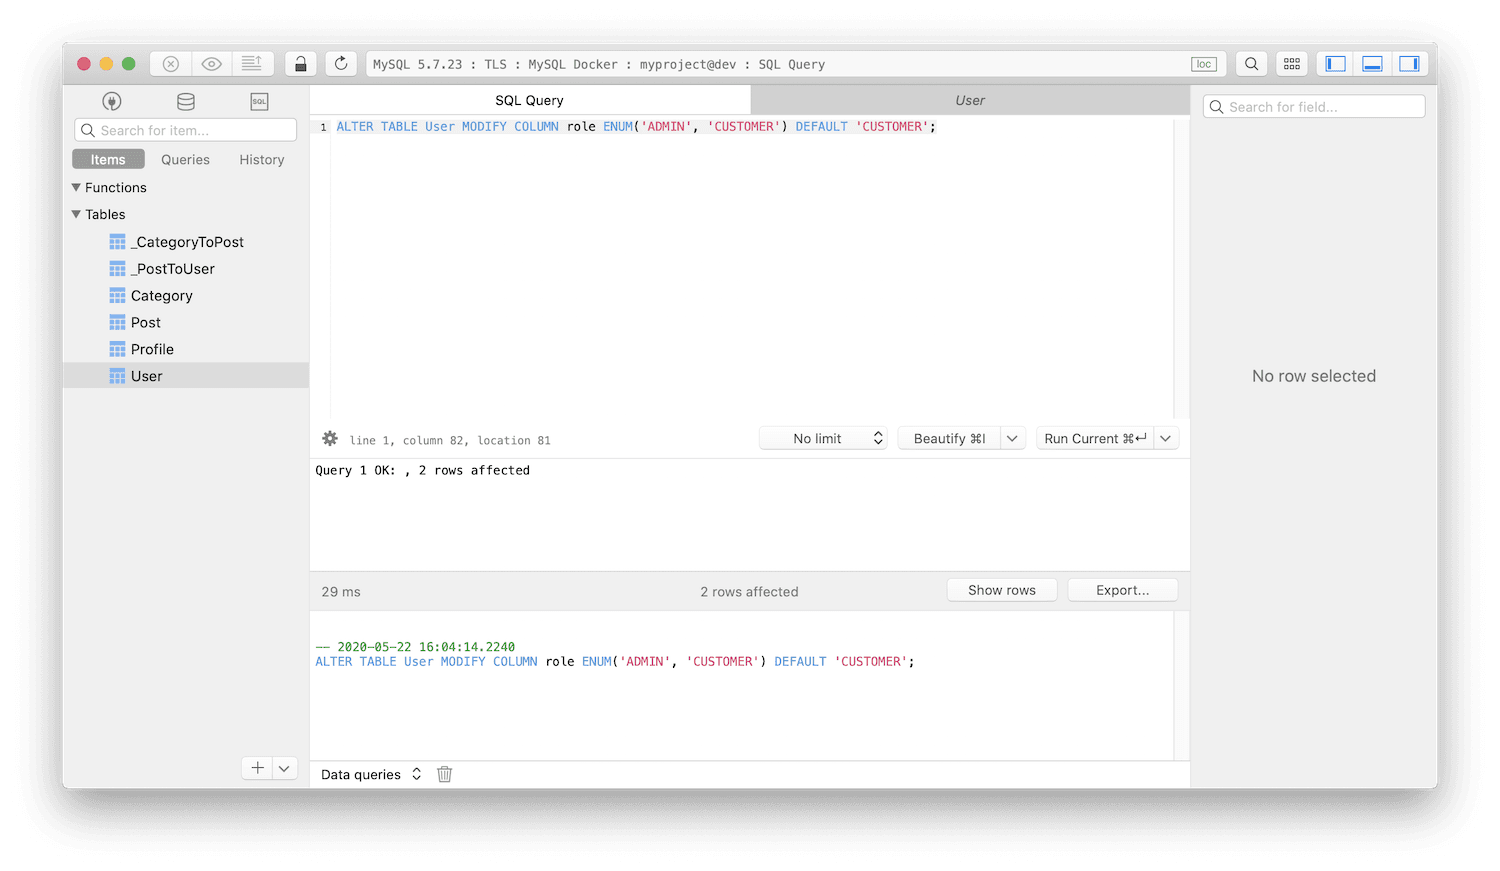
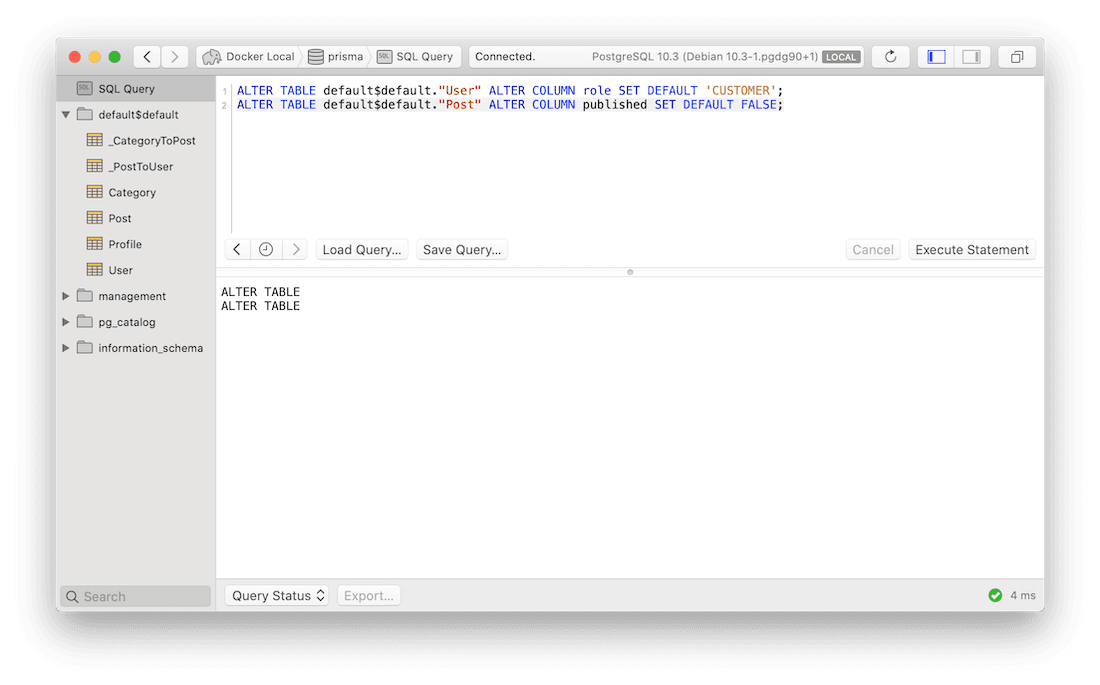
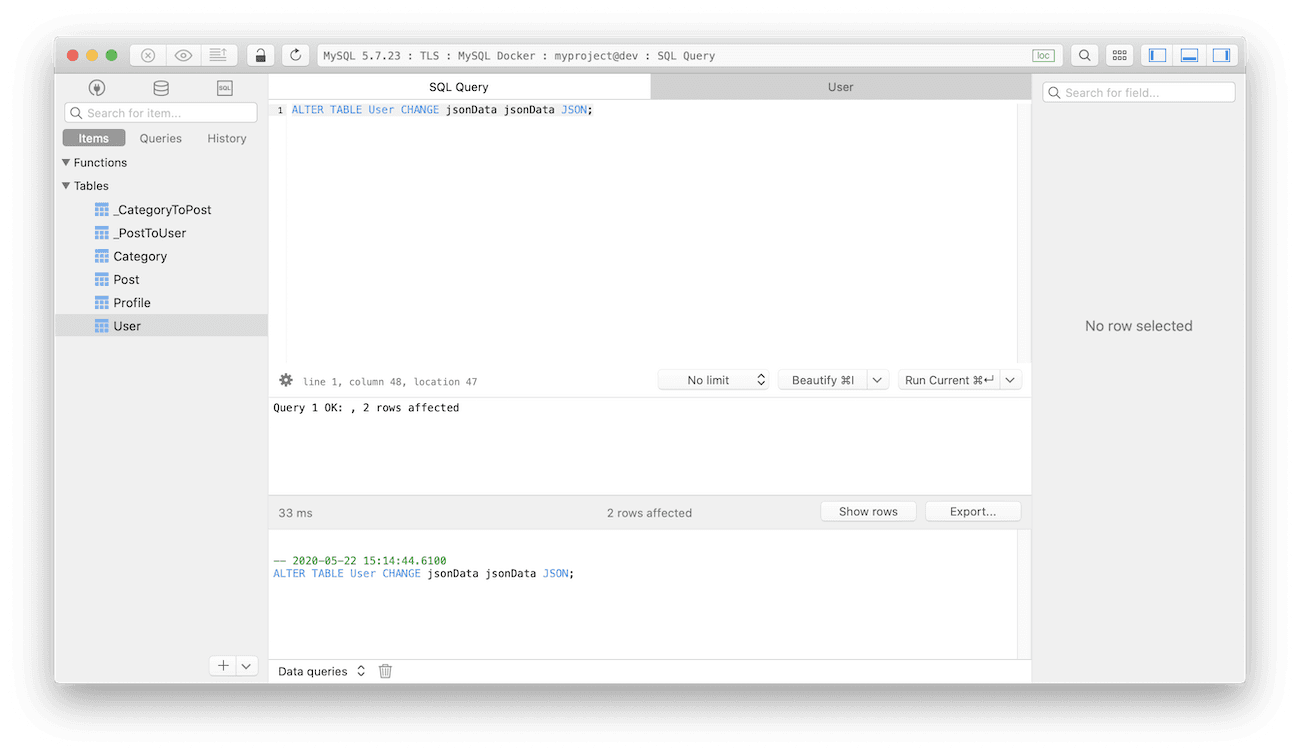
现在,你可以使用命令行客户端或 Postico 等 GUI 对数据库运行这些 SQL 语句:
¥You can now run these SQL statements against your database either using a command line client or a GUI like Postico:
5.1.3.修复具有 JSON 数据类型的列
¥5.1.3. Fix columns with JSON data types
接下来,该工具帮助你确保 Prisma 1 数据模型中的 Json 字段将表示为基础数据库中的 JSON 列,现在它们表示为纯字符串(例如 MySQL 中的 MEDIUMTEXT)。
¥Next, the tool helps you ensure that Json fields in your Prisma 1 datamodel will be represented as JSON columns in the underlying database, right now they are represented as plain strings (e.g. as MEDIUMTEXT in MySQL).
将列类型更改为 JSON 将确保该字段在 Prisma ORM 2 自省期间被正确识别为 Json。
¥Changing the column type to JSON will ensure that the field is properly recognized as Json during Prisma ORM 2 introspection.
CLI 当前显示以下输出:
¥The CLI currently shows the following output:
Fix columns with JSON data types
https://pris.ly/d/schema-incompatibilities#json-type-is-represented-as-text-in-database

  ALTER TABLE "default$default"."User" ALTER COLUMN "jsonData" TYPE JSON  USING "jsonData"::json;
⚠️ 警告:如果你正在运行 Prisma 1 和 Prisma ORM 2 side-by-side,则这些 SQL 语句将破坏你的 Prisma 1 设置。该文档将很快更新以反映这一点。
¥⚠️ Warning: If you are running Prisma 1 and Prisma ORM 2 side-by-side, these SQL statements will break your Prisma 1 setup. The docs will be updated to reflect this soon.
现在,你可以使用命令行客户端或 Postico 等 GUI 对数据库运行这些 SQL 语句:
¥You can now run these SQL statements against your database either using a command line client or a GUI like Postico:
5.1.4.在 Prisma ORM 2 中复制 @createdAt 行为
¥5.1.4. Replicate @createdAt behavior in Prisma ORM 2
该工具接下来要做的就是帮助你解决 @createdAt 未在数据库中表示 的行为问题
¥The next thing the tools does is help you resolve the issue that the behavior of @createdAt isn't represented in database
CLI 当前显示以下输出:
¥The CLI currently shows the following output:
Replicate `@createdAt` behavior in Prisma ORM 2.0
https://pris.ly/d/schema-incompatibilities#createdat-isnt-represented-in-database

  ALTER TABLE "default$default"."Post" ALTER COLUMN "createdAt" SET DEFAULT CURRENT_TIMESTAMP;
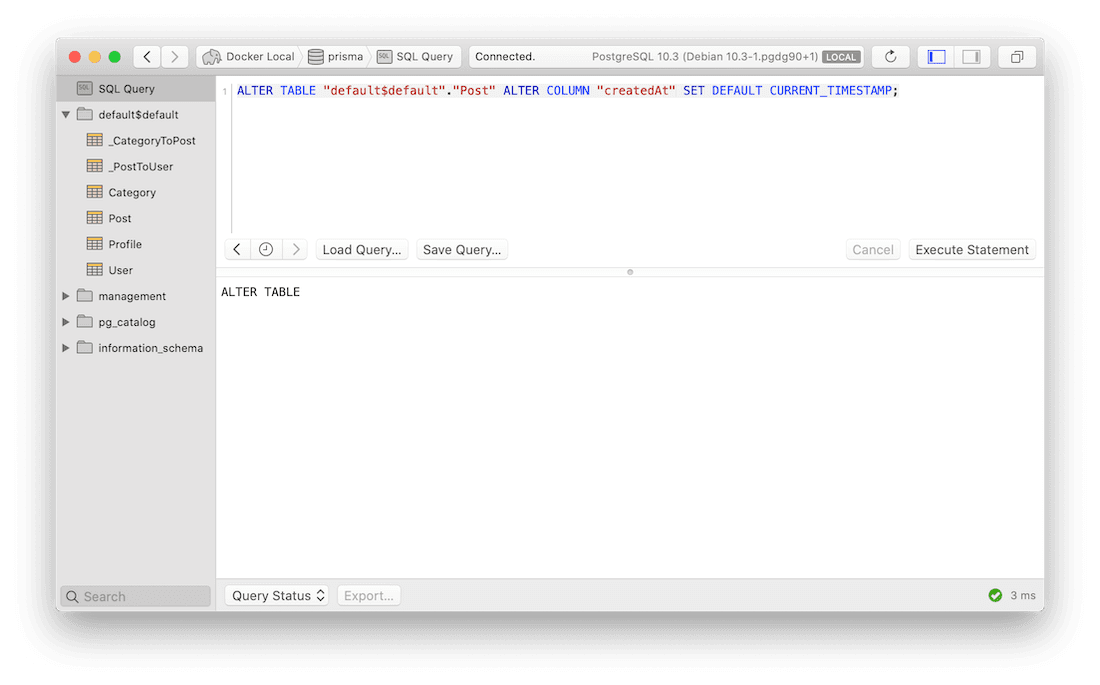
现在,你可以使用命令行客户端或 Postico 等 GUI 对数据库运行这些 SQL 语句:
¥You can now run these SQL statements against your database either using a command line client or a GUI like Postico:
5.1.5.通过添加 UNIQUE 约束来修复 1-1 关系
¥5.1.5. Fix 1-1 relations by adding UNIQUE constraints
现在,该工具将通过向数据库中名为 user(以 Prisma 1 数据模型中的关系字段命名)的外键列添加 UNIQUE 约束来帮助你 将 User ↔ Profile 之间当前的 1-n 关系恢复为 1-1 关系。
¥Now, the tool will help you turn the current 1-n relation between User ↔ Profile back into a 1-1 relation by adding a UNIQUE constraint to the foreign key column called user (named after the relation field in the Prisma 1 datamodel) in the database.
CLI 当前显示以下输出:
¥The CLI currently shows the following output:
Fix 1-1 relations by adding `UNIQUE` constraints
https://pris.ly/d/schema-incompatibilities#inline-1-1-relations-are-recognized-as-1-n-missing-unique-constraint

  ALTER TABLE "default$default"."Profile" ADD UNIQUE ("user");
现在,你可以使用命令行客户端或 Postico 等 GUI 对数据库运行这些 SQL 语句:
¥You can now run these SQL statements against your database either using a command line client or a GUI like Postico:
5.1.6.修复 CUID 长度不匹配的问题
¥5.1.6. Fix mismatch of CUID length
注意:即使你更改了基础数据库中的列类型,这些 SQL 语句也将继续出现在升级 CLI 中。这是升级 CLI 当前的一个限制。
¥Note: These SQL statements will keep appearing in the Upgrade CLI even after you have changed the column types in the underlying database. This is a currently a limitation in the Upgrade CLI.
最后,该工具将通过向数据库中名为 user(以 Prisma 1 数据模型中的关系字段命名)的外键列添加 UNIQUE 约束来帮助你实现 将当前 VARCHAR(25) 类型的 ID 列转换为 VARCHAR(30)。
¥Finally, the tool will help you turn the current ID columns of type VARCHAR(25) into VARCHAR(30) by adding a UNIQUE constraint to the foreign key column called user (named after the relation field in the Prisma 1 datamodel) in the database.
CLI 当前显示以下输出:
¥The CLI currently shows the following output:
Migrate IDs from varchar(25) to varchar(30)
https://pris.ly/d/schema-incompatibilities#mismatching-cuid-length

  ALTER TABLE "default$default"."Category" ALTER COLUMN "id" SET DATA TYPE character varying(30);
  ALTER TABLE "default$default"."Post" ALTER COLUMN "id" SET DATA TYPE character varying(30);
  ALTER TABLE "default$default"."Profile" ALTER COLUMN "id" SET DATA TYPE character varying(30);
  ALTER TABLE "default$default"."Profile" ALTER COLUMN "user" SET DATA TYPE character varying(30);
  ALTER TABLE "default$default"."User" ALTER COLUMN "id" SET DATA TYPE character varying(30);
现在,你可以使用命令行客户端或 Postico 等 GUI 对数据库运行这些 SQL 语句:
¥You can now run these SQL statements against your database either using a command line client or a GUI like Postico:
5.1.7.检测到重大变更
¥5.1.7. Breaking changes detected
如果升级 CLI 打印了有关重大更改的注释,则你的数据库架构需要进行一些调整,这将破坏 Prisma 1 兼容性,以便完全优化。
¥In case the Upgrade CLI has printed a note about breaking changes, your database schema needs some adjustments that will break Prisma 1 compatibility in order to be fully optimized.
如果没有检测到重大更改,你可以 向前跳至第 5.2 节
¥If there are no breaking changes detected, you can skip forward to section 5.2
根据你的 升级策略,你可以立即执行这些更改,也可以跳到升级 CLI 的下一阶段:
¥Depending on your upgrade strategy, you can either perform these changes now or skip to the next phase of the Upgrade CLI:
-
如果你遵循逐步并行升级策略,请不要执行这些更改,因为它们会破坏你的 Prisma 1 设置。在这种情况下,你可以通过键入 n 并点击 RETURN 继续进入升级 CLI 的下一阶段。
¥If you are following the gradual side-by-side upgrade strategy, do not perform these changes yet since they will break your Prisma 1 setup. In that case, you can continue to the next phase of the Upgrade CLI by typing n and hitting RETURN.
-
如果你遵循一次性升级策略,则现在可以执行这些更改。在这种情况下,请继续输入 Y 并点击 RETURN。
¥If you are following the all at once upgrade strategy, you can perform these changes now. In that case, continue by typing Y and hitting RETURN.
5.2.通过普通 SQL 修复数据库架构(破坏)
¥5.2. Fix the database schema via plain SQL (breaking)
在本部分中,你将解决破坏 Prisma 1 设置的架构不兼容问题。如果你的项目中仍在运行 Prisma 1,请勿执行这些更改!
¥In this section, you'll resolve the schema incompatibilities that are breaking your Prisma 1 setup. Do not perform these changes if you are still running Prisma 1 in your project!
5.2.1.修复不正确的 m-n 关系
¥5.2.1. Fix incorrect m-n relations
现在,升级 CLI 可帮助你修复 Prisma 1 使用关系表表示的所有 1-1 和 1-n 关系以及新 Prisma ORM 2 架构中的 目前仅以 m-n 关系存在。具体来说,User ↔ Post 关系就是这种情况,当前定义为 m-n 但实际上应该是 1-n 关系。
¥Now, the Upgrade CLI helps you fix all 1-1 and 1-n relations that Prisma 1 represents with relation tables and that currently only exist as m-n relations in your new Prisma ORM 2 schema. Concretely, this is the case for the User ↔ Post relation which currently is defined as m-n but should really be a 1-n relation.
要解决此问题,你需要执行以下迁移:
¥To fix this, you'll need to perform the following migration:
-
在
Post上创建一个新的外键列以直接链接到User表。¥Create a new foreign key column on
Postto link directly to theUsertable. -
将外键值从关系表迁移到
Post上的新外键列中。¥Migrate the foreign key values from the relation table into the new foreign key column on
Post. -
删除关系表。
¥Delete the relation table.
这些指令现在由 CLI 打印:
¥These instructions are now printed by the CLI:
➤ Adjust your database schema
Run the following SQL statements against your database:

  Fix one-to-many table relations
  https://pris.ly/d/schema-incompatibilities#all-non-inline-relations-are-recognized-as-m-n

    ALTER TABLE "default$default"."Post" ADD COLUMN "authorId" character varying(25) ;
    ALTER TABLE "default$default"."Post" ADD CONSTRAINT "author" FOREIGN KEY ("authorId") REFERENCES "default$default"."User"("id");
    UPDATE "default$default"."Post" SET "authorId" = "default$default"."_PostToUser"."B" FROM "default$default"."_PostToUser" WHERE "default$default"."_PostToUser"."A" = "default$default"."Post"."id";
    DROP TABLE "default$default"."_PostToUser";


➤ Next Steps

After you executed one or more of the previous SQL statements against your database,
please run the following two commands to refresh your Prisma ORM 2 schema and check
the changes.

  1. Run `npx prisma db pull` again to refresh your Prisma ORM 2 schema.
  2. Run `npx prisma-upgrade` again.

If you can't or don't want to execute the remaining SQL statements right now, you can
skip to the last step where the Upgrade CLI adds missing attributes to your Prisma ORM 2
schema that are not picked up by introspection.

Skip to the last step? [Y/n]?
对于此修复,你需要运行三个 SQL 语句:
¥For this fix, you'll need to run three SQL statements:
-
在
Post表上创建新列authorId。该列应该是引用User表的id字段的外键:¥Create new column
authorIdon thePosttable. This column should be a foreign key that references theidfield of theUsertable:ALTER TABLE `Post` ADD COLUMN `authorId` VARCHAR(25);
ALTER TABLE `Post` ADD FOREIGN KEY (`authorId`) REFERENCES `User` (`id`); -
编写一个 SQL 查询,从
_PostToUser关系表中读取所有行,并针对每一行:¥Write a SQL query that reads all the rows from the
_PostToUserrelation table and for each row:-
通过查找
A列中的值来查找相应的Post记录¥Finds the respective
Postrecord by looking up the value from columnA -
将
B列中的值作为authorId的值插入到该Post记录中¥Inserts the value from column
Bas the value forauthorIdinto thatPostrecord
UPDATE Post, _PostToUser
SET Post.authorId = _PostToUser.B
WHERE Post.id = _PostToUser.A -
-
删除
_PostToUser关系表¥Delete the
_PostToUserrelation tableDROP TABLE `_PostToUser`;
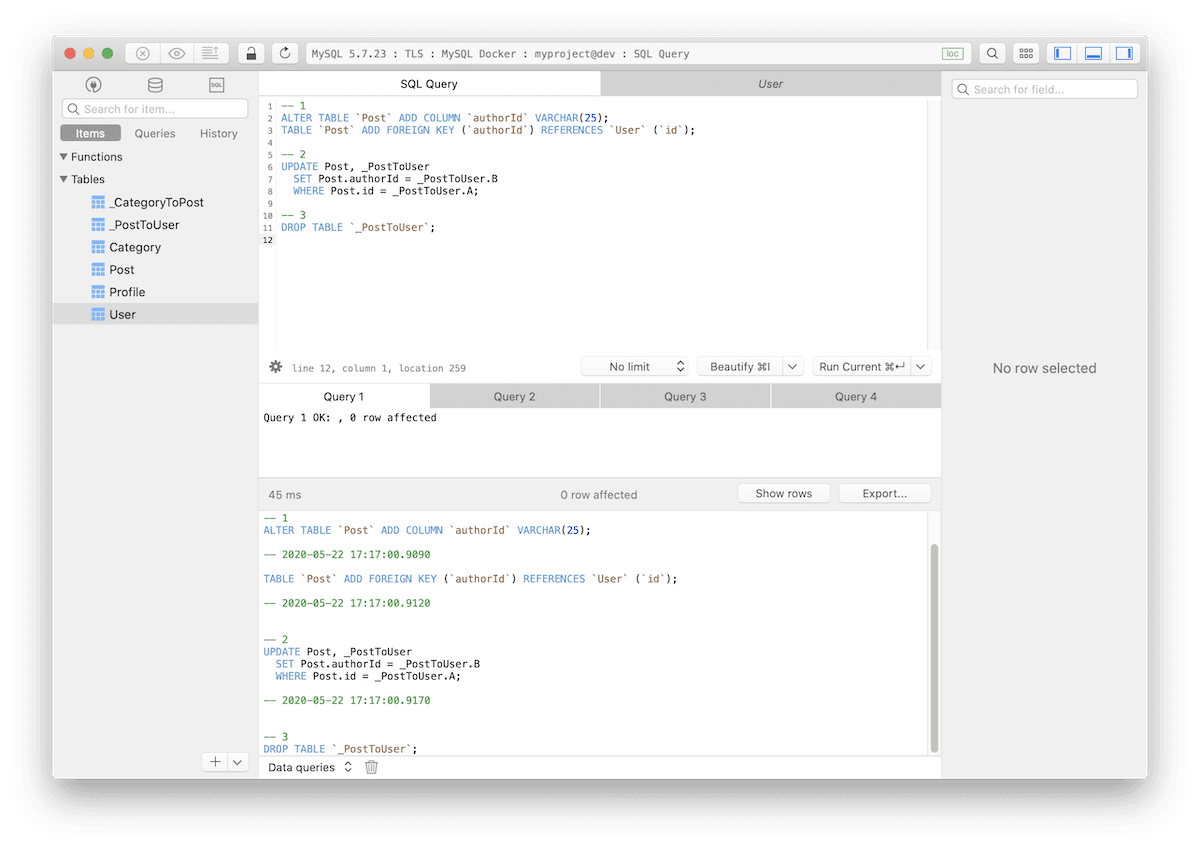
在这些命令之后,关系表的 B 列中的记录的用户 ID 值将迁移到新的 authorId 列。
¥After these commands, the user ID values of the records from column B of the relation table are migrated to the new authorId column.
5.2.重新检查你的数据库以更新你的 Prisma 架构
¥5.2. Re-introspect your database to update your Prisma schema
至此,你已经解决了升级 CLI 的架构不兼容性问题。你现在可以通过键入 n 并点击 RETURN 暂时退出升级 CLI。
¥At this point, you've resolved the schema incompatibilities with the Upgrade CLI. You can now exit the Upgrade CLI for now by typing n and hitting RETURN.
在本部分中,你将通过另一轮内省更新你的 Prisma 架构。这次,由于数据库架构进行了调整,Prisma 架构之前的缺陷将得到解决:
¥In this section, you'll update your Prisma schema with another introspection round. This time, the previous flaws of the Prisma schema will be resolved because the database schema has been adjusted:
npx prisma db pull
这次,生成的 Prisma 架构如下所示:
¥This time, the resulting Prisma schema looks as follows:
model User {
  id       String   @id
  name     String
  email    String?  @unique
  jsonData Json?
  role     Role     @default(CUSTOMER)
  Post     Post[]
  Profile  Profile?
}

model Post {
  id        String     @id
  createdAt DateTime   @default(now())
  updatedAt DateTime
  title     String
  content   String?
  published Boolean    @default(false)
  authorId  String?
  User      User?      @relation(fields: [authorId], references: [id])
  Category  Category[] @relation(references: [id])
}

model Category {
  id   String @id
  name String
  Post Post[] @relation(references: [id])
}

model Profile {
  bio  String?
  id   String  @id
  user String? @unique
  User User?   @relation(fields: [user], references: [id])
}

enum Role {
  ADMIN
  CUSTOMER
}
该架构解决了大部分问题,但仍缺少以下内容:
¥This schema has most issues resolved, but it still lacks the following:
5.2.将缺失的属性添加到 Prisma 2 架构并修复其他架构
¥5.2. Add missing attributes to the Prisma 2 schema and other schema fixes
CLI 现在打印以下内容:
¥The CLI now prints the following:
➤ What happens next
As a last step, some final adjustments will be made to your Prisma ORM 2 schema
to carry over some Prisma ORM-level attributes that aren't picked up by introspection.

As a last step, some final adjustments will be made to your Prisma ORM 2.0
schema to carry over some Prisma ORM-level attributes that aren't picked
up by introspection.

Warning
Your current Prisma ORM 2.0 schema will be overwritten, so please
make sure you have a backup!

Are you ready? [Y/n]
此时,你要么运行 CLI 打印的所有 SQL 语句,要么跳过其中的一些语句。无论哪种方式,你现在都可以继续最后一步,让升级 CLI 添加缺少的 Prisma ORM 2 属性。通常这些是以下内容:
¥At this point, you either ran all the SQL statement that were printed by the CLI or you skipped some of them. Either way, you can now move on the last step and let the Upgrade CLI add the missing Prisma ORM 2 attributes. Typically these are the following:
-
@default(cuid())代表你的@id字段¥
@default(cuid())for your@idfields -
@updatedAt表示在 Prisma 1 中使用此属性的任何字段¥
@updatedAtfor any fields that were using this attribute in Prisma 1 -
@map和@@map作为 Prisma 1 中@db和@@db的替代品¥
@mapand@@mapas replacements for@dband@@dbfrom Prisma 1
在此步骤中,升级 CLI 还修复了过渡到 Prisma ORM 2 过程中出现的其他问题:
¥In that step, the Upgrade CLI also fixes other issues that occurred in the transition to Prisma ORM 2:
-
它确保 Prisma 1 双方所需的 1-1 关系在 Prisma ORM 2 模式中也需要
¥it makes sure that 1-1-relations that were required on both sides in Prisma 1 are also required in your Prisma ORM 2 schema
-
它将关系字段重命名为它们在 Prisma 1 数据模型中的相同名称 (即将推出)
¥it renames relation fields to the same names they had in your Prisma 1 datamodel (coming soon)
要应用这些更改,你可以重新运行升级 CLI:
¥To apply these changes, you can re-run the Upgrade CLI:
npx prisma-upgrade prisma1/prisma.yml prisma/schema.prisma
如果你没有解决所有架构不兼容问题,升级 CLI 现在会打印剩余的 SQL 语句(以及用于迁移 ID 的语句)。此时你可以忽略它们,并通过连续键入 Y 并在出现提示时点击 RETURN 继续执行最后一步。
¥If you did not resolve all schema incompatibilities, the Upgrade CLI now prints the remaining SQL statements (as well as the ones for migrating IDs). You can just ignore them at this point and continue to the last step by continuously typing Y and hitting RETURN when prompted.
如果你确实解决了所有架构不兼容问题,则不会打印任何 SQL 语句,升级 CLI 仅输出以下内容:
¥If you did resolve all schema incompatibilities, no SQL statements will be printed and the Upgrade CLI only outputs the following:
$ npx prisma-upgrade prisma1/prisma.yml prisma/schema.prisma

➤ Next Steps

After you executed one or more of the previous SQL statements against your database,
please run the following two commands to refresh your Prisma ORM 2 schema and check
the changes.

  1. Run `npx prisma db pull` again to refresh your Prisma ORM 2 schema.
  2. Run `npx prisma-upgrade` again.

If you can't or don't want to execute the remaining SQL statements right now, you can
skip to the last step where the Upgrade CLI adds missing attributes to your Prisma ORM 2
schema that are not picked up by introspection.

Skip to the last step? [Y/n]?
再一次输入 Y 并点击 RETURN 进行确认。
¥One more time, type Y and hit RETURN to confirm.
升级 CLI 的最后提示现在要求你确认将对你的 Prisma 架构进行的上述更改:
¥The final prompt of the Upgrade CLI now asks you to confirm the above mentioned changes it will make to your Prisma schema:
➤ What happens next
As a last step, some final adjustments will be made to your Prisma ORM 2 schema
to carry over some Prisma ORM-level attributes that aren't picked up by introspection.

As a last step, some final adjustments will be made to your Prisma ORM 2.0
schema to carry over some Prisma ORM-level attributes that aren't picked
up by introspection.

Warning
Your current Prisma ORM 2.0 schema will be overwritten, so please
make sure you have a backup!

Are you ready? [Y/n]
最后一次,输入 Y 并点击 RETURN 进行确认。
¥One last time, type Y and hit RETURN to confirm.
这是升级 CLI 的最终输出:
¥This is the final output of the Upgrade CLI:
Updating prisma/schema.prisma...
Done updating prisma/schema.prisma!

✔ Congratulations, you're all set!

➤ Note
If you didn't execute all generated SQL commands against your database,
you can re-run the Upgrade CLI at any time.

Note that the Upgrade CLI doesn't resolve all of the schema incompatibilities
between Prisma 1 and Prisma ORM 2. If you want to resolve the remaining ones,
you can do so manually by following this guide:
https://pris.ly/d/upgrading-the-prisma-layer

➤ Next steps
Otherwise you can continue your upgrade process by installing Prisma Client 2:
npm install @prisma/client

You can find guides for different upgrade scenarios in the docs:
https://pris.ly/d/upgrade-from-prisma-1
5.3.最后结果
¥5.3. Final result
Prisma 架构的最终版本应如下所示:
¥The final version of the Prisma schema should look as follows:
model User {
  id       String   @id @default(cuid())
  name     String
  email    String?  @unique
  jsonData Json?
  role     Role     @default(CUSTOMER)
  Post     Post[]
  Profile  Profile?
}

model Post {
  id        String     @id @default(cuid())
  createdAt DateTime   @default(now())
  updatedAt DateTime   @updatedAt
  title     String
  content   String?
  published Boolean    @default(false)
  authorId  String?
  User      User?      @relation(fields: [authorId], references: [id])
  Category  Category[] @relation(references: [id])
}

model Profile {
  id   String  @id @default(cuid())
  bio  String?
  user String? @unique
  User User?   @relation(fields: [user], references: [id])
}

model Category {
  id   String @id @default(cuid())
  name String
  Post Post[] @relation(references: [id])
}

enum Role {
  ADMIN
  CUSTOMER
}
5.4.重命名关系字段
¥5.4. Rename relation fields
你会注意到此版本的 Prisma ORM 2 模式的一件事是所有 关系字段 均以其各自的模型命名,例如:
¥One thing you'll notice with this version of the Prisma ORM 2 schema is that all relation fields are named after their respective models, e.g:
model User {
  Post    Post[]
  Profile Profile?
}

model Post {
  User     User?      @relation(fields: [authorId], references: [id])
  Category Category[] @relation(references: [id])
}

model Profile {
  User User? @relation(fields: [user], references: [id])
}

model Category {
  Post Post[] @relation(references: [id])
}
这并不理想,实际上你可以手动将它们全部重命名为以前的版本!
¥This is not ideal and you can in fact manually rename all of them to their previous versions!
因为所有关系字段都是虚拟的,这意味着它们不会出现在数据库中,所以你可以随意命名它们。在这种情况下,所有关系字段都是小写的,有时是复数的。
¥Because all relation fields are virtual, meaning they don't manifest in the database, you can name them whatever you like. In this case, all relation fields are lowercased and sometimes pluralized.
重命名后它们的样子如下:
¥Here's what they look like after the rename:
model User {
  posts   Post[]
  profile Profile?
}

model Post {
  author     User?      @relation(fields: [authorId], references: [id])
  categories Category[] @relation(references: [id])
}

model Profile {
  user  String? @unique
  owner User?   @relation(fields: [user], references: [id])
}

model Category {
  posts Post[] @relation(references: [id])
}
注意:对于
User和Profile之间的 1-1 关系,无法为关系字段设置旧名称user。这是因为与保存外键的现有 关系标量 字段存在命名冲突。在这种情况下,你可以选择不同的名称,或者通过 SQL 直接在数据库中重命名外键列。¥Note: For the 1-1-relation between
UserandProfileit was not possible to set the old nameuserfor the relation field. This is because there'd be a naming conflict with the already existing relation scalar field that holds the foreign key. In that case, you can choose a different name or alternatively rename the foreign key column directly in the database via SQL.
5.5.解决剩余的架构不兼容问题
¥5.5. Resolving remaining schema incompatibilities
升级 CLI 尚未解决一些架构不兼容问题。此时你还没有修复 标量列表。你可以在 架构不兼容 页面上找到针对此问题和其他问题的建议解决方法。
¥There are a few schema incompatibilities that were not yet resolved by the Upgrade CLI. At this point you still haven't fixed scalar lists. You can find the recommended workarounds for this and others on the Schema incompatibilities page.
6. 安装并生成 Prisma 客户端
¥ Install and generate Prisma Client
现在你已准备好 Prisma ORM 2 架构,你可以使用以下命令安装 Prisma 客户端:
¥Now that you have your Prisma ORM 2 schema ready, you can install Prisma Client with the following command:
npm install @prisma/client
7. 下一步
¥ Next steps
恭喜,你现已将 Prisma ORM 层升级到 Prisma ORM 2!从这里开始,你可以使用以下指南之一继续更新你的应用代码:
¥Congratulations, you have now upgraded your Prisma ORM layer to Prisma ORM 2! From here on, you can move on to update your application code using one of the following guides:
-
从旧到新的 Nexus:如果你当前正在使用 GraphQL Nexus 运行 Prisma 1,请选择本指南。
¥Old to new Nexus: Choose this guide if you're currently running Prisma 1 with GraphQL Nexus.
-
prisma 绑定到 Nexus:如果你当前正在运行带有
prisma-binding的 Prisma 1 并且想要升级到 关系(和 TypeScript),请选择本指南。¥prisma-binding to Nexus: Choose this guide if you're currently running Prisma 1 with
prisma-bindingand want to upgrade to Nexus (and TypeScript). -
prisma 绑定到 SDL 优先:如果你当前正在运行带有
prisma-binding的 Prisma 1 并且想要升级到 SDL 优先 GraphQL 服务器,请选择本指南。¥prisma-binding to SDL-first: Choose this guide if you're currently running Prisma 1 with
prisma-bindingand want to upgrade to an SDL-first GraphQL server. -
剩余 API:如果你当前正在使用 Prisma Client 1 运行 Prisma 1 并正在构建 REST API,请选择本指南。
¥REST API: Choose this guide if you're currently running Prisma 1 using Prisma Client 1 and are building a REST API.
奖金:Prisma 客户端 API 比较
¥Bonus: Prisma Client API comparison
本节包含 Prisma 1 和 Prisma ORM 2 的 Prisma 客户端 API 的高级并排比较。有关新 Prisma 客户端 API 的更多详细信息,你可以浏览 Prisma 客户端 文档。
¥This section contains a high-level and side-by-side comparison of the Prisma Client APIs of Prisma 1 and Prisma ORM 2. For more details about the new Prisma Client API, you can explore the Prisma Client docs.
读取单条记录
¥Reading single records
const user = await prisma.user({ id: 1 })
await prisma.user.findUnique({
  where: { id: 1 },
})
读取记录列表
¥Reading lists of records
const user = await prisma.users()
await prisma.user.findMany()
过滤列表
¥Filtering lists
const users = await prisma.users({
  where: {
    name: 'Alice',
  },
})
await prisma.user.findMany({
  where: {
    name: 'Alice',
  },
})
分页列表
¥Paginating lists
const posts = await prisma.posts({
  skip: 5,
  first: 10,
})
await prisma.user.findMany({
  skip: 5,
  take: 10,
})
注意:你可以在文档中相应的 发行说明 或 分页 页面中了解有关新分页 API 的更多信息。
¥Note: You can learn more about the new pagination API in the respective release notes or the Pagination page in the docs.
排序列表
¥Sorting lists
await prisma.posts({
  orderBy: 'title_ASC',
})
await prisma.posts({
  orderBy: {
    title: 'asc',
  },
})
创建记录
¥Creating records
await prisma.createUser({
  name: 'Alice',
})
await prisma.user.create({
  data: {
    name: 'Alice',
  },
})
更新记录
¥Updating records
await prisma.updateUser({
  where: { id: 1 },
  data: {
    name: 'James',
    email: 'james@prisma.io',
  },
})
await prisma.user.update({
  where: { id: 1 },
  data: {
    name: 'James',
    email: 'james@prisma.io',
  },
})
删除记录
¥Deleting records
await prisma.deleteUser({ id: 1 })
await prisma.user.delete({
  where: { id: 1 },
})
选择字段和加载关系
¥Selecting fields & loading relations
在 Prisma 1 中,选择对象的特定字段和/或加载关系的唯一方法是使用基于字符串的 $fragment 和 $graphql 函数。借助 Prisma ORM 2,现在可以使用 select 和 include 以干净且类型安全的方式完成此操作。
¥In Prisma 1, the only ways to select specific fields and/or load relations of an object was by using the string-based $fragment and $graphql functions. With Prisma ORM 2, this is now done in a clean and type-safe manner using select and include.
这种方法的另一个好处是你可以在任何 Prisma 客户端查询上使用 select 和 include,例如 findUnique()、findMany、create、update、delete、...
¥Another benefit of this approach is that you can use select and include on any Prisma Client query, e.g. findUnique(), findMany, create, update, delete, ...
await prisma.user({ id: 1 }).$fragment(`
  fragment NameAndEmail on User { id email }`
`)
await prisma.user.findUnique({
  where: { id: 1 },
  select: {
    id: true,
    email: true,
  },
})
例如,在 Prisma 1 中创建新记录并仅检索返回对象中的 id 是不可能的。使用 Prisma ORM 2,你可以按如下方式实现此目的:
¥As an example, creating a new record and only retrieving the id in the returned object was not possible in Prisma 1. With Prisma ORM 2 you can achieve this as follows:
await prisma.user.create({
  data: {
    name: 'Alice',
  },
  select: {
    id: true,
  },
})