prisma 绑定到 Nexus
概述
¥Overview
本指南并非完全最新,因为它当前使用 nexus-plugin-prisma 的 deprecated 版本。虽然这仍然有效,但建议今后使用新的 nexus-prisma 库或替代的代码优先 GraphQL 库(例如 绿萝)。如果你有任何疑问,请加入我们的 Discord。
¥This guide is not fully up-to-date as it currently uses the deprecated version of the nexus-plugin-prisma. While this is still functional, it is recommended to use the new nexus-prisma library or an alternative code-first GraphQL library like Pothos going forward. If you have any questions, join us on our Discord.
本升级指南介绍如何迁移基于 Prisma 1 并使用 prisma-binding 实现 GraphQL 服务器的 Node.js 项目。
¥This upgrade guide describes how to migrate a Node.js project that's based on Prisma 1 and uses prisma-binding to implement a GraphQL server.
代码将迁移到 @nexus/schema 和 nexus-plugin-prisma。与 prisma-binding 中使用的 SDL 优先方法相反,Nexus 遵循代码优先方法来构建 GraphQL 模式。你可以在本 article 中了解这两种方法的主要区别。如果你想继续使用 SDL 优先方法,可以按照 guide 从 prisma-binding 升级到 SDL 优先设置。
¥The code will be migrated to @nexus/schema and the nexus-plugin-prisma. As opposed to the SDL-first approach that's used with prisma-binding, Nexus follows a code-first approach to construct GraphQL schemas. You can learn about the main differences of these two approaches in this article. If you want to continue using the SDL-first approach, you can follow the guide to upgrade from prisma-binding to an SDL-first setup.
本指南还解释了如何从 JavaScript 迁移到 TypeScript,因此它基本上假设对现有应用进行完全重写。如果你想继续在 JavaScript 中运行应用,则可以忽略与 TypeScript 设置相关的说明,继续像以前一样使用 JavaScript。
¥This guide also explains how to migrate from JavaScript to TypeScript, it therefore basically assumes a full rewrite of your existing app. If you want to keep running your application in JavaScript, you can ignore the instructions that relate to the TypeScript setup keep using JavaScript as before.
本指南假定你已经完成了 Prisma ORM 层升级指南。这意味着你已经:
¥The guide assumes that you already went through the guide for upgrading the Prisma ORM layer. This means you already:
-
安装 Prisma ORM 2.0 CLI
¥installed the Prisma ORM 2.0 CLI
-
创建了你的 Prisma ORM 2.0 架构
¥created your Prisma ORM 2.0 schema
-
检查你的数据库并解决潜在的 模式不兼容
¥introspected your database and resolved potential schema incompatibilities
-
安装并生成 Prisma 客户端
¥installed and generated Prisma Client
该指南进一步假设你有一个与此类似的文件设置:
¥The guide further assumes that you have a file setup that looks similar to this:
.
├── README.md
├── package.json
├── prisma
│   └── schema.prisma
├── prisma1
│   ├── datamodel.prisma
│   └── prisma.yml
└── src
    ├── generated
    │   └── prisma.graphql
    ├── index.js
    └── schema.graphql
重要的部分是:
¥The important parts are:
-
使用 Prisma ORM 2.0 架构以
prisma调用的文件夹¥A folder called with
prismawith your Prisma ORM 2.0 schema -
名为
src的文件夹,其中包含你的应用代码和名为schema.graphql的架构¥A folder called
srcwith your application code and a schema calledschema.graphql
如果这不是你的项目结构,你需要调整指南中的说明以匹配你自己的设置。
¥If this is not what your project structure looks like, you'll need to adjust the instructions in the guide to match your own setup.
1. 安装和配置 Nexus
¥ Installing and configuring Nexus
1.1.安装 Nexus 依赖
¥1.1. Install Nexus dependencies
第一步是在项目中安装 Nexus 依赖:
¥The first step is to install the Nexus dependency in your project:
npm install @nexus/schema
接下来,安装 Nexus 的 Prisma ORM 插件,这将允许你在 GraphQL API 中公开 Prisma 模型:
¥Next, install the the Prisma ORM plugin for Nexus which will allow you to expose Prisma models in your GraphQL API:
npm install nexus-plugin-prisma
nexus-plugin-prisma 依赖打包了所有必需的 Prisma ORM 依赖。因此,你应该删除在升级应用的 Prisma ORM 层时安装的依赖:
¥The nexus-plugin-prisma dependency bundles all required Prisma ORM dependencies. You should therefore remove the dependencies that you installed when you upgraded the Prisma ORM layer of your app:
npm uninstall @prisma/cli @prisma/client
但请注意,你仍然可以使用熟悉的命令调用 Prisma ORM 2.0 CLI:
¥Note however that you can still invoke the Prisma ORM 2.0 CLI with the familiar command:
npx prisma
1.2.配置 TypeScript
¥1.2. Configure TypeScript
由于你将在本指南中使用 TypeScript,因此需要添加所需的依赖:
¥Since you'll be using TypeScript in this guide, you need to add the required dependencies:
npm install typescript ts-node-dev --save-dev
在项目的根目录中创建一个名为 tsconfig.json 的新文件:
¥Create a new file named tsconfig.json in the root directory of your project:
touch tsconfig.json
现在将以下内容添加到新文件中:
¥Now add the following contents to the new file:
{
  "compilerOptions": {
    "skipLibCheck": true,
    "strict": true,
    "rootDir": "src",
    "noEmit": true
  },
  "include": ["src/**/*"]
}
1.3.创建你的基本 Nexus 设置
¥1.3. Create your basic Nexus setup
在 src 目录中创建名为 index.ts 的 API 根源文件:
¥Create the root source file of your API called index.ts inside the src directory:
touch src/index.ts
请注意,对于本指南,你将在 index.ts 内编写整个应用。在实践中,你可能希望将 GraphQL 类型拆分到不同的文件中,如本 example 中所示。
¥Note that for this guide, you'll write the entire application inside of index.ts. In practice, you probably want to split your GraphQL types across different files as shown in this example.
对于一些基本设置,请将此代码添加到 index.ts:
¥For some basic setup, add this code to index.ts:
import { queryType, makeSchema } from '@nexus/schema'
import { nexusSchemaPrisma } from 'nexus-plugin-prisma/schema'
import { GraphQLServer } from 'graphql-yoga'
import { createContext } from './context'

const Query = queryType({
  definition(t) {
    t.string('hello', () => {
      return 'Hello Nexus!'
    })
  },
})

export const schema = makeSchema({
  types: [Query],
  plugins: [nexusSchemaPrisma({ experimentalCRUD: true })],
  outputs: {
    schema: __dirname + '/../schema.graphql',
    typegen: __dirname + '/generated/nexus.ts',
  },
  typegenAutoConfig: {
    contextType: 'Context.Context',
    sources: [
      {
        source: '@prisma/client',
        alias: 'prisma',
      },
      {
        source: require.resolve('./context'),
        alias: 'Context',
      },
    ],
  },
})

new GraphQLServer({ schema, context: createContext() }).start(() =>
  console.log(`Server ready at: http://localhost:4000`)
)
请注意,此设置已包含 Nexus 的 Prisma ORM 插件的配置。这将启用 t.model 和 t.crud 功能,你将在本指南的后面部分了解这些功能。
¥Note that this setup already contains the configuration of the Prisma ORM plugin for Nexus. This will enable the t.model and t.crud functionality that you'll get to know later in this guide.
在 typegenAutoConfig 设置中,你将提供其他类型,帮助你的编辑器在开发应用时提供自动补齐功能。现在它引用了一个名为 context.ts 的文件,你的项目中还没有该文件。该文件将包含通过 GraphQL 解析器链传递的 context 对象的类型。
¥In the typegenAutoConfig setting, you're providing additional types that help your editor to provide your autocompletion as you develop your app. Right now it references a file named context.ts that you don't have in your project yet. This file will contain the type of your context object that's passed through your GraphQL resolver chain.
在 src 目录中创建新的 context.ts 文件:
¥Create the new context.ts file inside the src directory:
touch src/context.ts
现在添加以下代码:
¥Now add the following code to it:
import { PrismaClient } from '@prisma/client'

const prisma = new PrismaClient()

export interface Context {
  prisma: PrismaClient
}

export function createContext(): Context {
  return { prisma }
}
接下来,调整 package.json 内的 scripts 部分以包含以下命令:
¥Next, adjust the scripts section inside your package.json to include the following commands:
{
  "scripts": {
    "start": "node dist/server",
    "clean": "rm -rf dist",
    "build": "npm -s run clean && npm -s run generate && tsc",
    "generate": "npm -s run generate:prisma && npm -s run generate:nexus",
    "generate:prisma": "prisma generate",
    "generate:nexus": "ts-node --transpile-only src/schema",
    "dev": "ts-node-dev --no-notify --respawn --transpile-only src"
  }
}
dev 脚本启动一个开发服务器,在开发应用时你应该始终在后台运行该服务器。这很重要,因为 Nexus 在后台执行代码生成。
¥The dev script starts a development server that you always should have running in the background when developing your app. This is important because of the code generation Nexus performs in the background.
你可以使用以下命令启动开发服务器:
¥You can start the development server using the following command:
npm run dev
你应该看到以下 CLI 输出:
¥You should see the following CLI output:
Server ready at: http://localhost:4000
你的 GraphQL 服务器现在运行在 http://localhost:4000。到目前为止,它实现了一个 GraphQL 查询,你可以按如下方式发送该查询:
¥Your GraphQL server is now running at http://localhost:4000. So far it implements a single GraphQL query that you can send as follows:
{
  hello
}
在以下步骤中,我们将说明如何将使用 prisma-binding 实现的现有 SDL 优先 GraphQL 架构迁移到使用 Nexus 的等效设置。
¥In the following steps, we'll explain how you can migrate your existing SDL-first GraphQL schema that's implemented with prisma-binding to an equivalent setup using Nexus.
2. 创建你的 GraphQL 类型
¥ Create your GraphQL types
升级过程的下一步是创建 GraphQL 类型。在这种情况下,你的 GraphQL 类型将镜像 Prisma 模型(你的 prisma-binding 设置中也可能出现这种情况)。如果 GraphQL 类型偏离 Prisma 模型,你将能够使用 Nexus API 轻松相应地调整公开的 GraphQL 类型。
¥The next step of the upgrade process is to create your GraphQL types. In this case, your GraphQL types will mirror the Prisma models (as it likely was the case in your prisma-binding setup as well). If a GraphQL type deviates from a Prisma model, you'll be able to easily adjust the exposed GraphQL type accordingly using the Nexus API.
出于本指南的目的,你将把所有代码保存在一个文件中。但是,你可以根据个人喜好和 import 相应地构建文件。
¥For the purpose of this guide, you'll keep all the code in a single file. However, you can structure the files to your personal preference and import accordingly.
在 Nexus 中,GraphQL 类型是通过 objectType 函数定义的。导入 objectType,然后从第一个 GraphQL 类型的骨架开始。在本例中,我们首先将 Prisma 架构的 User 模型映射到 GraphQL:
¥In Nexus, GraphQL types are defined via the objectType function. Import objectType and then start with the skeleton for your first GraphQL type. In this case, we're starting by mapping Prisma schema's User model to GraphQL:
import { objectType } from 'nexus'

const User = objectType({
  name: 'User',
  definition(t) {
    // the fields of the type will be defined here
  },
})
有了此代码,你就可以开始一一公开 User 模型的字段。你可以使用编辑器的自动补齐功能来节省一些输入时间。在 definition 函数体内,键入 t.model.,然后按 CTRL+SPACE。这将启动自动补齐并建议 User 模型上定义的所有字段:
¥With this code in place, you can start exposing the fields of the User model one by one. You can use your editor's autocompletion to save some typing. Inside the body of the definition function, type t.model. and then hit CTRL+SPACE. This will bring up the autocompletion and suggest all fields that are defined on the User model:
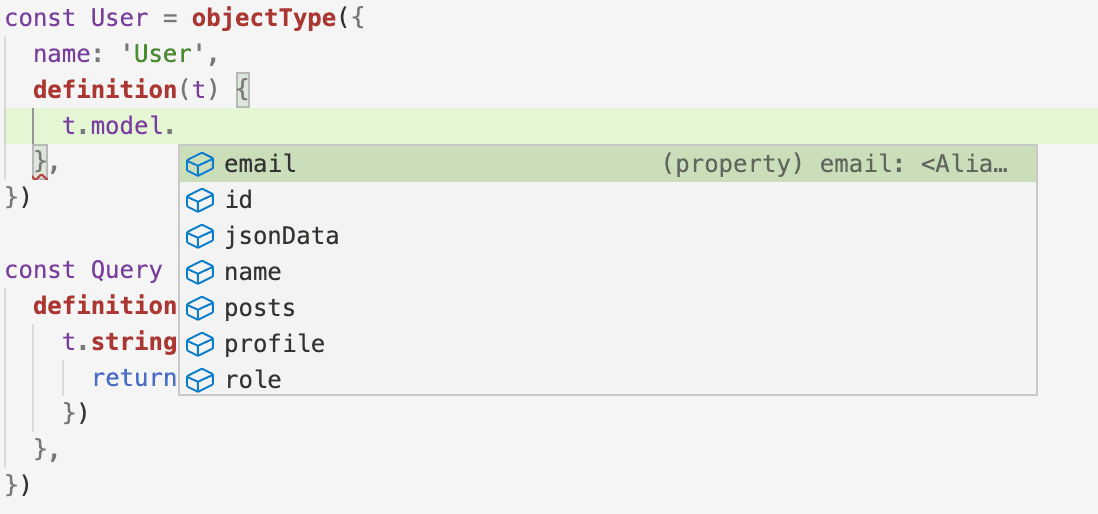
请注意,t 上的 model 属性由 nexus-plugin-prisma 提供。它利用 Prisma 架构中的类型信息,并允许你通过 GraphQL 公开 Prisma 模型。
¥Note that the model property on t is provided by the nexus-plugin-prisma. It leverages the type information from your Prisma schema and lets you expose your Prisma models via GraphQL.
通过这种方式,你可以开始完成对象类型定义,直到公开模型的所有字段:
¥In that manner, you can start completing your object type definition until you exposed all the fields of the model:
const User = objectType({
  name: 'User',
  definition(t) {
    t.model.id()
    t.model.email()
    t.model.name()
    t.model.jsonData()
    t.model.role()
    t.model.profile()
    t.model.posts()
  },
})
此时,任何关系字段都可能会给你带来 TypeScript 错误(在本例中,即 profile 和 posts,它们都指向其他对象类型)。这是预期的,在你添加其余类型后,这些错误将自动解决。
¥At this point, any relation fields might give you TypeScript errors (in this case, that would be profile and posts which both point to other object types). That's expected, these errors will resolve automatically after you've added the remaining types.
注意:确保你使用
npm run dev启动的 Nexus 开发服务器始终运行。它会不断更新生成的 Nexus 类型,以便在你保存文件时在后台启用自动补齐功能。¥Note: Be sure to have your Nexus development server that you started with
npm run devrunning all the time. It constantly updates the generated Nexus types that enable the autocompletion in the background as you save a file.
请注意,t.model.posts 关系公开了 Post 对象的列表。默认情况下,Nexus 仅公开该列表的分页属性 - 如果你还想为该关系添加排序和过滤,则需要显式启用这些属性:
¥Note that the t.model.posts relation exposes a list of Post objects. By default, Nexus exposes only pagination properties for that list – if you want to add ordering and filtering for that relation as well, you'll need to explicitly enable those:
const User = objectType({
  name: 'User',
  definition(t) {
    t.model.id()
    t.model.email()
    t.model.name()
    t.model.jsonData()
    t.model.role()
    t.model.profile()
    t.model.posts({
      filtering: true,
      ordering: true,
    })
  },
})
使用 objectType 函数定义类型后,你还需要手动将其添加到你使用 Nexus 构建的 GraphQL 架构中。你可以通过将其添加到 types 来完成此操作,types 作为 makeSchema 函数的选项提供:
¥After defining a type using the objectType function, you also need to manually add it to your GraphQL schema that you're building with Nexus. You can do it by adding it to the types which are provided as an option to the makeSchema function:
export const schema = makeSchema({
  types: [Query, User],
  plugins: [nexusSchemaPrisma()],
  outputs: {
    schema: __dirname + '/../schema.graphql',
    typegen: __dirname + '/generated/nexus.ts',
  },
  typegenAutoConfig: {
    sources: [
      {
        source: '@prisma/client',
        alias: 'prisma',
      },
    ],
  },
})
完成第一种类型后,你可以开始定义其余的类型。
¥Once you're done with the first type, you can start defining the remaining ones.
Expand to view the full version of the sample data model
要使用 Nexus 公开所有示例 Prisma 模型,需要以下代码:
¥To expose all sample Prisma models with Nexus, the following code is needed:
const User = objectType({
  name: 'User',
  definition(t) {
    t.model.id()
    t.model.email()
    t.model.name()
    t.model.jsonData()
    t.model.role()
    t.model.profile()
    t.model.posts({
      filtering: true,
      ordering: true,
    })
  },
})

const Post = objectType({
  name: 'Post',
  definition(t) {
    t.model.id()
    t.model.createdAt()
    t.model.updatedAt()
    t.model.title()
    t.model.content()
    t.model.published()
    t.model.author()
    t.model.authorId()
    t.model.categories({
      filtering: true,
      ordering: true,
    })
  },
})

const Profile = objectType({
  name: 'Profile',
  definition(t) {
    t.model.id()
    t.model.bio()
    t.model.userId()
    t.model.user()
  },
})

const Category = objectType({
  name: 'Category',
  definition(t) {
    t.model.id()
    t.model.name()
    t.model.posts({
      filtering: true,
      ordering: true,
    })
  },
})
确保在提供给 makeSchema 的 types 选项中包含所有新定义的类型:
¥Be sure to include all newly defined types in the types option that's provided to makeSchema:
export const schema = makeSchema({
  types: [Query, User, Post, Profile, Category],
  plugins: [nexusSchemaPrisma()],
  outputs: {
    schema: __dirname + '/../schema.graphql',
    typegen: __dirname + '/generated/nexus.ts',
  },
  typegenAutoConfig: {
    sources: [
      {
        source: '@prisma/client',
        alias: 'prisma',
      },
    ],
  },
})
你可以在 ./schema.graphql 中生成的 GraphQL 架构文件中查看 SDL 中 GraphQL 架构的当前版本。
¥You can view the current version of your GraphQL schema in SDL in the generated GraphQL schema file in ./schema.graphql.
3. 迁移 GraphQL 操作
¥ Migrate GraphQL operations
下一步,你可以开始将所有 GraphQL 查询和突变从 "previous" GraphQL API 迁移到使用 Nexus 构建的新 API。
¥As a next step, you can start migrating all the GraphQL queries and mutations from the "previous" GraphQL API to the new one that's built with Nexus.
对于本指南,将使用以下示例 GraphQL 架构:
¥For this guide, the following sample GraphQL schema will be used:
# import Post from './generated/prisma.graphql'
# import User from './generated/prisma.graphql'
# import Category from './generated/prisma.graphql'

input UserUniqueInput {
  id: String
  email: String
}

type Query {
  posts(searchString: String): [Post!]!
  user(userUniqueInput: UserUniqueInput!): User
  users(where: UserWhereInput, orderBy: Enumerable<UserOrderByInput>, skip: Int, after: String, before: String, first: Int, last: Int): [User]!
}

type Mutation {
  createUser(data: UserCreateInput!): User!
  createDraft(title: String!, content: String, authorId: ID!): Post
  updateBio(userUniqueInput: UserUniqueInput!, bio: String!): User
  addPostToCategories(postId: String!, categoryIds: [String!]!): Post
}
3.1.迁移 GraphQL 查询
¥3.1. Migrate GraphQL queries
在本部分中,你将把所有 GraphQL 查询从 prisma-binding 迁移到 Nexus。
¥In this section, you'll migrate all GraphQL queries from prisma-binding to Nexus.
3.1.1.迁移 users 查询(使用 forwardTo)
¥3.1.1. Migrate the users query (which uses forwardTo)
在我们的示例 API 中,示例 GraphQL 架构中的 users 查询的定义和实现如下。
¥In our sample API, the users query from the sample GraphQL schema is defined and implemented as follows.
使用 prisma-binding 的 SDL 架构定义
¥SDL schema definition with prisma-binding
type Query {
  users(where: UserWhereInput, orderBy: Enumerable<UserOrderByInput>, skip: Int, after: String, before: String, first: Int, last: Int): [User]!
  # ... other queries
}
使用 prisma-binding 实现解析器
¥Resolver implementation with prisma-binding
const resolvers = {
  Query: {
    users: forwardTo('prisma'),
    // ... other resolvers
  },
}
要在 Nexus 上镜像相同的行为,你可以在 definition 函数内的 t 变量上使用 crud 属性。
¥To mirror the same behaviour with Nexus, you can use the crud property on the t variable inside the definition function.
与 model 类似,此属性可用,因为你使用的是 nexus-prisma-plugin,它利用 Prisma 模型中的类型信息并在后台自动生成解析器。crud 属性还支持自动补齐,因此你可以再次在编辑器中探索所有可用的查询:
¥Similar to model, this property is available because you're using the nexus-prisma-plugin which leverages type information from your Prisma models and auto-generates resolvers under the hood. The crud property also supports autocompletion, so you can explore all available queries in your editor again:
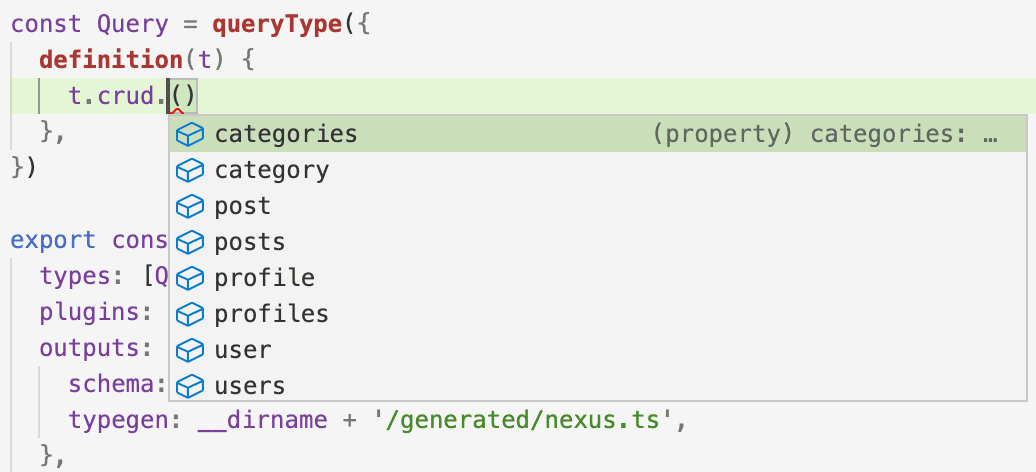
使用 nexus-prisma-plugin 转发查询
¥Forwarding the query with the nexus-prisma-plugin
要将 users 查询添加到 GraphQL API,请将以下行添加到查询类型定义中:
¥To add the users query to your GraphQL API, add the following lines to the query type definition:
const Query = queryType({
  definition(t) {
    t.crud.users({
      filtering: true,
      ordering: true,
    })
  },
})
如果你正在运行 Nexus 开发服务器,则可以保存该文件,并且你的 GraphQL API 将更新以公开新的 users 查询。你还可以通过查看生成的 schema.graphql 文件中的 Query 类型来观察这一点:
¥If you have the Nexus development server running, you can save the file and your GraphQL API will be updated to expose the new users query. You can also observe this by looking at the Query type inside the generated schema.graphql file:
type Query {
  users(after: UserWhereUniqueInput, before: UserWhereUniqueInput, first: Int, last: Int, orderBy: Enumerable<UserOrderByInput>, skip: Int, where: UserWhereInput): [User!]!
}
你现在可以针对新 API 编写第一个查询,例如:
¥You can now write your first query against the new API, e.g.:
{
  users {
    id
    name
    profile {
      id
      bio
    }
    posts {
      id
      title
      categories {
        id
        name
      }
    }
  }
}
如果你的应用使用 forwardTo 从 Prisma ORM 公开所有 CRUD 操作,你现在可以通过 t.crud 使用相同的方法继续添加所有剩余操作。要了解如何使用 Nexus 定义和解决 "custom" 查询,请继续阅读下一部分。
¥If your application exposes all CRUD operations from Prisma ORM using forwardTo, you can now continue adding all remaining ones using the same approach via t.crud. To learn how "custom" queries can be defined and resolved using Nexus, move on to the next sections.
3.1.2.迁移 posts(searchString: String): [Post!]! 查询
¥3.1.2. Migrate the posts(searchString: String): [Post!]! query
posts 查询的定义和实现如下。
¥The posts query is defined and implemented as follows.
使用 prisma-binding 的 SDL 架构定义
¥SDL schema definition with prisma-binding
type Query {
  posts(searchString: String): [Post!]!
  # ... other queries
}
使用 prisma-binding 实现解析器
¥Resolver implementation with prisma-binding
const resolvers = {
  Query: {
    posts: (_, args, context, info) => {
      return context.prisma.query.posts(
        {
          where: {
            OR: [
              { title_contains: args.searchString },
              { content_contains: args.searchString },
            ],
          },
        },
        info
      )
    },
    // ... other resolvers
  },
}
使用 nexus 的代码优先架构定义
¥Code-first schema definition with nexus
要在 Nexus 中获得相同的行为,你需要将 t.field 定义添加到 queryType:
¥To get the same behavior with Nexus, you'll need to add a t.field definition to the queryType:
const Query = queryType({
  definition(t) {
    // ... previous queries

    t.list.field('posts', {
      type: 'Post',
      nullable: false,
      args: { searchString: stringArg() },
    })
  },
})
尽管此代码可能会在编辑器中给你带来类型错误,但你已经可以在 schema.graphql 中查看生成的 GraphQL 模式的 SDL 版本。你会注意到这已经向你的 GraphQL 模式添加了正确的定义:
¥Although this code gives probably gives you a type error in your editor, you can already look at the generated SDL version of your GraphQL schema inside schema.graphql. You'll notice that this has added the correct definition to your GraphQL schema already:
type Query {
  posts(searchString: String): [Post!]!
  users(after: UserWhereUniqueInput, before: UserWhereUniqueInput, first: Int, last: Int, orderBy: Enumerable<UserOrderByInput>, skip: Int, where: UserWhereInput): [User!]!
}
但是,代码缺少实际的解析器逻辑。这就是你接下来要添加的内容。
¥However, the code is missing the actual resolver logic. This is what you're going to add next.
使用 nexus 实现解析器
¥Resolver implementation with nexus
你可以使用 Nexus 添加解析器,如下所示:
¥You can add the resolver with Nexus as follows:
const Query = queryType({
  definition(t) {
    // ... previous queries

    t.list.field('posts', {
      type: 'Post',
      nullable: false,
      args: { searchString: stringArg() },
      resolve: (_, args, context) => {
        return context.prisma.post.findMany({
          where: {
            OR: [
              {
                title: { contains: args.searchString },
              },
              {
                content: { contains: args.searchString },
              },
            ],
          },
        })
      },
    })
  },
})
为了验证实现,你现在可以 将以下示例查询发送到你的 GraphQL 服务器:
¥To validate the implementation, you can now e.g. send the following example query to your GraphQL server:
{
  posts {
    id
    title
    author {
      id
      name
    }
  }
}
3.1.2.迁移 user(uniqueInput: UserUniqueInput): User 查询
¥3.1.2. Migrate the user(uniqueInput: UserUniqueInput): User query
在我们的示例应用中,user 查询的定义和实现如下。
¥In our sample app, the user query is defined and implemented as follows.
使用 prisma-binding 的 SDL 架构定义
¥SDL schema definition with prisma-binding
type Query {
  user(userUniqueInput: UserUniqueInput): User
  # ... other queries
}

input UserUniqueInput {
  id: String
  email: String
}
请注意,这是一个有点人为的示例,旨在演示 input 类型与 Nexus 的用法。
¥Note that this is a bit of a contrived example to demonstrate the usage of input types with Nexus.
使用 prisma-binding 实现解析器
¥Resolver implementation with prisma-binding
const resolvers = {
  Query: {
    user: (_, args, context, info) => {
      return context.prisma.query.user(
        {
          where: args.userUniqueInput,
        },
        info
      )
    },
    // ... other resolvers
  },
}
使用 nexus 的代码优先架构定义
¥Code-first schema definition with nexus
要在 Nexus 中获得相同的行为,你需要将 t.field 定义添加到 queryType 并定义一个 inputObjectType,其中包含 User 模型的两个 @unique 字段:
¥To get the same behavior with Nexus, you'll need to add a t.field definition to the queryType and define an inputObjectType that includes the two @unique fields of your User model:
import { inputObjectType, arg } from '@nexus/schema'

const UserUniqueInput = inputObjectType({
  name: 'UserUniqueInput',
  definition(t) {
    t.string('id')
    t.string('email')
  },
})

const Query = queryType({
  definition(t) {
    // ... previous queries

    t.field('user', {
      type: 'User',
      args: {
        userUniqueInput: arg({
          type: 'UserUniqueInput',
          nullable: false,
        }),
      },
    })
  },
})
由于 UserUniqueInput 是 GraphQL 架构中的新类型,因此你再次需要将其添加到传递给 makeSchema 的 types 选项中:
¥Since UserUniqueInput is a new type in your GraphQL schema, you again need to add it to the types option that's passed to makeSchema:
export const schema = makeSchema({
  types: [Query, User, Post, Profile, Category, UserUniqueInput],
  plugins: [nexusSchemaPrisma()],
  outputs: {
    schema: __dirname + '/../schema.graphql',
    typegen: __dirname + '/generated/nexus.ts',
  },
  typegenAutoConfig: {
    sources: [
      {
        source: '@prisma/client',
        alias: 'prisma',
      },
    ],
  },
})
如果你查看 schema.graphql 内生成的 GraphQL 模式的 SDL 版本,你会注意到此更改已向你的 GraphQL 模式添加了正确的定义:
¥If you look at the generated SDL version of your GraphQL schema inside schema.graphql, you'll notice that this change already added the correct definition to your GraphQL schema:
type Query {
  posts(searchString: String): [Post!]
  user(userUniqueInput: UserUniqueInput!): User
  users(after: UserWhereUniqueInput, before: UserWhereUniqueInput, first: Int, last: Int, orderBy: Enumerable<UserOrderByInput>, skip: Int, where: UserWhereInput): [User!]!
}

input UserUniqueInput {
  email: String
  id: String
}
你甚至可以通过 GraphQL Playground 发送相应的查询:
¥You can even send the respective query via the GraphQL Playground already:
{
  user(userUniqueInput: { email: "alice@prisma.io" }) {
    id
    name
  }
}
但是,由于解析器尚未实现,你将无法返回任何数据。
¥However, because the resolver is not yet implemented you will not get any data back yet.
使用 nexus 实现代码优先解析器
¥Code-first resolver implementation with nexus
那是因为你仍然缺少该查询的解析器实现。你可以使用 Nexus 添加解析器,如下所示:
¥That's because you're still missing the resolver implementation for that query. You can add the resolver with Nexus as follows:
const UserUniqueInput = inputObjectType({
  name: 'UserUniqueInput',
  definition(t) {
    t.string('id')
    t.string('email')
  },
})

const Query = queryType({
  definition(t) {
    // ... previous queries

    t.field('user', {
      type: 'User',
      nullable: true,
      args: {
        userUniqueInput: arg({
          type: 'UserUniqueInput',
          nullable: false,
        }),
      },
      resolve: (_, args, context) => {
        return context.prisma.user.findUnique({
          where: {
            id: args.userUniqueInput?.id,
            email: args.userUniqueInput?.email,
          },
        })
      },
    })
  },
})
如果你重新发送之前的相同查询,你会发现它现在返回实际数据。
¥If you're re-sending the same query from before, you'll find that it now returns actual data.
3.2.迁移 GraphQL 突变
¥3.2. Migrate GraphQL mutations
在本部分中,你会将 GraphQL 突变从示例架构迁移到 Nexus。
¥In this section, you'll migrate the GraphQL mutations from the sample schema to the Nexus.
3.2.1.定义 Mutation 类型
¥3.2.1. Define the Mutation type
迁移任何突变的第一步是定义 GraphQL API 的 Mutation 类型。完成后,你可以逐渐向其添加操作。将以下定义添加到 index.ts:
¥The first step to migrate any mutations is to define the Mutation type of your GraphQL API. Once that's done, you can gradually add operations to it. Add the following definition to index.ts:
import { mutationType } from '@nexus/schema'

const Mutation = mutationType({
  definition(t) {
    // your GraphQL mutations + resolvers will be defined here
  },
})
为了确保新的 Mutation 类型被 Nexus 选择,你需要将其添加到提供给 makeSchema 的 types 中:
¥In order to make sure that the new Mutation type is picked by up Nexus, you need to add it to the types that are provided to makeSchema:
export const schema = makeSchema({
  types: [Query, User, Post, Profile, Category, UserUniqueInput, Mutation],
  plugins: [nexusSchemaPrisma()],
  outputs: {
    schema: __dirname + '/../schema.graphql',
    typegen: __dirname + '/generated/nexus.ts',
  },
  typegenAutoConfig: {
    sources: [
      {
        source: '@prisma/client',
        alias: 'prisma',
      },
    ],
  },
})
3.2.2.迁移 createUser 突变(使用 forwardTo)
¥3.2.2. Migrate the createUser mutation (which uses forwardTo)
在示例应用中,示例 GraphQL 架构中的 createUser 突变的定义和实现如下。
¥In the sample app, the createUser mutation from the sample GraphQL schema is defined and implemented as follows.
使用 prisma-binding 的 SDL 架构定义
¥SDL schema definition with prisma-binding
type Mutation {
  createUser(data: UserCreateInput!): User!
  # ... other mutations
}
使用 prisma-binding 实现解析器
¥Resolver implementation with prisma-binding
const resolvers = {
  Mutation: {
    createUser: forwardTo('prisma'),
    // ... other resolvers
  },
}
与转发 GraphQL 查询类似,你可以在 definition 函数内的 t 变量上使用 crud 属性,以便公开 Prisma 模型的完整 CRUD 功能。
¥Similar to forwarding GraphQL queries, you can use the crud property on the t variable inside the definition function in order to expose full CRUD capabilities for Prisma models.
与 model 类似,此属性可用,因为你使用的是 nexus-prisma-plugin,它利用 Prisma 模型中的类型信息并在后台自动生成解析器。crud 属性在定义突变时也支持自动补齐,因此你可以再次探索编辑器中的所有可用操作:
¥Similar to model, this property is available because you're using the nexus-prisma-plugin which leverages type information from your Prisma models and auto-generates resolvers under the hood. The crud property supports autocompletion when defining mutations as well, so you can explore all available operations in your editor again:
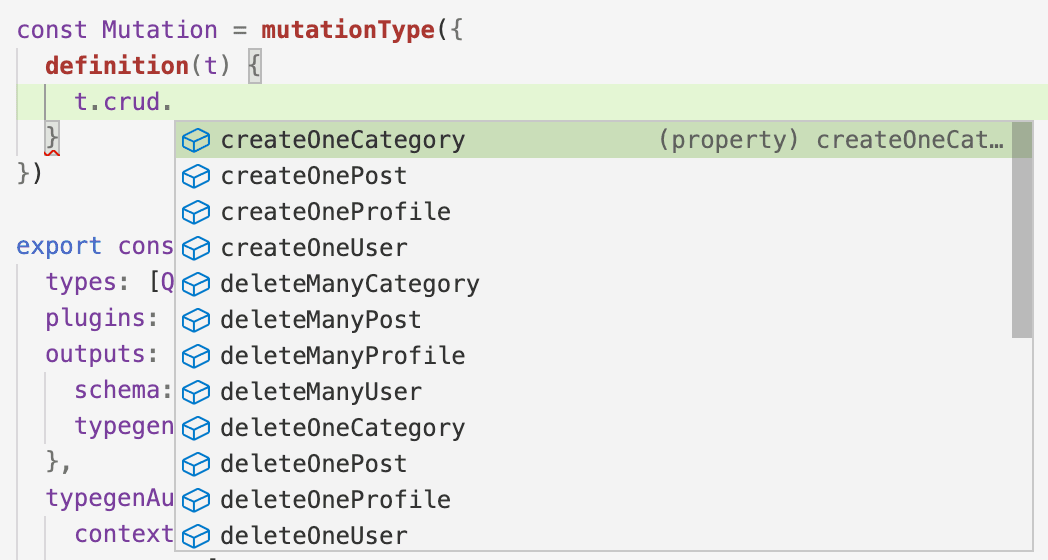
用 nexus-prisma-plugin 转发突变
¥Forwarding the mutation with the nexus-prisma-plugin
要将 createUser 突变添加到 GraphQL API,请将以下行添加到查询类型定义中:
¥To add the createUser mutation to your GraphQL API, add the following lines to the query type definition:
const Mutation = mutationType({
  definition(t) {
    t.crud.createOneUser({
      alias: 'createUser',
    })
  },
})
请注意,GraphQL 模式中突变的默认名称是 createOneUser(以 t.crud 公开的函数命名)。为了将其重命名为 createUser,你需要提供 alias 属性。
¥Note that the default name for the mutation in your GraphQL schema is createOneUser (named after the function which is exposed by t.crud). In order to rename it to createUser, you need to provide the alias property.
如果你正在运行 Nexus 开发服务器,则可以保存该文件,并且你的 GraphQL API 将更新以公开新的 createUser 突变。你还可以通过查看生成的 schema.graphql 文件中的 Mutation 类型来观察这一点:
¥If you have the Nexus development server running, you can save the file and your GraphQL API will be updated to expose the new createUser mutation. You can also observe this by looking at the Mutation type inside the generated schema.graphql file:
type Mutation {
  createUser(data: UserCreateInput!): User!
}
你现在可以针对新 API 编写第一个突变,例如:
¥You can now write your first mutation against the new API, e.g.:
mutation {
  createUser(data: { name: "Alice", email: "alice@prisma.io" }) {
    id
  }
}
如果你的应用使用 forwardTo 从 Prisma Client 公开所有 CRUD 操作,你现在可以通过 t.crud 使用相同的方法继续添加所有剩余操作。要了解如何使用 Nexus 定义和解决 "custom" 突变,请继续阅读下一部分。
¥If your application exposes all CRUD operations from Prisma Client using forwardTo, you can now continue adding all remaining ones using the same approach via t.crud. To learn how "custom" mutations can be defined and resolved using Nexus, move on to the next sections.
3.2.3.迁移 createDraft(title: String!, content: String, authorId: String!): Post! 查询
¥3.2.3. Migrate the createDraft(title: String!, content: String, authorId: String!): Post! query
在示例应用中,createDraft 突变的定义和实现如下。
¥In the sample app, the createDraft mutation is defined and implemented as follows.
使用 prisma-binding 的 SDL 架构定义
¥SDL schema definition with prisma-binding
type Mutation {
  createDraft(title: String!, content: String, authorId: String!): Post!
  # ... other mutations
}
使用 prisma-binding 实现解析器
¥Resolver implementation with prisma-binding
const resolvers = {
  Mutation: {
    createDraft: (_, args, context, info) => {
      return context.prisma.mutation.createPost(
        {
          data: {
            title: args.title,
            content: args.content,
            author: {
              connect: {
                id: args.authorId,
              },
            },
          },
        },
        info
      )
    },
    // ... other resolvers
  },
}
使用 nexus 的代码优先架构定义
¥Code-first schema definition with nexus
要在 Nexus 中获得相同的行为,你需要将 t.field 定义添加到 mutationType:
¥To get the same behavior with Nexus, you'll need to add a t.field definition to the mutationType:
const Mutation = mutationType({
  definition(t) {
    // ... previous mutations

    t.field('createDraft', {
      type: 'Post',
      args: {
        title: stringArg({ nullable: false }),
        content: stringArg(),
        authorId: stringArg({ nullable: false }),
      },
    })
  },
})
如果你查看 schema.graphql 内生成的 GraphQL 模式的 SDL 版本,你会注意到这已经向你的 GraphQL 模式添加了正确的定义:
¥If you look at the generated SDL version of your GraphQL schema inside schema.graphql, you'll notice that this has added the correct definition to your GraphQL schema already:
type Mutation {
  createUser(data: UserCreateInput!): User!
  createDraft(title: String!, content: String, authorId: String!): Post!
}
你甚至可以通过 GraphQL Playground 发送相应的突变:
¥You can even send the respective mutation via the GraphQL Playground already:
mutation {
  createDraft(title: "Hello World", authorId: "__AUTHOR_ID__") {
    id
    published
    author {
      id
      name
    }
  }
}
但是,由于解析器尚未实现,因此不会创建新的 Post 记录,并且你不会在响应中获取任何数据。
¥However, because the resolver is not yet implemented, no new Post record will be created and you will not get any data back in the response.
使用 nexus 实现解析器
¥Resolver implementation with nexus
那是因为你仍然缺少该突变的解析器实现。你可以使用 Nexus 添加解析器,如下所示:
¥That's because you're still missing the resolver implementation for that mutation. You can add the resolver with Nexus as follows:
const Mutation = mutationType({
  definition(t) {
    // ... previous mutations

    t.field('createDraft', {
      type: 'Post',
      args: {
        title: stringArg({ nullable: false }),
        content: stringArg(),
        authorId: stringArg({ nullable: false }),
      },
      resolve: (_, args, context) => {
        return context.prisma.post.create({
          data: {
            title: args.title,
            content: args.content,
            author: {
              connect: { id: args.authorId },
            },
          },
        })
      },
    })
  },
})
如果你重新发送之前的相同查询,你会发现它现在创建了一个新的 Post 记录并返回有效数据。
¥If you're re-sending the same query from before, you'll find that it now create a new Post record and return valid data.
3.2.4.迁移 updateBio(bio: String, userUniqueInput: UserUniqueInput!): User 突变
¥3.2.4. Migrate the updateBio(bio: String, userUniqueInput: UserUniqueInput!): User mutation
在示例应用中,updateBio 突变的定义和实现如下。
¥In the sample app, the updateBio mutation is defined and implemented as follows.
使用 prisma-binding 的 SDL 架构定义
¥SDL schema definition with prisma-binding
type Mutation {
  updateBio(bio: String!, userUniqueInput: UserUniqueInput!): User
  # ... other mutations
}
使用 prisma-binding 实现解析器
¥Resolver implementation with prisma-binding
const resolvers = {
  Mutation: {
    updateBio: (_, args, context, info) => {
      return context.prisma.mutation.updateUser(
        {
          data: {
            profile: {
              update: { bio: args.bio },
            },
          },
          where: { id: args.userId },
        },
        info
      )
    },
    // ... other resolvers
  },
}
使用 nexus 的代码优先架构定义
¥Code-first schema definition with nexus
要在 Nexus 中获得相同的行为,你需要将 t.field 定义添加到 mutationType:
¥To get the same behavior with Nexus, you'll need to add a t.field definition to the mutationType:
const Mutation = mutationType({
  definition(t) {
    // ... previous mutations

    t.field('updateBio', {
      type: 'User',
      args: {
        userUniqueInput: arg({
          type: 'UserUniqueInput',
          nullable: false,
        }),
        bio: stringArg({ nullable: false }),
      },
    })
  },
})
如果你查看 schema.graphql 内生成的 GraphQL 模式的 SDL 版本,你会注意到这已经向你的 GraphQL 模式添加了正确的定义:
¥If you look at the generated SDL version of your GraphQL schema inside schema.graphql, you'll notice that this has added the correct definition to your GraphQL schema already:
type Mutation {
  createUser(data: UserCreateInput!): User!
  createDraft(title: String!, content: String, authorId: String!): Post!
  updateBio(bio: String!, userUniqueInput: UserUniqueInput!): User
}
你甚至可以通过 GraphQL Playground 发送相应的突变:
¥You can even send the respective mutation via the GraphQL Playground already:
mutation {
  updateBio(
    userUniqueInput: { email: "alice@prisma.io" }
    bio: "I like turtles"
  ) {
    id
    name
    profile {
      id
      bio
    }
  }
}
但是,由于解析器尚未实现,数据库中不会更新任何内容,并且你不会在响应中获取任何数据。
¥However, because the resolver is not yet implemented, nothing will be updated in the database and you will not get any data back in the response.
使用 nexus 实现解析器
¥Resolver implementation with nexus
那是因为你仍然缺少该查询的解析器实现。你可以使用 Nexus 添加解析器,如下所示:
¥That's because you're still missing the resolver implementation for that query. You can add the resolver with Nexus as follows:
const Mutation = mutationType({
  definition(t) {
    // ... previous mutations

    t.field('updateBio', {
      type: 'User',
      args: {
        userUniqueInput: arg({
          type: 'UserUniqueInput',
          nullable: false
        }),
        bio: stringArg()
      },
      resolve: (_, args, context) => {
        return context.prisma.user.update({
          where: {
            id: args.userUniqueInput?.id,
            email: args.userUniqueInput?.email
          },
          data: {
            profile: {
              create: { bio: args.bio }
            }
          }
        })
      }
    }
  }
})
如果你重新发送之前的相同查询,你会发现它现在返回实际数据而不是 null。
¥If you're re-sending the same query from before, you'll find that it now returns actual data instead of null.
3.2.5.迁移 addPostToCategories(postId: String!, categoryIds: [String!]!): Post 突变
¥3.2.5. Migrate the addPostToCategories(postId: String!, categoryIds: [String!]!): Post mutation
在我们的示例应用中,addPostToCategories 突变的定义和实现如下。
¥In our sample app, the addPostToCategories mutation is defined and implemented as follows.
使用 prisma-binding 的 SDL 架构定义
¥SDL schema definition with prisma-binding
type Mutation {
  addPostToCategories(postId: String!, categoryIds: [String!]!): Post
  # ... other mutations
}
使用 prisma-binding 实现解析器
¥Resolver implementation with prisma-binding
const resolvers = {
  Mutation: {
    addPostToCategories: (_, args, context, info) => {
      const ids = args.categoryIds.map((id) => ({ id }))
      return context.prisma.mutation.updatePost(
        {
          data: {
            categories: {
              connect: ids,
            },
          },
          where: {
            id: args.postId,
          },
        },
        info
      )
    },
    // ... other resolvers
  },
}
使用 nexus 的代码优先架构定义
¥Code-first schema definition with nexus
要在 Nexus 中获得相同的行为,你需要将 t.field 定义添加到 mutationType:
¥To get the same behavior with Nexus, you'll need to add a t.field definition to the mutationType:
const Mutation = mutationType({
  definition(t) {
    // ... mutations from before

    t.field('addPostToCategories', {
      type: 'Post',
      args: {
        postId: stringArg({ nullable: false }),
        categoryIds: stringArg({
          list: true,
          nullable: false,
        }),
      },
    })
  },
})
如果你查看 schema.graphql 内生成的 GraphQL 模式的 SDL 版本,你会注意到这已经向你的 GraphQL 模式添加了正确的定义:
¥If you look at the generated SDL version of your GraphQL schema inside schema.graphql, you'll notice that this has added the correct definition to your GraphQL schema already:
type Mutation {
  createUser(data: UserCreateInput!): User!
  createDraft(title: String!, content: String, authorId: String!): Post!
  updateBio(bio: String, userUniqueInput: UserUniqueInput!): User
  addPostToCategories(postId: String!, categoryIds: [String!]!): Post
}
你甚至可以通过 GraphQL Playground 发送相应的查询:
¥You can even send the respective query via the GraphQL Playground already:
mutation {
  addPostToCategories(
    postId: "__AUTHOR_ID__"
    categoryIds: ["__CATEGORY_ID_1__", "__CATEGORY_ID_2__"]
  ) {
    id
    title
    categories {
      id
      name
    }
  }
}
但是,由于解析器尚未实现,数据库中不会更新任何内容,并且你不会在响应中获取任何数据。
¥However, because the resolver is not yet implemented, nothing will be updated in the database and you will not get any data back in the response.
使用 nexus 实现解析器
¥Resolver implementation with nexus
那是因为你仍然缺少该查询的解析器实现。你可以使用 Nexus 添加解析器,如下所示:
¥That's because you're still missing the resolver implementation for that query. You can add the resolver with Nexus as follows:
const Mutation = mutationType({
  definition(t) {
    // ... mutations from before
    t.field('addPostToCategories', {
      type: 'Post',
      args: {
        postId: stringArg({ nullable: false }),
        categoryIds: stringArg({
          list: true,
          nullable: false,
        }),
      },
      resolve: (_, args, context) => {
        const ids = args.categoryIds.map((id) => ({ id }))
        return context.prisma.post.update({
          where: {
            id: args.postId,
          },
          data: {
            categories: { connect: ids },
          },
        })
      },
    })
  },
})
如果你重新发送之前的相同查询,你会发现它现在返回实际数据而不是 null。
¥If you're re-sending the same query from before, you'll find that it now returns actual data instead of null.
4. 打扫干净
¥ Cleaning up
由于整个应用现已升级到 Prisma ORM 2.0 和 Nexus,你可以删除所有不必要的文件并删除不再需要的依赖。
¥Since the entire app has now been upgrade to Prisma ORM 2.0 and Nexus, you can delete all unnecessary files and remove the no longer needed dependencies.
4.1.清理 npm 依赖
¥4.1. Clean up npm dependencies
你可以首先删除与 Prisma 1 设置相关的 npm 依赖:
¥You can start by removing npm dependencies that were related to the Prisma 1 setup:
npm uninstall graphql-cli prisma-binding prisma1
4.2.删除未使用的文件
¥4.2. Delete unused files
接下来,删除 Prisma 1 设置的文件:
¥Next, delete the files of your Prisma 1 setup:
rm prisma1/datamodel.prisma prisma1/prisma.yml
你还可以删除任何剩余的 .js 文件、旧的 schema.graphql 和 prisma.graphql 文件。
¥You can also delete any remaining .js files, the old schema.graphql and prisma.graphql files.
4.3.停止 Prisma ORM 服务器
¥4.3. Stop the Prisma ORM server
最后,你可以停止运行 Prisma ORM 服务器。
¥Finally, you can stop running your Prisma ORM server.