工具
你可以使用 Prisma 工作室 或第三方数据库编辑器在 Prisma Postgres 中查看和编辑数据。
¥You can view and edit your data in Prisma Postgres using either Prisma Studio or 3rd party database editors.
在 Prisma Studio 中查看和编辑数据
¥Viewing and editing data in Prisma Studio
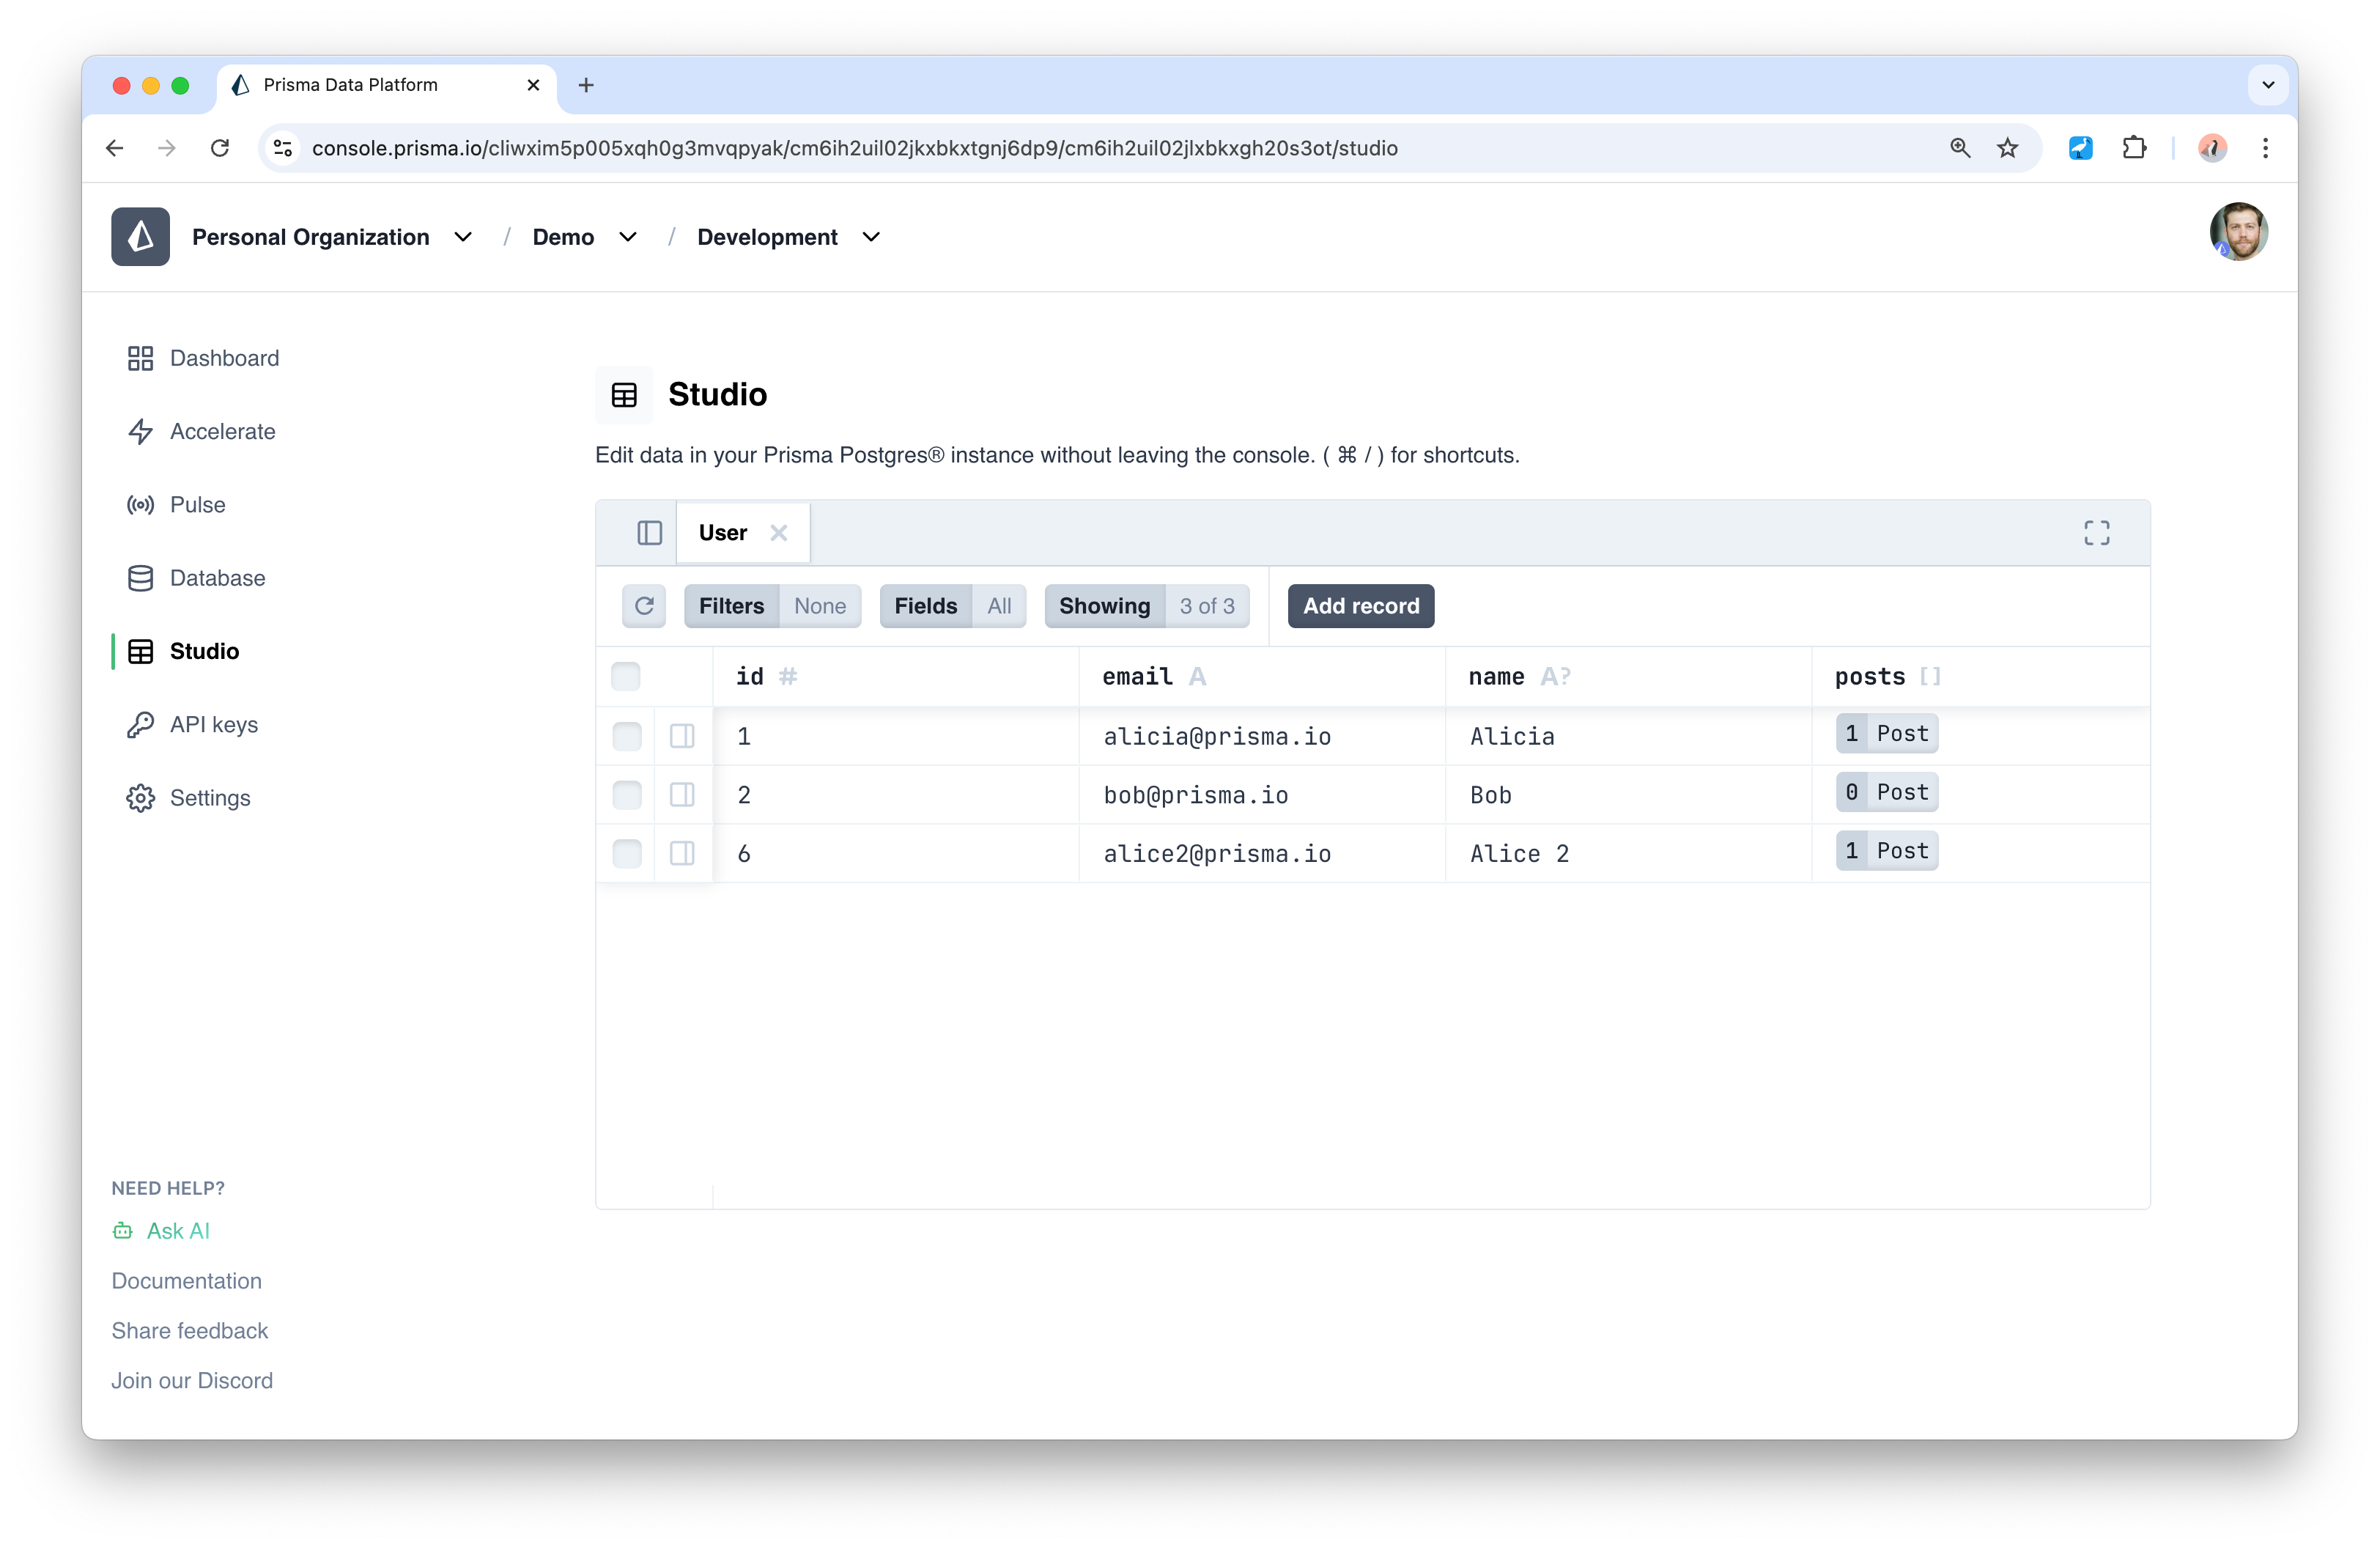
使用 Prisma Postgres,你可以在项目中使用 Prisma 工作室 的托管版本。在你的 项目环境中,选择左侧导航栏中的“Studio”选项卡以查看和编辑你的数据:
¥With Prisma Postgres, a hosted version of Prisma Studio is available for you in of your project. In your project environment in the , select the Studio tab in the left-hand navigation to view and edit your data:
你也可以通过运行以下命令在本地运行 Prisma Studio:
¥You can also run Prisma Studio locally by running:
npx prisma studio
这将在 http://localhost:5555 中启动一个实时服务器,你可以在其中访问数据库并进行交互。
¥This should start a live server in http://localhost:5555 where you can visit and interact with your database.
使用第三方数据库编辑器连接到 Prisma Postgres 实例
¥Connecting to Prisma Postgres instance with 3rd party database editors
你可以使用第三方数据库编辑器(例如 pgAdmin、TablePlus、Postico 等)通过 @prisma/ppg-tunnel 包 连接到你的 Prisma Postgres 实例。请参阅下面的示例以了解如何使用 TablePlus 进行连接。
¥You can connect to your Prisma Postgres instance using third party database editors like pgAdmin, TablePlus, Postico etc using @prisma/ppg-tunnel package. See the example below to connect using TablePlus.
1. 创建一个 TCP 隧道以直接访问 Prisma Postgres
¥ Create a TCP tunnel to access Prisma Postgres directly
如果你当前目录中已经有一个 .env 文件并且设置了 DATABASE_URL,隧道 CLI 将自动获取它,无需手动导出它。但是,如果你尚未设置 .env 文件,则需要明确设置 DATABASE_URL 环境变量。
¥If you already have a .env file in your current directory with DATABASE_URL set, the tunnel CLI will automatically pick it up, no need to manually export it. However, if you haven't set up a .env file, you'll need to set the DATABASE_URL environment variable explicitly.
在你的终端中,设置指向你要连接的 Prisma Postgres 实例的环境变量 DATABASE_URL(请务必将 API_KEY 占位符替换为你的 Prisma Postgres 实例的 API 密钥值):
¥In your terminal, to set the environment variable DATABASE_URL referring to your Prisma Postgres instance which you want to connect to (be sure to replace the API_KEY placeholder with the API key value of your Prisma Postgres instance):
- macOS
- Linux
- Windows
export DATABASE_URL="prisma+postgres://accelerate.prisma-data.net/?api_key=API_KEY"
export DATABASE_URL="prisma+postgres://accelerate.prisma-data.net/?api_key=API_KEY"
set DATABASE_URL="prisma+postgres://accelerate.prisma-data.net/?api_key=API_KEY"
如果你在终端中明确设置了 DATABASE_URL,则该值将优先于 .env 文件中的值。
¥If you explicitly set DATABASE_URL in your terminal, that value will take precedence over the one in your .env file.
运行以下命令,通过 @prisma/ppg-tunnel 包连接到 Prisma Postgres 实例:
¥Run the following command to connect to your Prisma Postgres instance via @prisma/ppg-tunnel package:
npx @prisma/ppg-tunnel --host 127.0.0.1 --port 52604
Prisma Postgres auth proxy listening on 127.0.0.1:52604 🚀

Your connection is authenticated using your Prisma Postgres API key.
...

==============================
hostname:  127.0.0.1
port:      52604
username:  <anything>
password:  <none>
==============================
从上面的输出中复制 port 文件,下一步你将需要它。
¥Copy the port from the output above, you will need it in the next step.
在使用数据库编辑器维护连接时,请保持此隧道进程运行。
¥Keep this tunnel process running while you are using the database editor to maintain the connection.
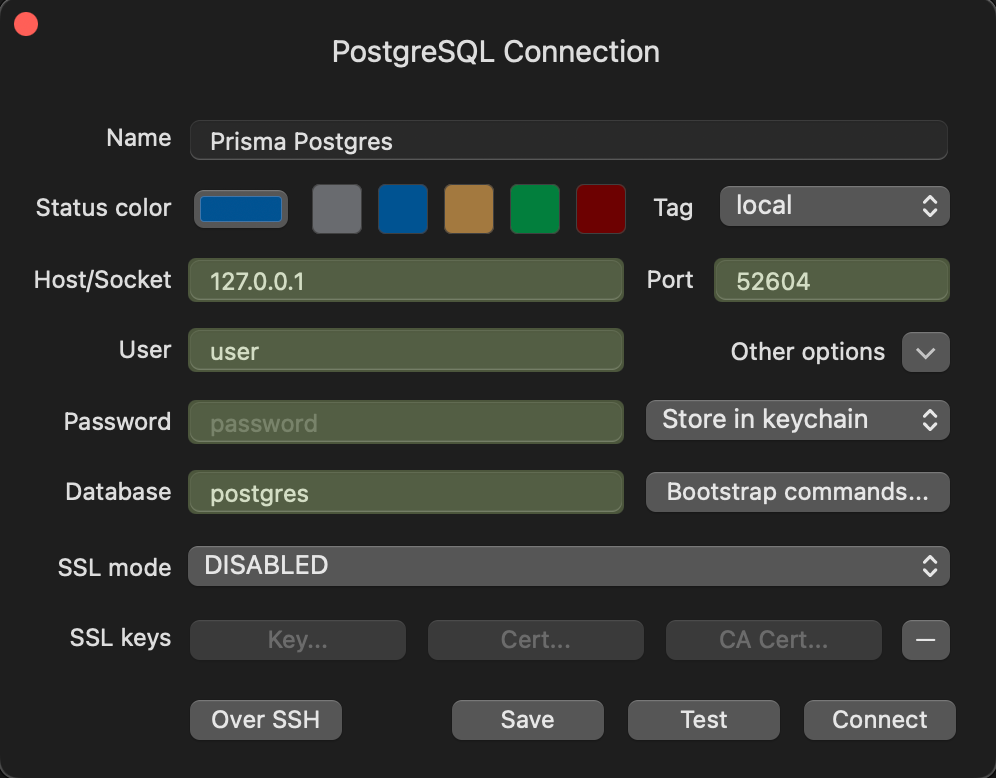
2a.使用 TablePlus 连接到 Prisma Postgres
¥2a. Connect to Prisma Postgres using TablePlus
根据你使用的数据库编辑器,你可以使用从 @prisma/ppg-tunnel 包输出中获得的详细信息连接到你的 Prisma Postgres 实例。要在 TablePlus 中添加连接字符串:
¥Based on the database editor you are using, you can connect to your Prisma Postgres instance using the details you obtained from the output of the @prisma/ppg-tunnel package. To add the connection string in TablePlus:
-
打开 TablePlus 并点击 + 图标添加新连接。
¥Open TablePlus and click on the + icon to add a new connection.
-
选择 PostgreSQL 作为数据库类型。
¥Select PostgreSQL as the database type.
-
输入以下详细信息:
¥Enter the following details:
-
名称:你想为连接指定的任何名称。
¥Name: Any name you want to give to your connection.
-
主持人:本例中为
127.0.0.1。¥Host:
127.0.0.1in this case. -
港口:你从
@prisma/ppg-tunnel包的输出中获得的port编号。¥Port: The
portnumber you obtained from the output of the@prisma/ppg-tunnelpackage. -
用户:由于隧道的存在,此项将被忽略,你可以在此处提供任何值。
¥User: This will be ignored due to the tunnel, you can provide any value here.
-
密码:由于隧道的存在,此项将被忽略,你可以在此处提供任何值。
¥Password: This will be ignored due to the tunnel, you can provide any value here.
-
-
点击“连接”连接到你的 Prisma Postgres 实例。
¥Click on Connect to connect to your Prisma Postgres instance.
2b.连接使用 DataGrip 连接到 Prisma Postgres
¥2b. Connect to Prisma Postgres using DataGrip
根据你使用的数据库编辑器,你可以使用从 @prisma/ppg-tunnel 包输出中获得的详细信息连接到你的 Prisma Postgres 实例。要在 DataGrip 中添加连接字符串:
¥Based on the database editor you are using, you can connect to your Prisma Postgres instance using the details you obtained from the output of the @prisma/ppg-tunnel package. To add the connection string in DataGrip:
-
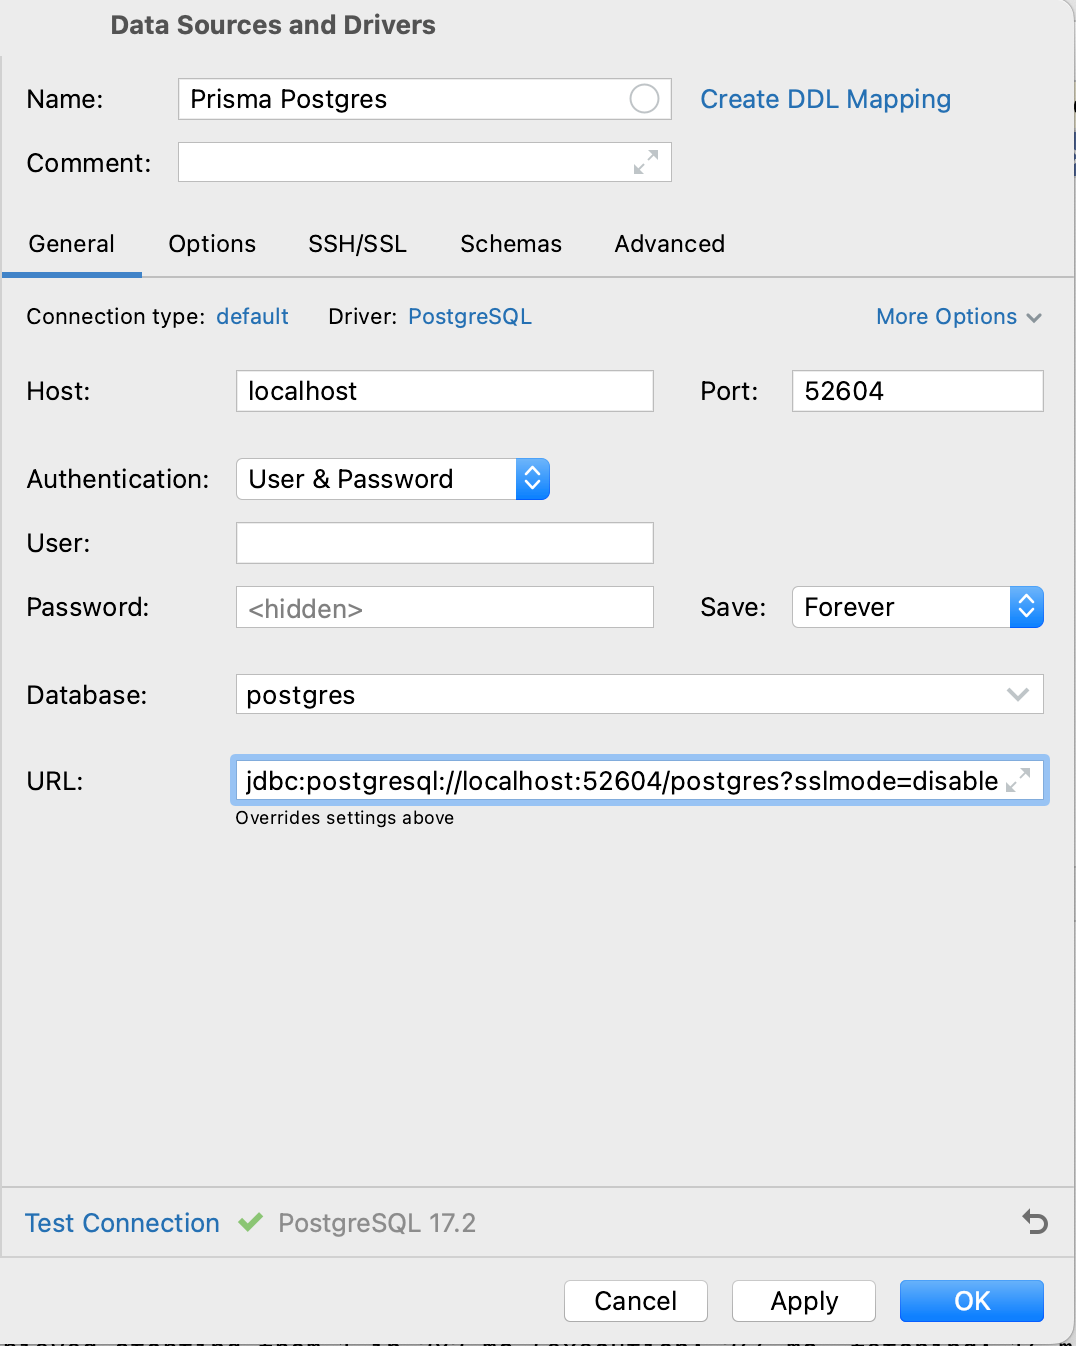
打开 DataGrip,单击 + 图标并选择 "数据源"。
¥Open DataGrip and click on the + icon and select "Datasource".
-
选择 PostgreSQL 作为数据库类型。
¥Select PostgreSQL as the database type.
-
输入以下详细信息:
¥Enter the following details:
-
名称:你想为连接指定的任何名称。
¥Name: Any name you want to give to your connection.
-
主持人:本例中为
127.0.0.1。¥Host:
127.0.0.1in this case. -
港口:你从
@prisma/ppg-tunnel包的输出中获得的port编号。¥Port: The
portnumber you obtained from the output of the@prisma/ppg-tunnelpackage. -
用户:由于隧道的存在,此项将被忽略,你可以将此字段保留为空。
¥User: This will be ignored due to the tunnel, you can keep this field empty.
-
密码:由于隧道的存在,此项将被忽略,你可以将此字段保留为空。
¥Password: This will be ignored due to the tunnel, you can keep this field empty.
-
URL:在 URL 中,将以下查询参数
?sslmode=disable附加到 URL 末尾。¥URL: In the URL append the following query parameter
?sslmode=disableto the end of the URL.
-
-
点击“测试连接”以确保 DataGrip 可以连接到你的 Prisma Postgres 实例。成功后,点击“确定”保存连接。
¥Click on Test Connection to ensure that DataGrip can connect to your Prisma Postgres instance. Once successful, click OK to save the connection.
2c.使用 DBeaver 连接到 Prisma Postgres
¥2c. Connect to Prisma Postgres using DBeaver
根据你使用的数据库编辑器,你可以使用从 @prisma/ppg-tunnel 包输出中获得的详细信息连接到你的 Prisma Postgres 实例。要在 DBeaver 中添加连接字符串:
¥Based on the database editor you are using, you can connect to your Prisma Postgres instance using the details you obtained from the output of the @prisma/ppg-tunnel package. To add the connection string in DBeaver:
-
打开 DBeaver,然后单击“新建数据库连接”按钮或“文件”>“新建”以添加新连接。
¥Open DBeaver and click on the New Database Connection button or File > New to add a new connection.
-
选择 PostgreSQL 作为数据库类型。
¥Select PostgreSQL as the database type.
-
在“连接方式”部分中选择“URL”选项。
¥Select URL option in Connect by section.
-
请按以下格式输入 URL:
¥Enter the URL in this format:
-
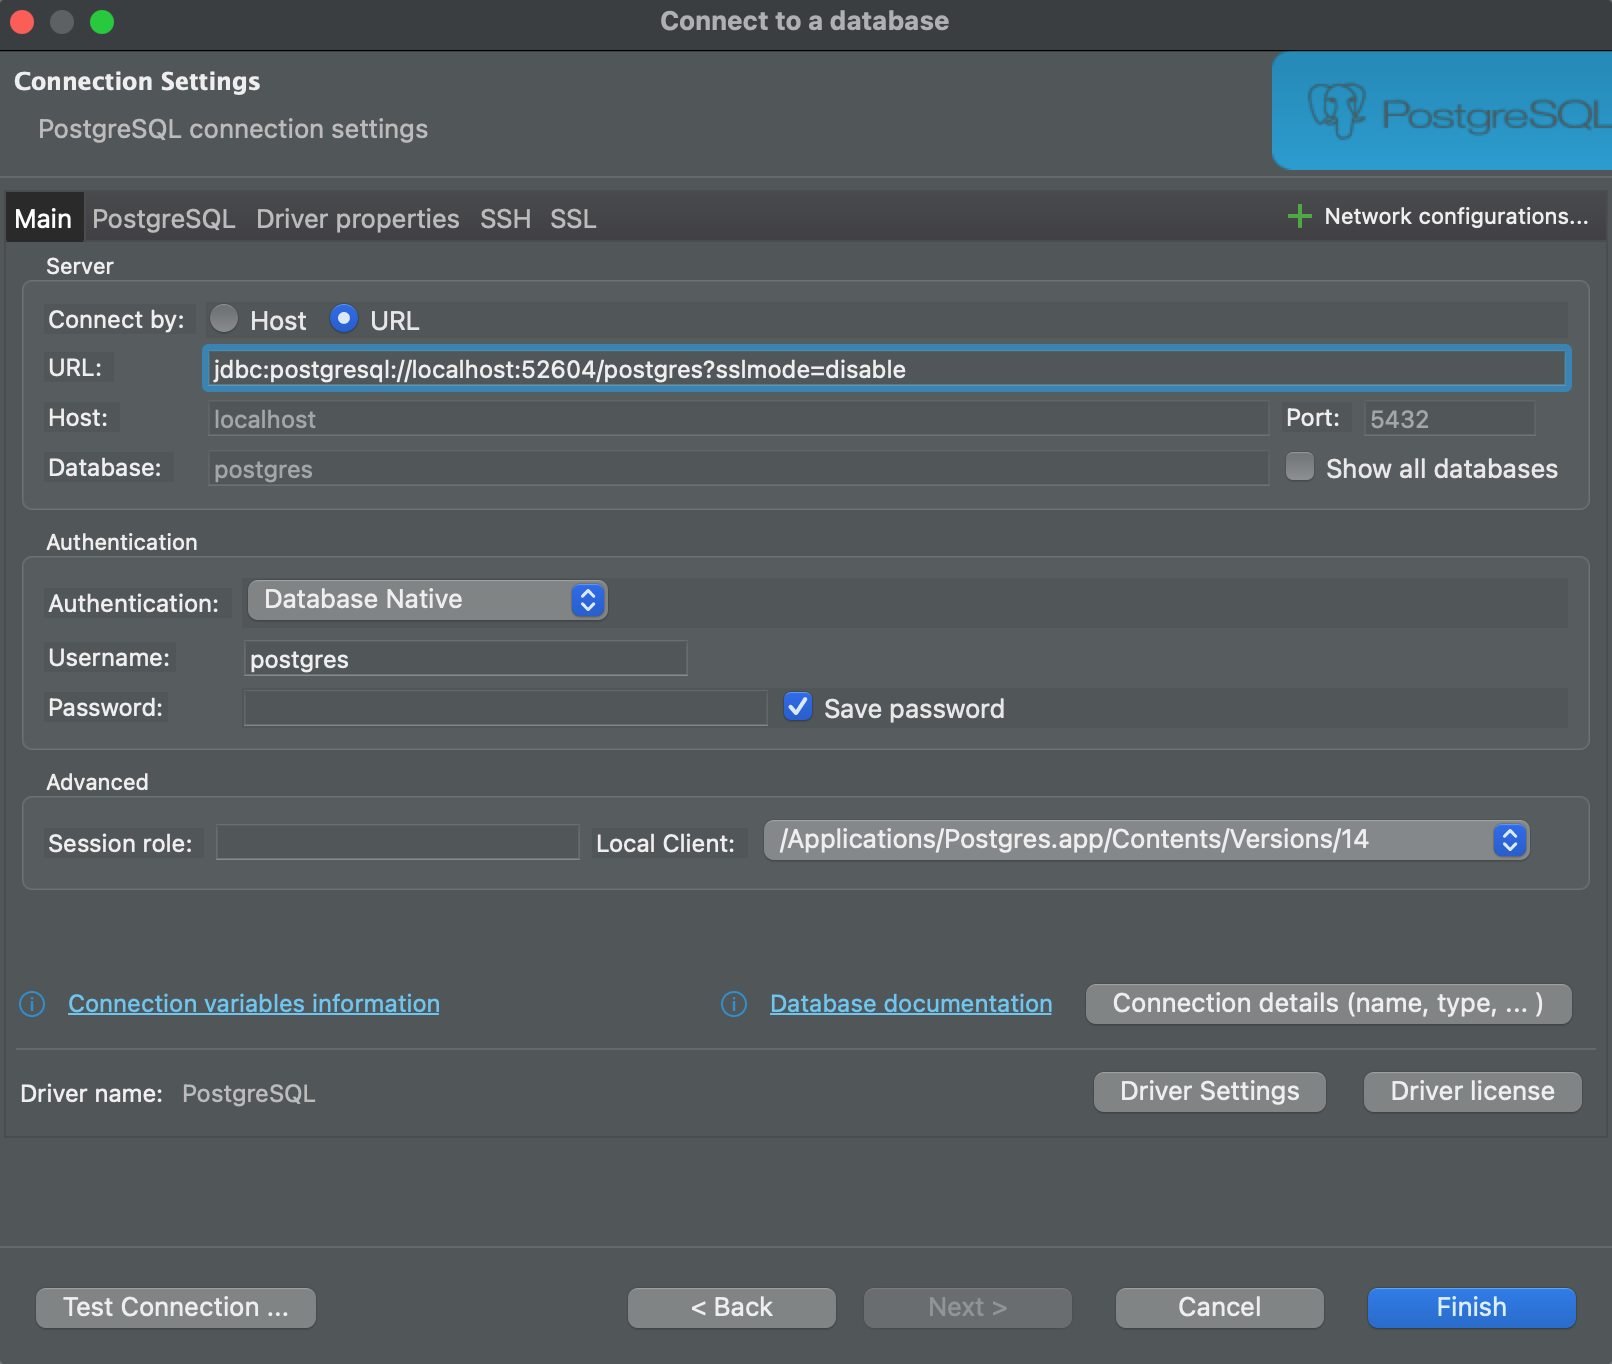
URL:你的 URL 应采用以下格式:
jdbc:postgresql://localhost:52604/postgres?sslmode=disable。请确保输入从@prisma/ppg-tunnel包输出中获取的端口号。在这种情况下,端口号为52604。无需输入用户名或密码,因为身份验证由 Tunnel 管理。¥URL: Your URL should be in this format:
jdbc:postgresql://localhost:52604/postgres?sslmode=disable. Here make sure that you enter the port number you obtained from the output of the@prisma/ppg-tunnelpackage. In this case, the port number is52604. There is no need to enter Username or Password as authentication is manged by Tunnel.
-
-
点击“测试连接”以确保 DBeaver 可以连接到你的 Prisma Postgres 实例。如果成功,请点击“完成”。
¥Click on Test Connection to ensure that DBeaver can connect to your Prisma Postgres instance. If successful, click Finish.
2d.使用 Postico 连接到 Prisma Postgres
¥2d. Connect to Prisma Postgres using Postico
根据你使用的数据库编辑器,你可以使用从 @prisma/ppg-tunnel 包输出中获得的详细信息连接到你的 Prisma Postgres 实例。要在 Postico 中添加连接字符串:
¥Based on the database editor you are using, you can connect to your Prisma Postgres instance using the details you obtained from the output of the @prisma/ppg-tunnel package. To add the connection string in Postico:
-
打开 Postico 并点击“新建服务器”按钮添加新连接。
¥Open Postico and click on the New Server button to add a new connection.
-
输入以下详细信息:
¥Enter the following details:
-
名称:你想为连接指定的任何名称。
¥Name: Any name you want to give to your connection.
-
主持人:本例中为
127.0.0.1。¥Host:
127.0.0.1in this case. -
港口:你从
@prisma/ppg-tunnel包的输出中获得的port编号。¥Port: The
portnumber you obtained from the output of the@prisma/ppg-tunnelpackage. -
用户:由于隧道的存在,此项将被忽略,你可以将此字段保留为空。
¥User: This will be ignored due to the tunnel, you can keep this field empty.
-
密码:由于隧道的存在,此项将被忽略,你可以将此字段保留为空。
¥Password: This will be ignored due to the tunnel, you can keep this field empty.
-
-
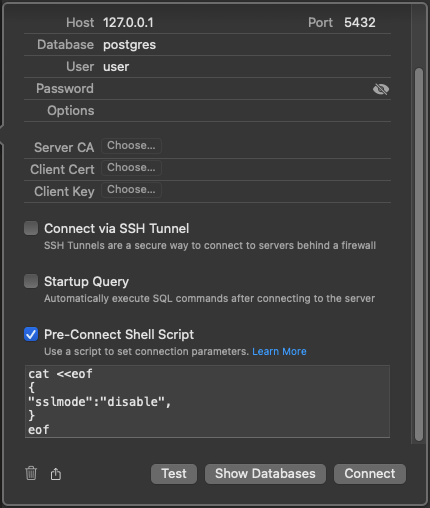
勾选 "预连接 Shell 脚本" 并输入:
¥Check "Pre-Connect Shell Script" and enter:
cat <<eof
{
"sslmode":"disable",
}
eof -
点击“测试连接”,以确保 Postico 可以连接到你的 Prisma Postgres 实例。如果成功,请点击“连接”。
¥Click on Test Connection to ensure that Postico can connect to your Prisma Postgres instance. If successful, click Connect.