如何将 Prisma ORM 与 Permit.io 结合使用
介绍
¥Introduction
Permit.io 是一个授权即服务平台,可让你根据实际关系实现细粒度的访问控制规则。
¥Permit.io is an authorization-as-a-service platform that lets you implement fine-grained access control rules based on real-world relationships.
本指南介绍如何将 Permit.io 连接到新的 Express + Prisma 应用、定义 基于关系的访问控制 (ReBAC) 策略以及自动过滤 Prisma 查询,以便用户只能看到他们有权访问的数据。
¥This guide explains how to connect Permit.io to a new Express + Prisma app, define a Relationship-Based Access Control (ReBAC) policy, and automatically filter Prisma queries so users only see the data they're allowed to access.
你将构建一个小型项目任务 API 来演示访问权限继承的实际操作。 - 无需手动设置 WHERE 子句。
¥You'll build a small project-task API to demonstrate access inheritance in action - no manual WHERE clauses required.
你可以找到本指南 此处 的完整示例。
¥You can find a complete example of this guide here.
先决条件
¥Prerequisites
-
PostgreSQL(本地或托管)
¥PostgreSQL (local or hosted)
-
Prisma CLI(
npx prisma) -
Permit CLI(
npm install -g @permitio/cli)
1. 设置你的项目
¥ Set up your project
首先,你将使用 TypeScript 从头创建一个新的 Express + Prisma 项目。你还将安装使用 Permit.io 支持 ReBAC 过滤所需的工具。
¥First of all, you'll create a new Express + Prisma project from scratch using TypeScript. You'll also install the tools needed to support ReBAC filtering with Permit.io.
1.1 创建项目文件夹
¥1.1 Create the project folder
mkdir prisma-rebac-filtering
cd prisma-rebac-filtering
npm init -y
1.2 安装所需依赖
¥1.2 Install the required dependencies
安装应用和开发依赖:
¥Install application and development dependencies:
npm install express cors dotenv @prisma/client @prisma/adapter-pg pg
npm install -D prisma typescript tsx @types/pg
如果你使用其他数据库提供商(MySQL、SQL Server、SQLite),请安装相应的驱动程序适配器包,而不是 @prisma/adapter-pg。欲了解更多信息,请参阅 数据库驱动程序。
¥If you are using a different database provider (MySQL, SQL Server, SQLite), install the corresponding driver adapter package instead of @prisma/adapter-pg. For more information, see Database drivers.
然后,初始化你的 Prisma 设置:
¥Then, initialize your Prisma setup:
npx prisma init
这创建:
¥This creates:
-
包含默认
schema.prisma文件的prisma/目录¥A
prisma/directory with a defaultschema.prismafile -
用于配置 Prisma 的
prisma.config.ts文件¥A
prisma.config.tsfile for configuring Prisma -
根目录下的
.env文件。¥A
.envfile at the root.
1.3 设置 TypeScript 配置
¥1.3 Set up your TypeScript config
创建 tsconfig.json 文件:
¥Create a tsconfig.json file:
{
  "compilerOptions": {
    "target": "ES2020",
    "module": "CommonJS",
    "moduleResolution": "node",
    "esModuleInterop": true,
    "forceConsistentCasingInFileNames": true,
    "strict": true,
    "skipLibCheck": true,
    "outDir": "dist"
  },
  "include": ["src", "scripts"]
}
1.4 创建文件夹结构
¥1.4 Create your folder structure
设置你的项目文件夹:
¥Set up your project folders:
mkdir -p src/controllers src/middleware src/config scripts
现在你可以定义 Prisma 数据模型了。
¥You're now ready to define your Prisma data model.
2. 授权模型
¥ The authorization model
在继续设置之前,定义访问控制在你的应用中的工作方式非常重要。
¥Before we continue with the setup, it's important to define how access control will work in your application.
本指南使用基于关系的访问控制 (ReBAC),根据用户与数据的关系自动限制数据库查询。
¥This guide uses Relationship-Based Access Control (ReBAC) to automatically restrict database queries based on a user's relationship to the data.
我们来看看它是什么样子的:
¥Let's see what this looks like:
场景概述
¥Scenario overview
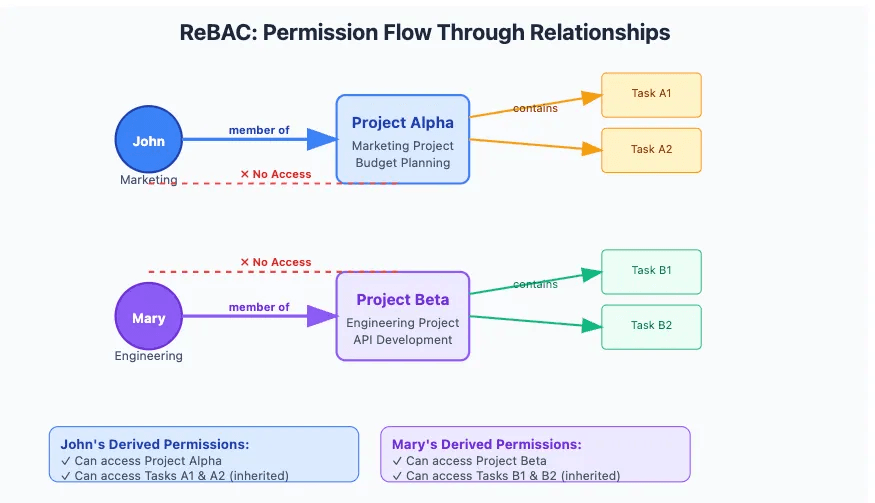
你正在构建一个支持团队级访问控制的项目管理 API。每个项目都属于一个团队(例如市场营销或工程团队),用户只能访问分配给他们的项目及其相关任务。
¥You're building a project management API that supports team-level access controls. Each project belongs to a team (like Marketing or Engineering), and users should only be able to access the projects—and their associated tasks—that they're assigned to.
这是一个完美的 ReBAC 用例,因为:
¥This is a perfect use case for ReBAC, because:
-
访问权限取决于用户和数据之间的关系(例如团队成员关系)
¥Access depends on relationships between users and data (e.g., team membership)
-
你希望任务访问权限继承自项目访问权限
¥You want task access to inherit from project access
-
你希望避免在每个控制器中手动检查权限
¥You want to avoid manually checking permissions in every controller
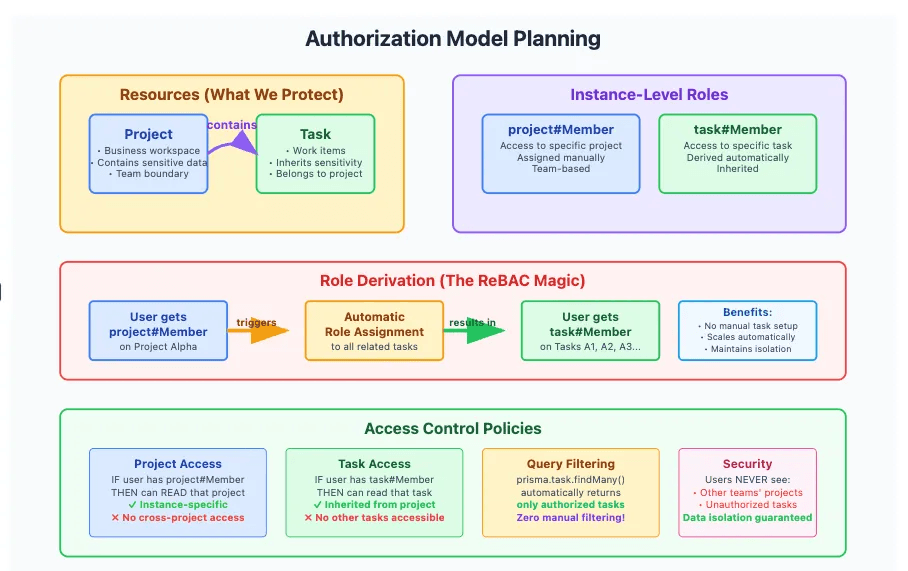
资源
¥Resources
这些是你将保护的主要数据实体:
¥These are the main data entities you'll protect:
-
Project:表示特定于团队的工作区,其中可能包含业务关键数据(时间表、预算、客户交付成果)。¥
Project: Represents a team-specific workspace that may contain business-critical data (timelines, budgets, client deliverables). -
Task:表示属于某个项目的工作项¥
Task: Represents an item of work that belongs to a project
关系
¥Relationships
-
项目包含任务 (
Project → Task)¥Projects contain tasks (
Project → Task) -
用户是项目成员 (
User → Project)¥Users are members of projects (
User → Project)
实例级角色
¥Instance-level roles
实例级角色描述了用户可以对特定资源执行的操作:
¥Instance-level roles describe what users can do with specific resources:
| 角色 | 描述 |
|---|---|
project#Member | 用户可以访问特定项目 |
task#Member | 用户可以访问该项目中的任务 |
角色派生
¥Role derivation
ReBAC 允许你根据关系自动派生角色。在本例中:
¥ReBAC lets you automatically derive roles based on relationships. In this case:
-
如果用户是
project#Member,则他们将自动成为该项目内所有任务的task#Member。¥If a user is a
project#Member, they automatically become atask#Memberfor all tasks within that project. -
新任务将继承项目访问权限 - 无需手动更新权限。
¥New tasks inherit project access—no need to update permissions manually.
访问策略
¥Access policies
定义关系和角色后,访问策略将决定用户可以执行的操作:
¥Once relationships and roles are defined, access policies determine what users can do:
| 角色 | 行动 | 资源 |
|---|---|---|
project#Member | read | 项目 |
task#Member | read | 任务 |
此模型确保:
¥This model ensures that:
-
用户只能访问分配给他们的项目和任务
¥Users can only access the projects and tasks they're assigned to
-
无跨团队可见性
¥No cross-team visibility
-
访问权限自动与业务结构保持同步
¥Access automatically stays in sync with the business structure
3. 定义你的数据模型
¥ Define your data model
要支持权限感知的数据过滤,你需要构建数据库,以便清晰地定义关系。在本例中,每个 Task 都属于一个 Project,用户通过成为父项目的成员来访问任务。
¥To support permission-aware data filtering, you need to structure your database so that relationships are clearly defined. In this case, every Task belongs to a Project, and users gain access to tasks by being members of the parent project.
3.1 更新 Prisma 模式
¥3.1 Update your Prisma schema
打开 prisma/schema.prisma 并将内容替换为以下内容:
¥Open prisma/schema.prisma and replace the contents with the following:
generator client {
  provider = "prisma-client"
}

datasource db {
  provider = "postgresql"
}

model Project {
  id        String   @id @default(uuid())
  name      String
  tasks     Task[]   // One-to-many relationship for permission inheritance
  createdAt DateTime @default(now())
  updatedAt DateTime @updatedAt
}

model Task {
  id          String   @id @default(uuid())
  name        String
  description String?
  projectId   String
  project     Project  @relation(fields: [projectId], references: [id])
  createdAt   DateTime @default(now())
  updatedAt   DateTime @updatedAt
}
3.2 将 dotenv 添加到 prisma.config.ts
¥3.2 Add dotenv to prisma.config.ts
要访问 .env 文件中的变量,它们可以通过运行时加载,也可以使用 dotenv 加载。在 prisma.config.ts 文件的顶部添加对 dotenv 的导入语句。
¥To get access to the variables in the .env file, they can either be loaded by your runtime, or by using dotenv.
Include an import for dotenv at the top of the prisma.config.ts
import 'dotenv/config'
import { defineConfig, env } from 'prisma/config';
export default defineConfig({
  schema: 'prisma/schema.prisma',
  migrations: {
    path: 'prisma/migrations',
  },
  datasource: {
    url: env('DATABASE_URL'),
  },
});
3.3 运行你的第一个迁移
¥3.3 Run your first migration
要创建数据库模式:
¥To create the database schema:
npx prisma migrate dev --name init
npx prisma generate
这将造成:
¥This will:
-
将你的模式应用于连接的 PostgreSQL 数据库
¥Apply your schema to the connected PostgreSQL database
-
生成你的 Prisma 客户端
¥Generate your Prisma Client
-
为
Project和Task创建具有一对多关系的表¥Create tables for
ProjectandTaskwith a one-to-many relationship
3.3 确认结构
¥3.3 Confirm the structure
你可以打开 Prisma Studio 检查你的数据库:
¥You can open Prisma Studio to inspect your database:
npx prisma studio
此结构允许 @permitio/permit-prisma 扩展在查询时按用户关系过滤记录。接下来,你将植入测试数据,以模拟团队对项目和任务的不同所有权。
¥This structure allows the @permitio/permit-prisma extension to filter records by user relationships at query time. Next, you'll seed test data to simulate distinct team ownership over projects and tasks.
4. 使用项目边界填充测试数据
¥ Seed test data with project boundaries
要测试你的数据过滤逻辑,你需要创建两个项目,每个项目都有各自的一组任务。这种分离模拟了团队所有权,并允许你验证用户是否只能看到其分配项目的数据。
¥To test your data filtering logic, you'll create two projects, each with its own set of tasks. This separation simulates team ownership and will allow you to validate that users only see the data of their assigned project.
4.1 创建种子脚本
¥4.1 Create the seed script
在 scripts/seed.ts 处创建一个新文件并添加以下内容:
¥Create a new file at scripts/seed.ts and add the following:
import { PrismaClient } from '../src/generated/prisma/client';
import { PrismaPg } from '@prisma/adapter-pg';

const adapter = new PrismaPg({
  connectionString: process.env.DATABASE_URL!,
});

const prisma = new PrismaClient({
  adapter,
});

async function main() {
  console.log('🌱 Seeding test data...');

  // Clear existing records
  await prisma.task.deleteMany();
  await prisma.project.deleteMany();

  // Create Project Alpha for the Marketing team
  const projectAlpha = await prisma.project.create({
    data: {
      id: 'project_alpha',
      name: 'Marketing Campaign Q2',
    },
  });

  // Create Project Beta for the Engineering team
  const projectBeta = await prisma.project.create({
    data: {
      id: 'project_beta',
      name: 'API Development Sprint',
    },
  });

  // Add tasks to Project Alpha
  await prisma.task.createMany({
    data: [
      {
        id: 'task-alpha-1',
        name: 'Strategy Planning',
        description: 'Define campaign goals and KPIs',
        projectId: projectAlpha.id,
      },
      {
        id: 'task-alpha-2',
        name: 'Budget Review',
        description: 'Review marketing budget with finance',
        projectId: projectAlpha.id,
      },
    ],
  });

  // Add tasks to Project Beta
  await prisma.task.createMany({
    data: [
      {
        id: 'task-beta-1',
        name: 'Implement Auth API',
        description: 'Create endpoints for user login/signup',
        projectId: projectBeta.id,
      },
      {
        id: 'task-beta-2',
        name: 'Schema Migration',
        description: 'Update tables for new user roles',
        projectId: projectBeta.id,
      },
    ],
  });

  console.log('✅ Seeded 2 projects and 4 tasks with distinct ownership');
}

main()
  .catch((e) => {
    console.error('❌ Error seeding data:', e);
    process.exit(1);
  })
  .finally(async () => {
    await prisma.$disconnect();
  });
4.2 运行种子脚本
¥4.2 Run the seed script
npx tsx scripts/seed.ts
如果成功,你将看到:
¥If successful, you'll see:
✅ 设置 2 个项目和 4 个具有不同所有权的任务
¥✅ Seeded 2 projects and 4 tasks with distinct ownership
此时,如果你运行类似 prisma.task.findMany() 的查询,它将返回所有任务。接下来,你将连接 Permit.io,以便根据用户的访问权限自动过滤这些结果。
¥At this point, if you run a query like prisma.task.findMany(), it will return all tasks. In the next steps, you'll connect Permit.io to filter these results automatically based on the user's access rights.
5. 安装并配置 ReBAC 过滤
¥ Install and configure ReBAC filtering
在本节中,你将安装 @permitio/permit-prisma 扩展程序,并将其配置为根据访问控制策略自动过滤 Prisma 查询。
¥In this section, you'll install the @permitio/permit-prisma extension and configure it to automatically filter Prisma queries based on your access control policies.
5.1 安装 Permit 扩展
¥5.1 Install the Permit extension
安装 permit-prisma 包:
¥Install the permit-prisma package:
npm install @permitio/permit-prisma
5.2 配置 Permit 客户端
¥5.2 Configure the Permit client
在 src/config/permit-config.ts 目录下创建一个新文件:
¥Create a new file at src/config/permit-config.ts:
import dotenv from 'dotenv';
dotenv.config();

export const clientExtensionConfig = {
  permitConfig: {
    token: process.env.PERMIT_API_KEY!, // Your Permit.io API key
    pdp: process.env.PERMIT_PDP_URL || 'http://localhost:7766', // Local or cloud PDP
    debug: true,
  },
  enableAutomaticChecks: true,
  enableDataFiltering: true,     // Enables automatic query filtering
  enableResourceSync: true       // (Optional) Keeps Permit in sync with resource changes
};
你可以在 Permit.io 仪表板 中找到你的 API 密钥和 PDP URL。
¥You can find your API key and PDP URL in your Permit.io dashboard.
5.3 此配置的作用
¥5.3 What this configuration does
当你稍后使用此配置扩展 Prisma 客户端时:
¥When you later extend the Prisma Client with this config:
-
所有 Prisma 查询都将自动检查访问规则
¥All Prisma queries will automatically check access rules
-
findMany()及其类似方法将仅返回用户有权访问的数据。¥
findMany()and similar methods will only return data the user is allowed to access -
你不再需要手动添加
WHERE子句来强制执行权限¥You no longer need to manually add
WHEREclauses to enforce permissions
现在,你可以使用 Permit CLI 定义 ReBAC 策略了。
¥You're now ready to define your ReBAC policy using the Permit CLI.
6. 在 Permit.io 中定义你的访问控制策略
¥ Define your access control policy in Permit.io
接下来,你将使用 Permit CLI 应用与你的项目任务结构匹配的现成 ReBAC 模板。
¥Next, you'll use the Permit CLI to apply a ready-made ReBAC template that matches your project-task structure.
6.1 安装 Permit CLI
¥6.1 Install the Permit CLI
npm install -g @permitio/cli
6.2 登录你的 Permit 账户
¥6.2 Log in to your Permit account
使用 CLI 进行身份验证:
¥Use the CLI to authenticate:
permit login
这将打开一个浏览器窗口,你可以在其中登录你的 Permit.io 账户,并将你的 CLI 会话链接到环境。
¥This opens a browser window where you can log in to your Permit.io account and link your CLI session to an environment.
6.3 应用 ReBAC 策略模板
¥6.3 Apply the ReBAC policy template
Permit 提供预建的策略结构,用于分层数据过滤。
¥Permit provides a prebuilt policy structure for hierarchical data filtering.
使用方法:
¥Apply it using:
permit env template apply --template orm-data-filtering
这将造成:
¥This will create:
-
资源:
project、task¥Resources:
project,task -
关系:
project是task的父级¥Relationships:
projectis the parent oftask -
角色:
¥Roles:
-
project#Member:用户可以访问特定项目¥
project#Member: User can access a specific project -
task#Member:源自项目会员资格¥
task#Member: Derived from project membership
-
-
访问策略:拥有相应角色的用户可以对每个资源进行
read操作¥Access policies: Users with the appropriate roles can
readeach resource
6.4 在 Permit UI 中查看策略
¥6.4 View the policy in the Permit UI
前往 Permit.io 仪表板 并导航至你的环境进行探索:
¥Go to the Permit.io dashboard and navigate to your environment to explore:
-
你的资源图
¥Your resource graph
-
角色派生
¥Role derivations
-
关系映射
¥Relationship mappings
-
read访问的策略规则¥Policy rules for
readaccess
@permitio/permit-prisma 扩展使用这些规则来确定为每个用户自动返回哪些记录。
¥These rules are used by the @permitio/permit-prisma extension to determine which records to return for each user—automatically.
制定策略后,你现在可以在 Express 中间件中连接用户上下文和过滤逻辑了。
¥With your policy in place, you're now ready to wire up user context and filtering logic in your Express middleware.
7. 添加中间件以设置用户上下文
¥ Add middleware to set user context
要按用户过滤 Prisma 查询,你需要:
¥To filter Prisma queries per user, you need to:
-
识别当前用户(通过电子邮件标头模拟)
¥Identify the current user (simulated via an email header)
-
将筛选后的 Prisma 客户端实例附加到请求。
¥Attach the filtered Prisma Client instance to the request
-
在 Permit 上下文 (
prisma.$permit.setUser()) 中设置用户¥Set the user in the Permit context (
prisma.$permit.setUser())
7.1 创建中间件文件
¥7.1 Create the middleware file
创建新文件:src/middleware/auth.middleware.ts
¥Create a new file: src/middleware/auth.middleware.ts
import { Request, Response, NextFunction } from 'express';
import { PrismaClient } from '../generated/prisma/client.js';
import { PrismaPg } from '@prisma/adapter-pg';
import createPermitClientExtension from '@permitio/permit-prisma';
import { clientExtensionConfig } from '../config/permit-config';

const adapter = new PrismaPg({
  connectionString: process.env.DATABASE_URL!,
});

// Extend PrismaClient with Permit
const prisma = new PrismaClient({
  adapter,
}).$extends(
  createPermitClientExtension(clientExtensionConfig)
);

// Extend Request type with Prisma and user context
export interface AuthRequest extends Request {
  user?: { email: string };
  prisma?: typeof prisma;
}

export const authenticate = (
  req: AuthRequest,
  res: Response,
  next: NextFunction
): void => {
  const userEmail = req.headers['x-user-email'] as string;

  if (!userEmail) {
    res.status(401).json({ error: 'Missing user email' });
    return;
  }

  // Register the user in Permit context
  prisma.$permit.setUser(userEmail);

  // Add user + Prisma client to request
  req.user = { email: userEmail };
  req.prisma = prisma;

  next();
};
在生产环境中,你需要将 x-user-email 标头替换为适当的身份验证逻辑(例如 JWT 或会话验证)。
¥In a production app, you'd replace the x-user-email header with proper authentication logic (e.g. JWT or session validation).
7.2 此中间件的作用作用
¥7.2 What this middleware does
-
从请求标头读取用户的电子邮件
¥Reads the user's email from the request header
-
在 Permit 上下文中设置用户身份(用于查询过滤)
¥Sets the user identity in the Permit context (used for query filtering)
-
将过滤后的 Prisma 客户端添加到请求对象 (
req.prisma)¥Adds the filtered Prisma client to the request object (
req.prisma) -
使用户和数据库客户端可供所有下游路由处理程序使用
¥Makes the user and database client available to all downstream route handlers
现在你可以构建 API 端点,而无需编写任何访问控制逻辑。
¥You're now ready to build your API endpoints without writing a single line of access control logic.
8. 构建 API 端点
¥ Build your API endpoints
现在你将创建两个端点:
¥You'll now create two endpoints:
-
GET /api/projects:返回用户有权访问的所有项目¥
GET /api/projects: returns all projects the user has access to -
GET /api/tasks:返回用户有权访问的所有任务(继承自项目成员资格)¥
GET /api/tasks: returns all tasks the user has access to (inherited from project membership)
得益于 Permit-Prisma 集成,你无需添加任何手动过滤逻辑 - 它将自动处理。
¥Thanks to the Permit-Prisma integration, you won't need to add any manual filtering logic—it's handled automatically.
8.1 获取用户可见的项目
¥8.1 Get user-visible projects
创建控制器文件:src/controllers/project.controller.ts
¥Create a controller file: src/controllers/project.controller.ts
import { Response } from 'express';
import { AuthRequest } from '../middleware/auth.middleware';

export const getProjects = async (req: AuthRequest, res: Response) => {
  try {
    const prisma = req.prisma!;

    const projects = await prisma.project.findMany(); // Auto-filtered

    res.json({
      user: req.user?.email,
      count: projects.length,
      projects,
    });
  } catch (error: any) {
    console.error('Error fetching projects:', error);
    res.status(500).json({ error: error.message });
  }
};
即使这是一个原始的 findMany() 查询,也只会返回当前用户的授权记录。
¥Even though this is a raw findMany() query, only authorized records will be returned for the current user.
8.2 获取用户可见的任务
¥8.2 Get user-visible tasks
创建另一个控制器:src/controllers/task.controller.ts
¥Create another controller: src/controllers/task.controller.ts
import { Response } from 'express';
import { AuthRequest } from '../middleware/auth.middleware';

export const getTasks = async (req: AuthRequest, res: Response) => {
  try {
    const prisma = req.prisma!;
    const projectId = req.query.projectId as string;

    const where = projectId ? { projectId } : undefined;

    const tasks = await prisma.task.findMany({ where }); // Still filtered

    res.json({
      user: req.user?.email,
      count: tasks.length,
      tasks,
    });
  } catch (error: any) {
    console.error('Error fetching tasks:', error);
    res.status(500).json({ error: error.message });
  }
};
即使你手动提供 projectId,查询结果仍会根据权限进行过滤。
¥Even if you provide a projectId manually, the query results are still filtered by permissions.
8.3 演示内容
¥8.3 What this demonstrates
-
你可以编写常规的 Prisma 查询
¥You can write normal Prisma queries
-
用户只能查看他们被允许查看的记录
¥Users will only get records they're allowed to see
-
你不需要在每个处理程序中都自定义角色检查逻辑
¥You don't need custom role-checking logic in every handler
-
任务访问权限自动从项目成员资格中派生
¥Task access is automatically derived from project membership
现在,你可以将所有内容整合在一起并启动应用了。
¥You're now ready to wire it all together and launch the app.
9.1 创建 Express 应用
¥9.1 Create your Express app
创建 src/app.ts:
¥Create src/app.ts:
import express from 'express';
import cors from 'cors';
import { authenticate } from './middleware/auth.middleware';
import { getProjects } from './controllers/project.controller';
import { getTasks } from './controllers/task.controller';

const app = express();
const PORT = process.env.PORT || 3000;

app.use(cors());
app.use(express.json());

// Auth middleware applies ReBAC filtering per request
app.get('/api/projects', authenticate, getProjects);
app.get('/api/tasks', authenticate, getTasks);

app.listen(PORT, () => {
  console.log(`🚀 Server running at http://localhost:${PORT}`);
  console.log(`🔐 ReBAC filtering is now active`);
});
9.2 运行服务器
¥9.2 Run the server
使用以下命令启动开发服务器:
¥Start the development server with:
npx tsx src/app.ts
如果一切设置正确,控制台将显示:
¥If everything is set up correctly, the console will display:
🚀 Server running at http://localhost:3000
🔐 ReBAC filtering is now active
9.3 测试 API
¥9.3 Test your API
你可以通过设置 x-user-email 标头来模拟以不同用户身份发出的请求。这模拟了具有特定项目访问权限的登录用户。
¥You can simulate requests as different users by setting the x-user-email header. This mimics logged-in users with access to specific projects.
示例:John(市场团队成员)
¥Example: John (Marketing team member)
curl -H "x-user-email: john@company.com" http://localhost:3000/api/projects
这应该只返回项目 Alpha(及其任务)。
¥This should only return Project Alpha (and its tasks).
示例:Mary(工程团队成员)
¥Example: Mary (Engineering team member)
curl -H "x-user-email: mary@company.com" http://localhost:3000/api/tasks
这应该只返回来自 Project Beta 的任务。
¥This should only return tasks from Project Beta.
如果你尚未在 Permit.io UI 中将用户分配给项目成员资格,请访问策略编辑器并将用户分配给角色(项目#成员)。
¥If you haven't yet assigned users to project memberships in the Permit.io UI, visit the Policy Editor and assign users to roles (project#Member).
确认这些结果后,你的 Prisma API 现在将强制执行安全的、基于关系的访问控制,而无需在代码中的任何位置添加手动过滤逻辑。
¥Once you've confirmed these results, your Prisma API is now enforcing secure, relationship-based access control, all without adding manual filtering logic anywhere in your code.
现在,你已经构建了一个安全的 API,它:
¥You've now built a secure API that:
-
根据用户关系过滤查询结果
¥Filters query results based on user relationships
-
使用 ReBAC 避免角色爆炸和脆弱的权限逻辑
¥Uses ReBAC to avoid role explosion and brittle permission logic
-
保持 Prisma 查询简洁、安全且可扩展
¥Keeps Prisma queries clean, safe, and scalable
10 . 后续步骤
¥. Next steps
现在你已经成功使用 Prisma 和 ReBAC 实现了数据过滤,你可以扩展此基础以支持更复杂的授权用例和开发者工具。
¥Now that you've successfully implemented data filtering with Prisma and ReBAC, you can extend this foundation to support more complex authorization use cases and developer tooling.
扩展你的模型
¥Extend your model
-
添加一个
User模型,并在用户和项目之间创建多对多的Membership关系。¥Add a
Usermodel and create a many-to-manyMembershiprelationship between users and projects. -
引入具有不同权限的实例级角色,例如
Editor或Owner。¥Introduce instance-level roles like
EditororOwnerwith different permissions. -
使用 Permit.io 的角色策略,支持其他操作,例如
create、update和delete。¥Support additional actions like
create,update, anddelete, using Permit.io's role policies.
添加身份验证
¥Add authentication
将你的 API 与身份验证提供程序(例如 Clerk、Auth0)集成,并将 x-user-email 标头替换为安全身份机制(例如 JWT 令牌)。
¥Integrate your API with an auth provider (e.g., Clerk, Auth0) and replace the x-user-email header with a secure identity mechanism (like a JWT token).
使用 Permit 元素
¥Use Permit Elements
Permit.io 提供以下 UI 组件:
¥Permit.io provides UI components for:
-
可视化管理用户访问权限
¥Managing user access visually
-
查看访问日志
¥Reviewing access logs
-
批准访问请求 (MCP)
¥Approving access requests (MCP)
探索 Permit 元素,让你的终端用户或管理员更轻松地进行访问管理。
¥Explore Permit Elements to make access management easier for your end users or admins.
更多资源
¥More resources
Stay connected with Prisma
Continue your Prisma journey by connecting with our active community. Stay informed, get involved, and collaborate with other developers:
- Follow us on X for announcements, live events and useful tips.
- Join our Discord to ask questions, talk to the community, and get active support through conversations.
- Subscribe on YouTube for tutorials, demos, and streams.
- Engage on GitHub by starring the repository, reporting issues, or contributing to an issue.